Spring data tutorial for beginners
In this example, we shall demonstrate how to configure Spring Framework to communicate with database using JPA and Hibernate as the JPA vendor.
The benefits of using Spring Data is that it removes a lot of boiler-plate code and provides a cleaner and more readable implementation of DAO layer. Also, it helps make the code loosely coupled and as such switching between different JPA vendors is a matter of configuration.
So let’s set-up the database for the example. We shall use the MySQL database for this demo.
We create a table “employee” with 2 columns as shown:
CREATE TABLE `employee` (
`employee_id`  bigint(20) NOT NULL AUTO_INCREMENT,
`employee_name`  varchar(40) ,
PRIMARY KEY (`employee_id`)
)
Now that the table is ready, let’s have a look at the libraries we will require for this demo :
- antlr-2.7.7
- aopalliance-1.0
- commons-collections-3.2
- commons-logging-1.1
- dom4j-1.6.1
- hibernate-commons-annotations-4.0.2.Final
- hibernate-core-4.2.6.Final
- hibernate-entitymanager-4.2.6.Final
- hibernate-jpa-2.0-api-1.0.1.Final
- javaee-api-5.0-2
- javassist-3.15.0-GA
- jboss-logging-3.1.0.GA
- jta
- log4j-1.2.14
- mysql-connector-java-5.1.11-bin
- slf4j-api-1.5.6
- slf4j-log4j12-1.5.6
- spring-aop-3.2.4.RELEASE
- spring-beans-3.2.4.RELEASE
- spring-context-3.2.4.RELEASE
- spring-context-support-3.2.4.RELEASE
- spring-core-3.2.4.RELEASE
- spring-expression-3.2.4.RELEASE
- spring-jdbc-3.2.4.RELEASE
- spring-orm-3.2.4.RELEASE
- spring-tx-3.2.4.RELEASE
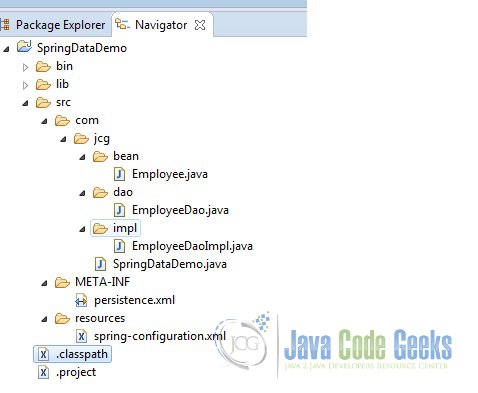
And here’s the project structure :
Now that the project is all set, we will start writing the code.
First of all, we create the Employee class with employeeId and employeeName. The Person class will be the entity that we will store and retrieve from the database using the JPA.
The @Entity marks the class as the JPA Entity. We map the properties of the Employee class with the columns of the employee table and the entity with employee table itself using the @Table annotation.
The toString method is over-ridden so that we get a meaningful output when we print the instance of the class.
Employee.java
package com.jcg.bean;

import javax.persistence.Column;
import javax.persistence.Entity;
import javax.persistence.GeneratedValue;
import javax.persistence.GenerationType;
import javax.persistence.Id;
import javax.persistence.Table;

@Entity
@Table(name="employee")
public class Employee
{
	@Id
	@GeneratedValue(strategy=GenerationType.AUTO)
	@Column(name = "employee_id")
	private long employeeId;

	@Column(name="employee_name")
	private String employeeName;

	public Employee()
	{
	}

	public Employee(String employeeName)
	{
		this.employeeName = employeeName;
	}

	public long getEmployeeId()
	{
		return this.employeeId;
	}

	public void setEmployeeId(long employeeId)
	{
		this.employeeId = employeeId;
	}

	public String getEmployeeName()
	{
		return this.employeeName;
	}

	public void setEmployeeName(String employeeName)
	{
		this.employeeName = employeeName;
	}


	@Override
	public String toString()
	{
		return "Employee [employeeId=" + this.employeeId + ", employeeName=" + this.employeeName + "]";
	}
}
Once the Entity is ready, we define the interface for the storage and retrieval of the entity i.e. we shall create a Data Access Interface.
EmployeeDao.java
package com.jcg.dao;

import java.sql.SQLException;

import com.jcg.bean.Employee;

public interface EmployeeDao
{
	void save(Employee employee) throws SQLException;

	Employee findByPrimaryKey(long id) throws SQLException;
}
We will then, attempt to implement the Data Access Interface and create the actual Data Access Object which will modify the Person Entity.
EmployeeDaoImpl.java
package com.jcg.impl;


import javax.persistence.EntityManager;
import javax.persistence.PersistenceContext;

import org.springframework.stereotype.Repository;
import org.springframework.transaction.annotation.Propagation;
import org.springframework.transaction.annotation.Transactional;

import com.jcg.bean.Employee;
import com.jcg.dao.EmployeeDao;

@Repository("EmployeeDaoImpl")
@Transactional(propagation = Propagation.REQUIRED)
public class EmployeeDaoImpl implements EmployeeDao
{
	@PersistenceContext
	private EntityManager entityManager;


	@Override
	public void save(Employee employee)
	{
			entityManager.persist(employee);
	}

	@Override
	public Employee findByPrimaryKey(long id)
	{
			Employee employee = entityManager.find(Employee.class, id);

			return employee;
	}

	/**
	 * @return the entityManager
	 */
	public EntityManager getEntityManager()
	{
		    return entityManager;
	}

	/**
	 * @param entityManager the entityManager to set
	 */
	public void setEntityManager(EntityManager entityManager)
	{
		    this.entityManager = entityManager;
	}
}
The DAO Implementation class is annotated with @Repository which marks is as a Repository Bean and prompts the Spring Bean Factory to load the Bean.
@Transactional asks the container to provide a transaction to use the methods of this class. Propagation.REQUIRED denotes that the same transaction is used if one is available when multiple methods which require transaction are nested. The container creates a single Physical Transaction in the Database and multiple Logical transactions for each nested method. However, if a method fails to successfully complete a transaction, then the entire physical transaction is rolled back. One of the other options is Propagation.REQUIRES_NEW, wherein a new physical transaction is created for each method. There are other options which help in having a fine control over the transaction management.
The @PersistenceContext annotation tells the container to inject an instance of entitymanager in the DAO. The class implements the save and findbyPk methods which save and fetch the data using the instance of EntityManager injected.
Now we define our persistence Unit in the Persistence.xml which is put in the META-INF folder under src. We then mention the class whose instances are to be used Persisted. For this example, it is the Employee Entity we created earlier.
persistence.xml
<?xml version="1.0" encoding="UTF-8"?>
<persistence xmlns="http://java.sun.com/xml/ns/persistence"
version="1.0">
<persistence-unit name="jcgPersistence" transaction-type="RESOURCE_LOCAL" >
<class>com.jcg.bean.Employee</class>
</persistence-unit>
</persistence>
Now we configure the Spring Container using the spring-configuration.xml file.
spring-configuration.xml
<?xml version="1.0" encoding="UTF-8"?>
<beans xmlns="http://www.springframework.org/schema/beans"
	xmlns:xsi="http://www.w3.org/2001/XMLSchema-instance" xmlns:aop="http://www.springframework.org/schema/aop"
	xmlns:context="http://www.springframework.org/schema/context" xmlns:tx="http://www.springframework.org/schema/tx"
	xsi:schemaLocation="http://www.springframework.org/schema/beans
http://www.springframework.org/schema/beans/spring-beans-3.0.xsd
http://www.springframework.org/schema/aop
http://www.springframework.org/schema/aop/spring-aop-3.0.xsd
http://www.springframework.org/schema/context
http://www.springframework.org/schema/context/spring-context-3.0.xsd
http://www.springframework.org/schema/tx
http://www.springframework.org/schema/tx/spring-tx.xsd">

	<context:component-scan base-package="com.jcg" />

	<bean id="dataSource"
		class="org.springframework.jdbc.datasource.DriverManagerDataSource">
		<property name="driverClassName" value="com.mysql.jdbc.Driver" />
		<property name="url" value="jdbc:mysql://localhost:3306/jcg" />
		<property name="username" value="root" />
		<property name="password" value="toor" />
	</bean>

	<bean id="jpaDialect" class="org.springframework.orm.jpa.vendor.HibernateJpaDialect" />

	<bean id="entityManagerFactory"
		class="org.springframework.orm.jpa.LocalContainerEntityManagerFactoryBean">
		<property name="persistenceUnitName" value="jcgPersistence" />
		<property name="dataSource" ref="dataSource" />
		<property name="persistenceXmlLocation" value="META-INF/persistence.xml" />
		<property name="jpaVendorAdapter" ref="jpaVendorAdapter" />
		<property name="jpaDialect" ref="jpaDialect" />
		<property name="jpaProperties">
         <props>
            <prop key="hibernate.hbm2ddl.auto">validate</prop>
            <prop key="hibernate.dialect">org.hibernate.dialect.MySQL5Dialect</prop>
         </props>
      </property>
	</bean>

	<bean id="jpaVendorAdapter"
		class="org.springframework.orm.jpa.vendor.HibernateJpaVendorAdapter">
	</bean>

	<bean id="txManager" class="org.springframework.orm.jpa.JpaTransactionManager">
		<property name="entityManagerFactory" ref="entityManagerFactory" />
		<property name="dataSource" ref="dataSource" />
		<property name="jpaDialect" ref="jpaDialect" />
	</bean>

	<tx:annotation-driven transaction-manager="txManager" />

</beans>
We define the beans we need in the spring-configuration.xml. The datasource contains the basic configuration properties like URL, user-name, password and the JDBC Driver class-name.
We create a EntityManagerFactory using the LocalContainerEntityManagerFactoryBean. The properties are provided like the datasource, persistenceUnitName, persistenceUnitLocation, dialect etc. The instance of EntityManager gets injected form this FactoryBean into the EmployeeDaoImpl instance.
Line 51 in the above XML asks the Spring container to manage Transactions using the Spring Container. The TransactionManagerProvider Class is the JpaTransactionManager Class.
Now that we have completed all the hard-work, its time to test the configuration:
The SpringDataDemo class extracts the EmployeeDaoImpl and attempts to save an instance of Employee to the employee table and retrieve the same instance from the database.
SpringDataDemo.java
package com.jcg;


import java.sql.SQLException;

import org.springframework.beans.BeansException;
import org.springframework.context.ApplicationContext;
import org.springframework.context.ConfigurableApplicationContext;
import org.springframework.context.support.ClassPathXmlApplicationContext;

import com.jcg.bean.Employee;
import com.jcg.dao.EmployeeDao;


public class SpringDataDemo
{
	public static void main(String[] args)
	{
		try
		{
			ApplicationContext context = new ClassPathXmlApplicationContext("resources\\spring-configuration.xml");

			//Fetch the DAO from Spring Bean Factory
			EmployeeDao employeeDao = (EmployeeDao)context.getBean("EmployeeDaoImpl");
			Employee employee = new Employee("Employee123");
			//employee.setEmployeeId("1");

			//Save an employee Object using the configured Data source
			employeeDao.save(employee);
			System.out.println("Employee Saved with EmployeeId "+employee.getEmployeeId());

			//find an object using Primary Key
			Employee emp = employeeDao.findByPrimaryKey(employee.getEmployeeId());
			System.out.println(emp);

			//Close the ApplicationContext
			((ConfigurableApplicationContext)context).close();
		}
		catch (BeansException | SQLException e)
		{
			e.printStackTrace();
		}
       }
}
Output:
log4j:WARN No appenders could be found for logger (org.springframework.core.env.StandardEnvironment).
log4j:WARN Please initialize the log4j system properly.
Employee Saved with EmployeeId 8
Employee [employeeId=8, employeeName=Employee123]
As you can see the employee gets saved and we are able to retrieve the employee Object we saved.
Download the Source Code
Thus we understood how to configure JPA with Spring and what are the benefits of Spring with JPA over vanilla JPA.
You can download the source code of this example here: SpringDataDemo.zip


Hi,
thank you for this nice blog. I got a question about the MVC framework setup.
I see in some places there is a Service layer (apart from Repository and Model layer). Can you explain what Service layer is meant to be (I don’t see in your blog)? I want to understand the scenarios where Service layer might make sense.
Your comments are appriciated.