Hello readers, in this tutorial we will create a simple login application that uses the spring and Hibernate framework to validate the user’s credentials.
Table Of Contents
1. Introduction
1.1 What is Spring framework?
- Spring is an open-source framework created to address the complexity of an enterprise application development
- One of the chief advantages of the Spring framework is its layered architecture, which allows a developer to be selective about which of its components they can use while providing a cohesive framework for
J2EEapplication development - Spring framework provides support and integration to various technologies for e.g.:
- Support for Transaction Management
- Support for interaction with the different databases
- Integration with the Object Relationship frameworks for e.g. Hibernate, iBatis etc
- Support for Dependency Injection which means all the required dependencies will be resolved with the help of containers
- Support for
RESTstyle web-services
1.1.1 What is Spring MVC Framework?
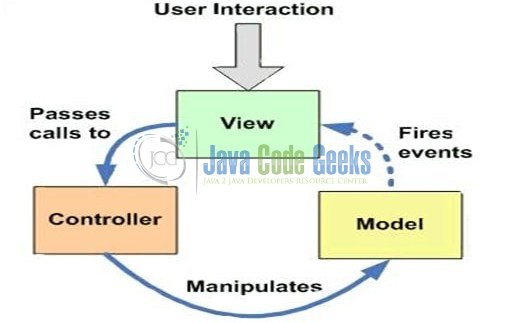
Model-View-Controller (MVC) is a well-known design pattern for designing the GUI based applications. It mainly decouples the business logic from UI by separating the roles of Model, View, and Controller in an application. This pattern divides the application into three components to separate the internal representation of the information from the way it is being presented to the user. The three components are:
- Model (M): Model’s responsibility is to manage the application’s data, business logic, and the business rules. It is a
POJOclass which encapsulates the application data given by the controller - View (V): A view is an output representation of the information, such as displaying information or reports to the user either as a text-form or as charts. Views are usually the
JSPtemplates written with Java Standard Tag Library (JSTL) - Controller (C): Controller’s responsibility is to invoke the Models to perform the business logic and then update the view based on the model’s output. In spring framework, the controller part is played by the Dispatcher Servlet
1.2 What is Hibernate?
- Hibernate is the Opensource lightweight ORM (Object Relational Mapping) based framework to communicate with the database. ORM is a programming technique that maps the object to the data stored in the database
- Hibernate framework makes the development of Java application to interact with the database in a simple manner
- Hibernate handles mapping of Java classes to database tables (i.e. Java data types and SQL data types)
- Hibernate also provides data query and retrieval facilities
- Hibernate is purely used for data persistence (i.e. to store/retrieve data from the database)
- Hibernate framework internally uses the JDBC API to interact with the database. It hides internal JDBC implementations from end users
1.2.1 Hibernate Architecture
There are 4 layers in hibernate architecture i.e. Java Application Layer, Hibernate Framework Layer, Backend API Layer, and Database Layer. Let’s understand the diagram of hibernate architecture:
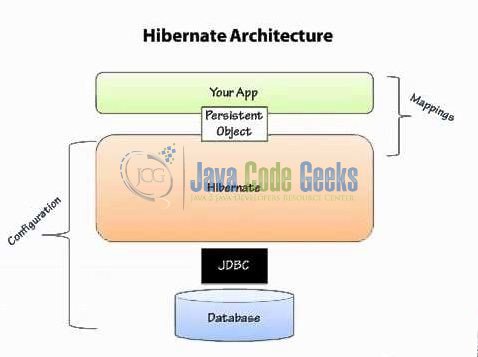
For creating the first hibernate application, we must know the elements of Hibernate architecture. They are as follows:
| Element | Description |
|---|---|
SessionFactory | The SessionFactory is a factory of session and client of Connection Provider. It holds second level cache (optional) of data |
Session | The session object provides an interface between the application and data stored in the database. It is a short-lived object and wraps the JDBC connection. It is a factory of Transaction, Query, and Criteria and holds a first-level cache (mandatory) of data. The Session interface provides methods to INSERT, UPDATE, and DELETE the object |
Transaction | The transaction object specifies the atomic unit of work and is an optional parameter in hibernate framework |
ConnectionProvider | It is a factory of JDBC connections and abstracts the application from Driver Manager or DataSource. It is an optional parameter in hibernate framework |
TransactionFactory | It is a factory of Transaction and is again an optional parameter in hibernate framework |
Now, open up the Eclipse Ide and let’s start building the application!
2. Spring MVC and Hibernate Login Form Example
Below are the steps involved in developing this application.
2.1 Tools Used
We are using Eclipse Kepler SR2, JDK 8 and Maven. Having said that, we have tested the code against JDK 1.7 and it works well.
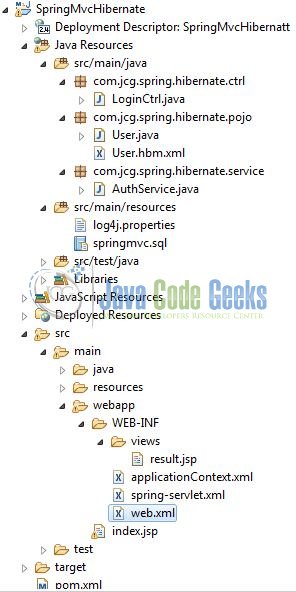
2.2 Project Structure
Firstly, let’s review the final project structure, in case you are confused about where you should create the corresponding files or folder later!
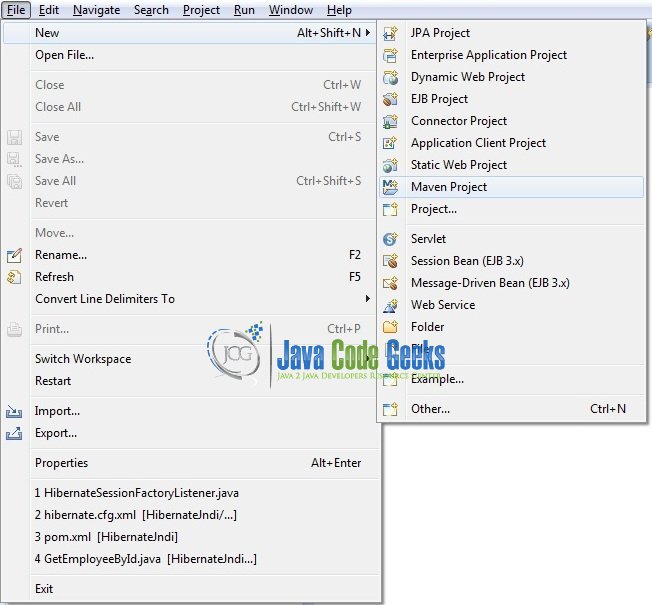
2.3 Project Creation
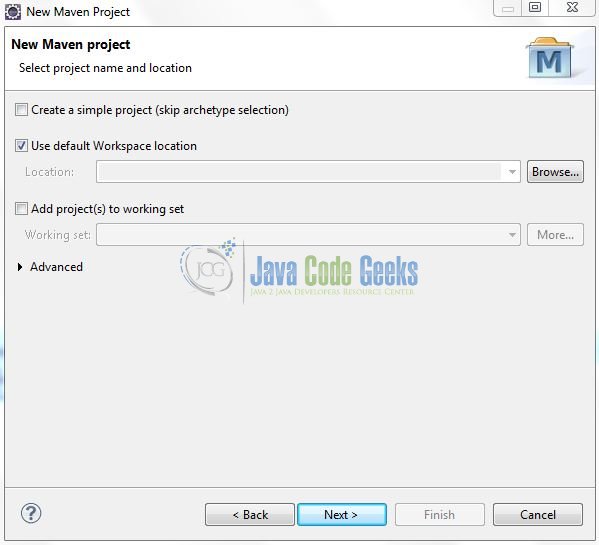
This section will demonstrate on how to create a Java-based Maven project with Eclipse. In Eclipse IDE, go to File -> New -> Maven Project.
In the New Maven Project window, it will ask you to select project location. By default, ‘Use default workspace location’ will be selected. Just click on next button to proceed.
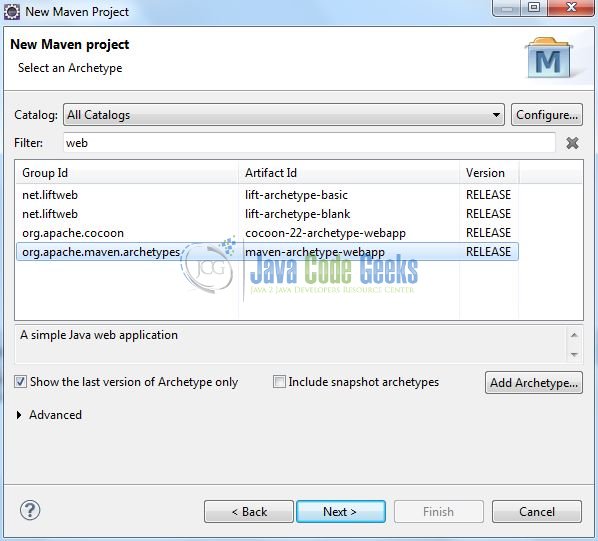
Select the Maven Web App Archetype from the list of options and click next.
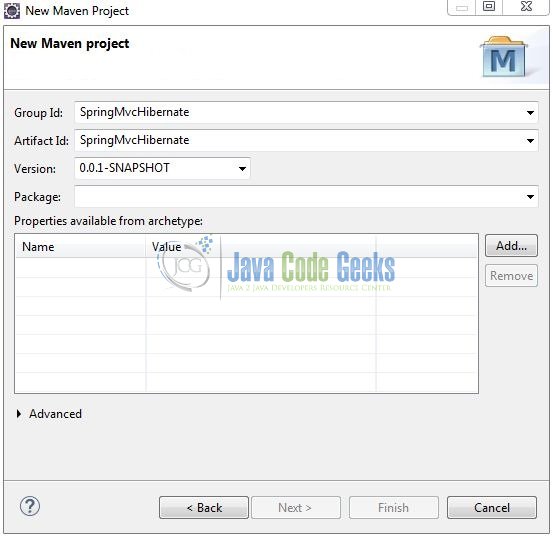
It will ask you to ‘Enter the group and the artifact id for the project’. We will input the details as shown in the below image. The version number will be by default: 0.0.1-SNAPSHOT.
Click on Finish and the creation of a maven project is completed. If you observe, it has downloaded the maven dependencies and a pom.xml file will be created. It will have the following code:
pom.xml
<project xmlns="http://maven.apache.org/POM/4.0.0" xmlns:xsi="http://www.w3.org/2001/XMLSchema-instance" xsi:schemaLocation="http://maven.apache.org/POM/4.0.0 http://maven.apache.org/xsd/maven-4.0.0.xsd">
	<modelVersion>4.0.0</modelVersion>
	<groupId>SpringMvcHibernate</groupId>
	<artifactId>SpringMvcHibernate</artifactId>
	<version>0.0.1-SNAPSHOT</version>
	<packaging>war</packaging>
</project>
We can start adding the dependencies that developers want like Spring MVC, Servlet API, Hibernate, Mysql, and Log4j etc. Let’s start building the application!
3. Application Building
Below are the steps involved in developing this application.
3.1 Database & Table Creation
The following MySQL script is used to create a database called springmvc with a table: user. Open MySQL terminal or workbench terminal and execute the SQLscript.
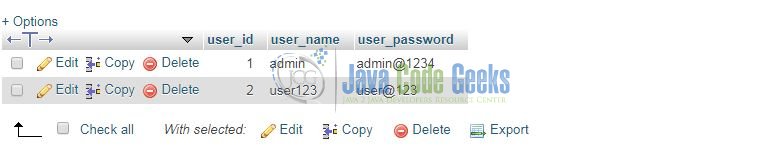
CREATE DATABASE springmvc;

USE springmvc;

CREATE TABLE `user` (
  user_id int(11) NOT NULL AUTO_INCREMENT,
  user_name varchar(50) NOT NULL,
  user_password varchar(50) NOT NULL,
  PRIMARY KEY (user_id)
);

INSERT INTO `user` (user_id, user_name, user_password) VALUES (1, 'admin', 'admin@1234');
INSERT INTO `user` (user_id, user_name, user_password) VALUES (2, 'user123', 'user@123');

SELECT * FROM `user`;
If everything goes well, the table will be shown in the MySQL Workbench.
3.2 Maven Dependencies
In this example, we are using the most stable spring web-mvc, MySQL, Hibernate, and Log4j version in order to set-up the Spring MVC and Hibernate functionality. The updated file will have the following code:
pom.xml
<project xmlns="http://maven.apache.org/POM/4.0.0" xmlns:xsi="http://www.w3.org/2001/XMLSchema-instance"
	xsi:schemaLocation="http://maven.apache.org/POM/4.0.0 http://maven.apache.org/maven-v4_0_0.xsd">
	<modelVersion>4.0.0</modelVersion>
	<groupId>SpringMvcHibernate</groupId>
	<artifactId>SpringMvcHibernate</artifactId>
	<packaging>war</packaging>
	<version>0.0.1-SNAPSHOT</version>
	<name>SpringMvcHibernate Maven Webapp</name>
	<url>http://maven.apache.org</url>
	<properties>
		<project.build.sourceEncoding>UTF-8</project.build.sourceEncoding>
	</properties>
	<dependencies>
		<!-- spring dependency -->
		<dependency>
			<groupId>org.springframework</groupId>
			<artifactId>spring-webmvc</artifactId>
			<version>5.0.5.RELEASE</version>
		</dependency>
		<dependency>
			<groupId>org.springframework</groupId>
			<artifactId>spring-orm</artifactId>
			<version>5.0.5.RELEASE</version>
		</dependency>
		<!-- jstl dependency -->
		<dependency>
			<groupId>javax.servlet</groupId>
			<artifactId>jstl</artifactId>
			<version>1.2</version>
		</dependency>
		<!-- javax servlet api -->
		<dependency>
			<groupId>javax.servlet</groupId>
			<artifactId>servlet-api</artifactId>
			<version>3.0-alpha-1</version>
		</dependency>
		<!-- hibernate dependency -->
		<dependency>
			<groupId>org.hibernate</groupId>
			<artifactId>hibernate-core</artifactId>
			<version>5.2.13.Final</version>
		</dependency>
		<!-- mysql connector dependency -->
		<dependency>
			<groupId>mysql</groupId>
			<artifactId>mysql-connector-java</artifactId>
			<version>5.1.21</version>
		</dependency>
		<!-- log4j dependency -->
		<dependency>
			<groupId>log4j</groupId>
			<artifactId>log4j</artifactId>
			<version>1.2.17</version>
		</dependency>
	</dependencies>
	<build>
		<finalName>${project.artifactId}</finalName>
	</build>
</project>
3.3 Java Class Creation
Let’s create the different Java files required to carry out this tutorial.
3.3.1 Implementation of POJO class
This model class defines the schema as per which the user data is stored in the MySQL database. This class is mapped to User.hbm.xml file which links the POJO variables to the database columns. Add the following code to it:
User.java
package com.jcg.spring.hibernate.pojo;

import java.io.Serializable;

public class User implements Serializable {

	private static final long serialVersionUID = 1L;

	private int id;
	private String name, password;

	public long getId() {
		return id;
	}

	public void setId(int id) {
		this.id = id;
	}

	public String getName() {
		return name;
	}

	public void setName(String name) {
		this.name = name;
	}

	public String getPassword() {
		return password;
	}

	public void setPassword(String password) {
		this.password = password;
	}
}
3.3.2 Implementation of Service class
The AuthService.java performs the database operation. This service class validates the user credentials with the database records and gives a Boolean output. Add the following code to it:
AuthService.java
package com.jcg.spring.hibernate.service;

import java.util.List;

import org.apache.log4j.Logger;
import org.springframework.orm.hibernate5.HibernateTemplate;

import com.jcg.spring.hibernate.pojo.User;

public class AuthService {

	private HibernateTemplate hibernateTemplate;
	private static Logger log = Logger.getLogger(AuthService.class);

	private AuthService() { }

	public void setHibernateTemplate(HibernateTemplate hibernateTemplate) {
		this.hibernateTemplate = hibernateTemplate;
	}

	@SuppressWarnings( { "unchecked", "deprecation" } )
	public boolean findUser(String uname, String upwd) {
		log.info("Checking the user in the database");
		boolean isValidUser = false;
		String sqlQuery = "from User u where u.name=? and u.password=?";
		try {
			List userObj = (List) hibernateTemplate.find(sqlQuery, uname, upwd);
			if(userObj != null && userObj.size() > 0) {
				log.info("Id= " + userObj.get(0).getId() + ", Name= " + userObj.get(0).getName() + ", Password= " + userObj.get(0).getPassword());
				isValidUser = true;
			}
		} catch(Exception e) {
			isValidUser = false;
			log.error("An error occurred while fetching the user details from the database", e);
		}
		return isValidUser;
	}
}
3.3.3 Implementation of Controller class
This is a typical spring controller which is annotated by the Spring MVC annotation types. This class consists of the request mapping method which interacts with the MySQL database to perform the validation operation. Let’s write a quick Java program in the spring controller class to handle the HTTP request. Add the following code to it.
LoginCtrl.java
package com.jcg.spring.hibernate.ctrl;

import org.apache.log4j.Logger;
import org.springframework.beans.factory.annotation.Autowired;
import org.springframework.stereotype.Controller;
import org.springframework.web.bind.annotation.RequestMapping;
import org.springframework.web.bind.annotation.RequestMethod;
import org.springframework.web.bind.annotation.RequestParam;
import org.springframework.web.servlet.ModelAndView;

import com.jcg.spring.hibernate.service.AuthService;

@Controller
@RequestMapping("/user")
public class LoginCtrl {

	@Autowired
	private AuthService authenticateService;			// This will auto-inject the authentication service into the controller.

	private static Logger log = Logger.getLogger(LoginCtrl.class);

	// Checks if the user credentials are valid or not.
	@RequestMapping(value = "/validate", method = RequestMethod.POST)
	public ModelAndView validateUsr(@RequestParam("username")String username, @RequestParam("password")String password) {
		String msg = "";
		boolean isValid = authenticateService.findUser(username, password);
		log.info("Is user valid?= " + isValid);

		if(isValid) {
			msg = "Welcome " + username + "!";
		} else {
			msg = "Invalid credentials";
		}

		return new ModelAndView("result", "output", msg);
	}
}
3.4 Configuration Files
Let’s write all the configuration files involved in this tutorial.

3.4.1 Spring Configuration File
To configure the spring framework, we need to implement a bean configuration file i.e. spring-servlet.xml which provide an interface between the basic Java class and the outside world. Put this XML file in the SpringMvcHibernate/src/main/webapp/WEB-INF folder and add the following code to it:
spring-servlet.xml
<?xml version="1.0" encoding="UTF-8"?>
<beans xmlns="http://www.springframework.org/schema/beans" xmlns:xsi="http://www.w3.org/2001/XMLSchema-instance" xmlns:p="http://www.springframework.org/schema/p" xmlns:context="http://www.springframework.org/schema/context" xsi:schemaLocation="http://www.springframework.org/schema/beans               http://www.springframework.org/schema/beans/spring-beans-3.0.xsd               http://www.springframework.org/schema/context               http://www.springframework.org/schema/context/spring-context-3.0.xsd">

    <context:component-scan base-package="com.jcg.spring.hibernate" />

    <!-- Resolves Views Selected For Rendering by @Controllers to *.jsp Resources in the /WEB-INF/ Folder -->
    <bean class="org.springframework.web.servlet.view.InternalResourceViewResolver">
        <property name="prefix" value="/WEB-INF/views/" />
        <property name="suffix" value=".jsp" />
    </bean>

</beans>
3.4.2 Database Configuration File
To configure the database settings, we need to implement a bean configuration file i.e. applicationContext.xml which provide the JDBC connection details. Put this XML file in the SpringMvcHibernate/src/main/webapp/WEB-INF folder and add the following code to it:
applicationContext.xml
<?xml version="1.0" encoding="UTF-8"?>
<beans xmlns="http://www.springframework.org/schema/beans" xmlns:xsi="http://www.w3.org/2001/XMLSchema-instance" xsi:schemaLocation="http://www.springframework.org/schema/beans http://www.springframework.org/schema/beans/spring-beans.xsd">

   <!-- Configuring the JDBC connection-->
   <bean id="dataSourceBean" class="org.springframework.jdbc.datasource.DriverManagerDataSource">
      <property name="driverClassName" value="com.mysql.jdbc.Driver" />
      <property name="url" value="jdbc:mysql://localhost:3306/springmvc" />
      <property name="username" value="root" />
      <property name="password" value="" />
   </bean>

   <!-- Configuring the Hibernate4 Session Factory Bean -->
   <bean id="sessionFactoryBean" class="org.springframework.orm.hibernate5.LocalSessionFactoryBean">
      <property name="dataSource" ref="dataSourceBean" />
      <property name="mappingResources">
         <value>com/jcg/spring/hibernate/pojo/User.hbm.xml</value>
      </property>
      <property name="hibernateProperties">
         <props>
            <prop key="hibernate.dialect">org.hibernate.dialect.MySQL5Dialect</prop>
            <prop key="hibernate.show_sql">true</prop>
         </props>
      </property>
   </bean>

   <bean id="hibernateTemplateBean" class="org.springframework.orm.hibernate5.HibernateTemplate">
      <property name="sessionFactory" ref="sessionFactoryBean" />
   </bean>

   <bean id="authenticateServiceBean" class="com.jcg.spring.hibernate.service.AuthService">
      <property name="hibernateTemplate" ref="hibernateTemplateBean" />
   </bean>
</beans>
3.4.3 Web Deployment Descriptor
The web.xml file declares one servlet (i.e. Dispatcher Servlet) to receive all kind of the requests, specify the database configuration file, and the default welcome page when accessing the application. Add the following code to it:
web.xml
<?xml version="1.0" encoding="UTF-8"?>
<web-app xmlns="http://java.sun.com/xml/ns/javaee" xmlns:xsi="http://www.w3.org/2001/XMLSchema-instance" version="2.5" xsi:schemaLocation="http://java.sun.com/xml/ns/javaee              http://java.sun.com/xml/ns/javaee/web-app_2_5.xsd">

    <display-name>SpringMvcHibernatt</display-name>

    <!-- Spring Configuration - Processes Application Requests -->
    <servlet>
        <servlet-name>SpringController</servlet-name>
        <servlet-class>org.springframework.web.servlet.DispatcherServlet</servlet-class>
        <init-param>
            <param-name>contextConfigLocation</param-name>
            <param-value>/WEB-INF/spring-servlet.xml</param-value>
        </init-param>
        <load-on-startup>1</load-on-startup>
    </servlet>
    <servlet-mapping>
        <servlet-name>SpringController</servlet-name>
        <url-pattern>/</url-pattern>
    </servlet-mapping>

    <!-- Spring Database Configuration File -->
    <context-param>
        <param-name>contextConfigLocation</param-name>
        <param-value>/WEB-INF/applicationContext.xml</param-value>
    </context-param>

    <listener>
        <listener-class>org.springframework.web.context.ContextLoaderListener</listener-class>
    </listener>

    <!-- Welcome File List -->
    <welcome-file-list>
        <welcome-file>index.jsp</welcome-file>
    </welcome-file-list>
</web-app>
3.5 Creating JSP Views
Spring MVC supports many types of views for different presentation technologies. These include – JSP, HTML, XML etc.
3.5.1 Index Page
Let us write a simple view in the SpringMvcHibernate/src/main/webapp/WEB-INF/ folder. This page displays a login form for the users. Add the following code to it:
index.jsp
<%@ page language="java" contentType="text/html; charset=UTF-8" pageEncoding="UTF-8"%>
<%@ taglib uri="http://java.sun.com/jsp/jstl/core" prefix="c" %>
<!DOCTYPE html PUBLIC "-//W3C//DTD HTML 4.01 Transitional//EN" "http://www.w3.org/TR/html4/loose.dtd">
<html>
	<head>
	    <title>User Login</title>
	    <meta http-equiv="Content-Type" content="text/html; charset=UTF-8">
	    <link rel="stylesheet" href="https://maxcdn.bootstrapcdn.com/bootstrap/4.0.0/css/bootstrap.min.css">
	</head>
	<body>
	    <div class="container">
	        <h3 id="form_header" class="text-warning" align="center">Login Application</h3>
	        <div> </div>

	        <!-- User input form to validate a user -->
	        <c:url var="validateUrl" value="/user/validate" />
	        <form id="user_form" action="${validateUrl}" method="POST">
	            <div class="form-group">
	                <label for="name">Username:</label>
	                <input type="text" class="form-control" id="name" placeholder="Enter username" name="username">
	            </div>
	            <div class="form-group">
	                <label for="pwd">Password:</label>
	                <input type="password" class="form-control" id="pwd" placeholder="Enter password" name="password">
	            </div>
	            <button id="confirm_user" type="submit" class="btn btn-primary">Confirm Indentity</button>
	        </form>
	    </div>
	</body>
</html>
3.5.2 Result Page
Let us write a simple view in the SpringMvcHibernate/src/main/webapp/WEB-INF/views folder. This page displays an output message to the users. Add the following code to it:
result.jsp
<%@ page language="java" contentType="text/html; charset=UTF-8" pageEncoding="UTF-8"%>
<!DOCTYPE html PUBLIC "-//W3C//DTD HTML 4.01 Transitional//EN" "http://www.w3.org/TR/html4/loose.dtd">
<html>
	<head>
		<title>Welcome</title>
	    <meta http-equiv="Content-Type" content="text/html; charset=UTF-8">
	    <link rel="stylesheet" href="https://maxcdn.bootstrapcdn.com/bootstrap/4.0.0/css/bootstrap.min.css">
	</head>
	<body>
		<div class="container">
			<h3 id="output_header" class="text-success"><%= request.getAttribute("output") %></h3>
		</div>
	</body>
</html>
4. Run the Application
As we are ready for all the changes, let us compile the project and deploy the application on the Tomcat7 server. To deploy the application on Tomat7, right-click on the project and navigate to Run as -> Run on Server.
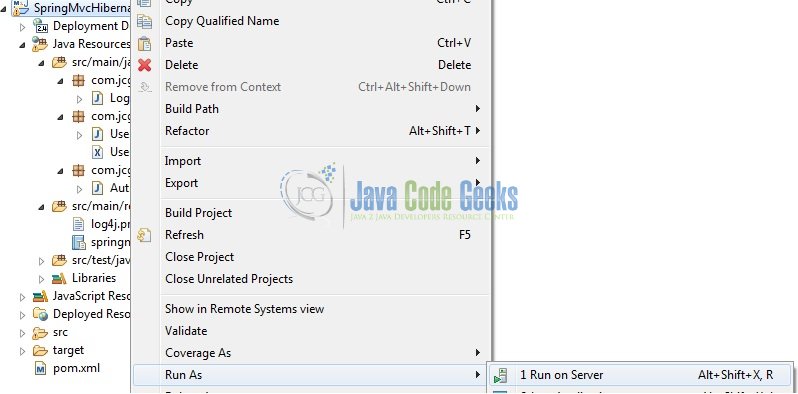
Tomcat will deploy the application in its web-apps folder and shall start its execution to deploy the project so that we can go ahead and test it in the browser.
5. Project Demo
Open your favorite browser and hit the following URL. The output page will be displayed.
http://localhost:8080/SpringMvcHibernate/
Server name (localhost) and port (8080) may vary as per your tomcat configuration. Developers can debug the example and see what happens after every step. Enjoy!
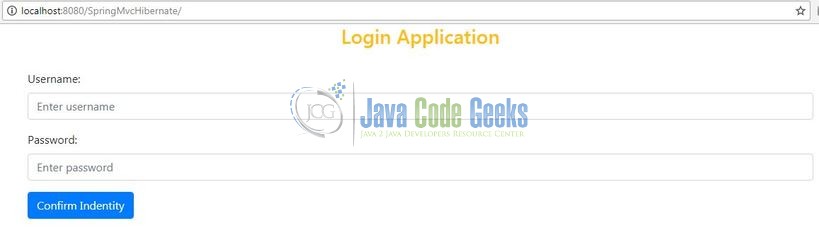
Here, developers can enter the credentials and click on the ‘Confirm Identity’ button. If the user credentials are successfully authenticated, the user will be shown a success message else an error message. That’s all for this post. Happy Learning!
6. Conclusion
In this section, developers learned how to create a simple Spring MVC application with Hibernate. Developers can download the sample application as an Eclipse project in the Downloads section, and remember to update the database connection settings.
7. Download the Eclipse Project
This was a login form example with Spring MVC and Hibernate.
You can download the full source code of this example here: SpringMvcHibernate

Hi!what contain user.hbm.xml file? Thanks!
its just com/…/User
not user.hbm.xml
what about jar files
Sam, it’s a maven project and required jar entries are specified in the
pom.xml. You need to update the project and the jar files will be automatically downloaded from the maven repository.Its a great tutorial but could you also include logout functionality.
Will add in the future articles.
Thank you somuch ranga…your code is so detailed and understandable..its very useful to us.
If its possible can you please post “spring mvc role wise login security with mysql” example application.
Sure will do that! :)
I had created this project step by step. i uses mysql8.0.16 version. i had include user.hbm.xml, but i am getting bean creation exception and this waring : The web application [DubbleKing] appears to have started a thread named [mysql-cj-abandoned-connection-cleanup]. I think there is missing in code src/test/java and some other files also log4j as some other…. Do anyone can help me out to resolve all issues. java.lang.IllegalStateException: Illegal access: this web application instance has been stopped already. Could not load []. The following stack trace is thrown for debugging purposes as well as to attempt to terminate the thread which… Read more »
I think these links can help you! Some problems with the mysql jar.
https://forums.mysql.com/read.php?39,666260,666260
https://stackoverflow.com/questions/25699985/the-web-application-appears-to-have-started-a-thread-named-abandoned-connect
Hi,
a nice example I like it, I download and run this example. am getting hibernateTemplate.find() method deprecated method, please tell next process how to do, thanks
how to develop same project without maven.
use dynamic web project in eclipse.
Hi, I can’t say I am newby in this matter, but I really appreciate this tutorial and how it’s organized. I am not using Maven dependancy, but that is not the point. I noticed that in one of the screenshot of Authservice.java there is this line List userObj = (List) hibernateTemplate.find(sqlQuery, uname, upwd); while in the download package for the same file there is this line List userObj = (List) hibernateTemplate.find(sqlQuery, uname, upwd); I am having an issue with hibernateTemplate.fin()…… Eclipse says: – The type org.springframework.dao.DataAccessException cannot be resolved. It is indirectly referenced from required .class files So I’m stuck………any… Read more »