Welcome readers, in this tutorial, we will show the Angular 6 Http Client module and Spring MVC example to fetch the model data. Here, we are using Angular 6 as a front-end technology to make a request and receive the response.
1. Introduction
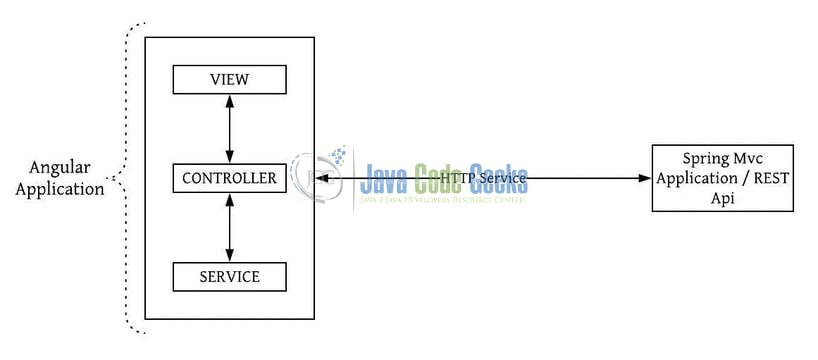
Refer below diagram to understand the spring mvc and angular 6 applications. The two different applications interact via the HTTP service.
Now, open up the Eclipse IDE and let us see how to implement this tutorial in the spring mvc and angular 6 frameworks.
2. Spring MVC and Angular 6 Example
Here is a systematic guide for implementing this tutorial.
2.1 Tools Used
We are using Eclipse Kepler SR2, JDK 8, Maven, and Angular 6. Having said that, we have tested the code against JDK 1.7 and it works well.
2.2 Project Structure
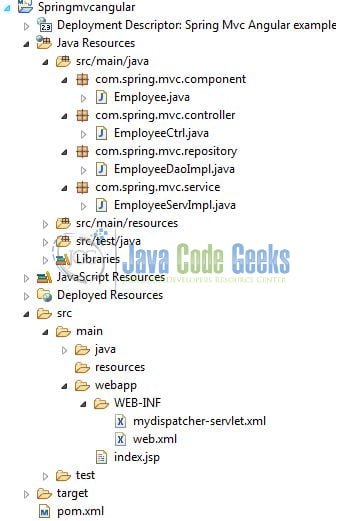
In case you are confused about where you should create the corresponding files or folder, let us review the project structure of the spring mvc application.
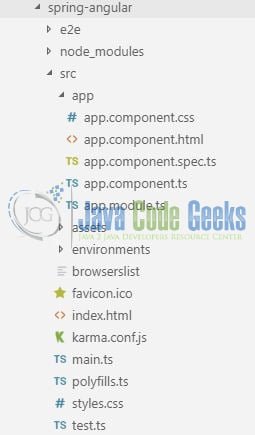
In addition to this, let us also review the structure of the angular 6 application.
3. Creating Spring MVC application
Below are the steps involved in developing the backend application.
3.1 Maven Dependencies
Here, we specify the dependencies for the Spring and Jackson framework. Maven will automatically resolve the rest dependencies such as Spring Beans, Spring Core etc. The updated file will have the following code.
pom.xml
<project xmlns="http://maven.apache.org/POM/4.0.0"
	xmlns:xsi="http://www.w3.org/2001/XMLSchema-instance"
	xsi:schemaLocation="http://maven.apache.org/POM/4.0.0 http://maven.apache.org/maven-v4_0_0.xsd">
	<modelVersion>4.0.0</modelVersion>
	<groupId>com.springmvc.angular</groupId>
	<artifactId>Springmvcangular</artifactId>
	<packaging>war</packaging>
	<version>0.0.1-SNAPSHOT</version>
	<name>Springmvcangular Maven Webapp</name>
	<url>http://maven.apache.org</url>
	<dependencies>
		<!-- Servlet API Dependency -->
		<dependency>
			<groupId>javax.servlet</groupId>
			<artifactId>servlet-api</artifactId>
			<version>3.0-alpha-1</version>
		</dependency>
		<!-- https://mvnrepository.com/artifact/org.springframework/spring-webmvc -->
		<dependency>
			<groupId>org.springframework</groupId>
			<artifactId>spring-webmvc</artifactId>
			<version>5.0.8.RELEASE</version>
		</dependency>
		<!-- https://mvnrepository.com/artifact/com.github.javafaker/javafaker -->
		<dependency>
			<groupId>com.github.javafaker</groupId>
			<artifactId>javafaker</artifactId>
			<version>0.16</version>
		</dependency>
		<!-- https://mvnrepository.com/artifact/com.fasterxml.jackson.core/jackson-databind -->
		<dependency>
			<groupId>com.fasterxml.jackson.core</groupId>
			<artifactId>jackson-databind</artifactId>
			<version>2.9.8</version>
		</dependency>
	</dependencies>
	<build>
		<finalName>Springmvcangular</finalName>
	</build>
</project>
3.2 Configuration Files
Let us write all the configuration files involved in this application.
3.2.1 Deployment Descriptor
The web.xml file declares one servlet (i.e. Dispatcher Servlet) to receive all kind of the requests. Add the following code to it.
web.xml
<!DOCTYPE web-app PUBLIC
 "-//Sun Microsystems, Inc.//DTD Web Application 2.3//EN"
 "http://java.sun.com/dtd/web-app_2_3.dtd" >

<web-app>
	<display-name>Spring Mvc Angular example</display-name>

	<servlet>
		<servlet-name>mydispatcher</servlet-name>
		<servlet-class>org.springframework.web.servlet.DispatcherServlet</servlet-class>
	</servlet>

	<servlet-mapping>
		<servlet-name>mydispatcher</servlet-name>
		<url-pattern>/</url-pattern>
	</servlet-mapping>
</web-app>
3.2.2 Spring Configuration
To configure the mvc framework, developers need to implement the bean configuration file which acts as an interface between the java class and the outside work. Put this file in the Springmvcangular/src/main/webapp/WEB-INF/ folder and add the following code to it.
mydispatcher-servlet.xml
<?xml version="1.0" encoding="UTF-8"?>
<beans xmlns="http://www.springframework.org/schema/beans"
	xmlns:xsi="http://www.w3.org/2001/XMLSchema-instance"
	xmlns:context="http://www.springframework.org/schema/context"
	xmlns:mvc="http://www.springframework.org/schema/mvc"
	xsi:schemaLocation="
        http://www.springframework.org/schema/beans http://www.springframework.org/schema/beans/spring-beans.xsd
        http://www.springframework.org/schema/context http://www.springframework.org/schema/context/spring-context.xsd
        http://www.springframework.org/schema/mvc http://www.springframework.org/schema/mvc/spring-mvc.xsd">

	<context:annotation-config />

	<mvc:annotation-driven />

	<!-- for the stereotype annotation to work -->
	<context:component-scan
		base-package="com.spring.mvc" />
</beans>
3.3 Java Classes
Let us write all the java classes involved in this application.
3.3.1 Controller class
Add the following code to the employee controller class designed to handle the incoming requests.
EmployeeCtrl.java
package com.spring.mvc.controller;

import java.util.List;

import org.springframework.beans.factory.annotation.Autowired;
import org.springframework.web.bind.annotation.CrossOrigin;
import org.springframework.web.bind.annotation.RequestMapping;
import org.springframework.web.bind.annotation.RequestMethod;
import org.springframework.web.bind.annotation.RestController;

import com.spring.mvc.component.Employee;
import com.spring.mvc.service.EmployeeServImpl;

@RestController
public class EmployeeCtrl {

	@Autowired
	EmployeeServImpl empService;

	// Method to test the angular fetch call.
	@CrossOrigin(origins="http://localhost:4200")							// @CrossOrigin is used to handle the request from a difference origin.
	@RequestMapping(value= "/getemployees", method= RequestMethod.GET)
	public List<Employee> getAllEmployees() {
		return empService.getAllEmployees();
	}
}
3.3.2 Service class
Add the following code to the employee service class.
EmployeeServImpl.java
package com.spring.mvc.service;

import java.util.List;

import org.springframework.beans.factory.annotation.Autowired;
import org.springframework.stereotype.Service;

import com.spring.mvc.component.Employee;
import com.spring.mvc.repository.EmployeeDaoImpl;

@Service
public class EmployeeServImpl {

	@Autowired
	EmployeeDaoImpl empdao;

	public List<Employee> getAllEmployees() {
		return empdao.getAllEmployeesFromDb();
	}
}
3.3.3 Data-Access-Object class
Add the following code to the employee data-access-object class.
EmployeeDaoImpl.java
package com.spring.mvc.repository;

import java.util.ArrayList;
import java.util.List;

import org.springframework.stereotype.Repository;

import com.github.javafaker.Faker;
import com.spring.mvc.component.Employee;

@Repository
public class EmployeeDaoImpl {

	// Method to generate the dummy employee records.
	public List<Employee> getAllEmployeesFromDb() {

		// To generate the fake details for the employees.
		Faker faker = new Faker();

		// Employee list.
		List<Employee> employeelist = new ArrayList<Employee>();

		// Creating fake employees to be shown on the angular html page.
		for(int i=101; i<=110; i++) {

			// Creating employee model objects.
			Employee myemployee = new Employee();
			myemployee.setId(i);
			myemployee.setName(faker.name().fullName());
			myemployee.setMobile(faker.phoneNumber().cellPhone());
			myemployee.setAddress(faker.address().streetAddress());
			myemployee.setCompanylogo(faker.company().logo());

			// Adding the employee records to the employee list.
			employeelist.add(myemployee);
		}

		return employeelist;
	}
}
3.3.4 Model class
Add the following code to the employee model class.

Employee.java
package com.spring.mvc.component;

import org.springframework.stereotype.Component;

@Component
public class Employee {

	private int id;
	private String name;
	private String mobile;
	private String address;
	private String companylogo;

	public int getId() {
		return id;
	}
	public void setId(int id) {
		this.id = id;
	}
	public String getName() {
		return name;
	}
	public void setName(String name) {
		this.name = name;
	}
	public String getMobile() {
		return mobile;
	}
	public void setMobile(String mobile) {
		this.mobile = mobile;
	}
	public String getAddress() {
		return address;
	}
	public void setAddress(String address) {
		this.address = address;
	}
	public String getCompanylogo() {
		return companylogo;
	}
	public void setCompanylogo(String companylogo) {
		this.companylogo = companylogo;
	}
}
4. Creating an Angular 6 application
Run the ng new spring-angular command in the npm console to create a new angular project. Once the new project is created, add the following code to the default module of the angular application.
4.1 Application Module
Add the following code to the app.module.ts file.
app.module.ts
import { BrowserModule } from '@angular/platform-browser';
import { NgModule } from '@angular/core';
import { HttpClientModule } from '@angular/common/http';

import { AppComponent } from './app.component';

@NgModule({
  declarations: [
    AppComponent
  ],
  imports: [
    BrowserModule,
    HttpClientModule
  ],
  providers: [],
  bootstrap: [AppComponent]
})
export class AppModule { }
4.2 Application Component
Add the following code to the app.component.ts file.
app.component.ts
import { Component } from '@angular/core';
import { HttpClient } from '@angular/common/http';

@Component({
  selector: 'app-root',
  templateUrl: './app.component.html',
  styleUrls: ['./app.component.css']
})
export class AppComponent {
  title = 'Spring Mvc Angular Tutorial';

  // Object to save the response returned from the service.
  myresponse: any;

  // Url to fetch the employee records from the spring application.
  readonly APP_URL = 'http://localhost:8082/Springmvcangular';

  constructor(private _http: HttpClient) { }

  // Method to fetch all employees from the database table.
  getAllEmployees() {
    this._http.get(this.APP_URL + '/getemployees').subscribe(
      data => {
        this.myresponse = data;
      },
      error => {
        console.log('Error occured', error);
      }
    );
  }
}
4.3 Application Template
Add the following code to the app.component.html file.
app.component.html
<html>

<head>
  <link rel="stylesheet" href="https://maxcdn.bootstrapcdn.com/bootstrap/4.1.3/css/bootstrap.min.css">
</head>

<body>
  <div class="container">
    <h1 class="text-danger text-center">Welcome to {{ title }}!</h1>
    <hr />

    <div id="fetchbtn">
      <button type="button" class="btn btn-outline-success" (click)="getAllEmployees();">Click me</button>
    </div>
    <div><small class="text-info">Click the button to fetch the employees from the database!</small></div>

    <div *ngIf="myresponse">
      <table class="table table-bordered table-hover">
        <thead>
          <th>Employee Id</th>
          <th>Name</th>
          <th>Phone no.</th>
          <th>Address</th>
          <th>Company Logo</th>
        </thead>
        <tbody>
          <tr *ngFor="let employee of myresponse">
            <td>{{employee.id}}</td>
            <td>{{employee.name}}</td>
            <td>{{employee.mobile}}</td>
            <td>{{employee.address}}</td>
            <td><img src="{{employee.companylogo}}" alt="Company logo" class="img-thumbnail mx-auto d-block" style="width: 30%" /></td>
          </tr>
        </tbody>
      </table>
    </div>
  </div>
</body>

</html>
5. Run the Application
As we are ready with all the changes, let us compile the spring project and deploy the application on the Tomcat7 server. In addition, compile and run the angular application with ng serve –o command. Once the projects are successfully compiled and deployed, open the browser to test it.
6. Project Demo
Open your favorite browser and hit the angular application url (http://localhost:4200/) to display the index page of the application.

Click the button to fetch the employees list from the spring application and display it on the browser.

That is all for this tutorial and I hope the article served you whatever you were looking for. Happy Learning and do not forget to share!
7. Conclusion
In this section, developers learned how to create a Spring MVC Angular Application. Developers can download the sample application as an Eclipse project in the Downloads section.
8. Download the Eclipse Project
This was a tutorial of Spring MVC and Angular 6 application.
You can download the full source code of this example here: SpringMvcAngular6Example

This would only work locally but how would you assign the back end URL that is in the remote server? localhost would not work and would you need to somehow make the IP configurable ?
you could do that using interceptor in angular. prefix the base url or use environment file to configure the base url.
Hi what is the database name, and table name in this project