RabbitMQ is an open source message broker which implements many protocols. It can be used for point to point, request/ reply or publish-subscribe messaging patterns and is cluster deployable for high availability and throughput.
The key point to remember about RabbitMQ‘s messaging model is this: The producer sends messages to an exchange, which pushes them to queues.
The two important types of exchanges are Direct Exchange and Topic Exchange. Queues are the components where RabbitMQ stores and forwards the messages. The mapping of messages to queues is done by matching two keys: routing key and binding key. Messages carry a routing key where as queues are labelled with a binding key. A message sent with a particular routing key will be delivered to all the queues that have a matching binding key.
Table of Contents
1. Introduction
Spring framework provides a convenient helper class, RabbitTemplate that provides a simple mechanism for sending and receiving messages. Going a step further, Spring Integration provides AmqpInboundChannelAdapter which according to its documentation, “receives messages from an AMQP queue, converts them to Spring Integration Messages, and sends the results to a Message Channel.”
In Spring Integration, Message Endpoints are the components that let us connect our domain-specific code to the messaging infrastructure by using declarative configuration. The main purpose is to decouple integration code and business logic code. The documentation draws an interesting analogy with the MVC pattern of web applications, by naming the endpoints as equivalent to the Controllers. It states, “Just as a Controller handles HTTP requests, the Message Endpoint handles Messages. Just as Controllers are mapped to URL patterns, Message Endpoints are mapped to Message Channels. The goal is the same in both cases: isolate application code from the infrastructure.”
The Message endpoints that Spring Integration provides are: Transformer, Filter, Router, Splitter, Aggregator, Service Activator, and Channel Adapter. Transformer is a component that enables loose coupling between producers and consumers. A Message Transformer, as the Spring Integration documentation states, “is responsible for converting a Message‘s content or structure and returning the modified Message. Probably the most common type of transformer is one that converts the payload of the Message from one format to another (e.g. from XML Document to java.lang.String)”.
2. Application
The example we will discuss in this article is an e-commerce application that uses RabbitMQ as its message broker. The producer, called sender, publishes Orders to RabbitMQ. The consumer, called receiver listens to RabbitMQ and generates Invoices using a custom transformer. Both the sender and receiver are Gradle-based Spring Boot Applications.
The technical plumbing is simple. sender uses Spring RabbitTemplate to connect to RabbitMQ, whereas receiver uses spring Integration components AmqpInboundChannelAdapter, Transformer and ServiceActivator.
Spring Integration provides a few transformer components out of the box, like object-to-string and json-to-object etc. In our application, we will write our own converter that takes in an Order object and sends an Invoice object to a channel.
Given below is the class diagram for the domain layer:
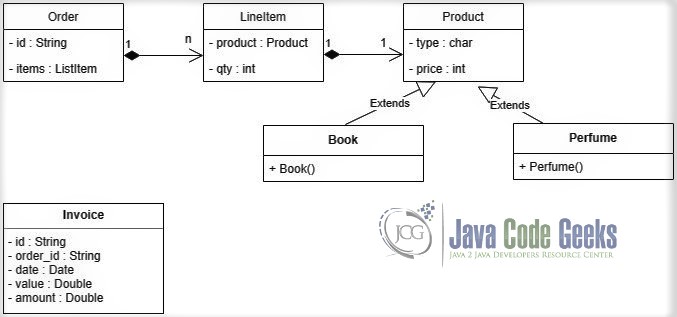
The business rules are: Books are priced at 100 each and Perfumes are priced at 200 each. Books are taxed at 5% and Perfumes are taxed at 8%.
The first order published by sender has two Books and three Perfumes. The order value is 800 and tax is 58, totaling to an Invoice amount of 858. The second order consists of five Books and two Perfumes, for which the order value is 900 and tax 957.
3. Environment
The technical platform I used to run this example consists of:
- Java 1.8
- Gradle 4.10.2
- Spring Boot 2.0.5
- RabbitMQ 3.7.7
- Windows 10
4. Source Code
To begin with, we will see the annotations used in the application. We have a domain layer containing a set of classes in the org.javacodegeeks.ecom.domain package. In the classes, we have lombok annotations of @Getter, @Setter, and @NoArgsConstructor. These respectively generate the getters and setters to the fields and a default no-argument constructor.
In the configuration classes, we use the annotations, @Configuration, @Bean, and @Qualifier. @Configuration indicates that a class declares one or more @Bean methods and may be processed by the Spring container to generate bean definitions and service requests for those beans at runtime. @Bean indicates that a method produces a bean to be managed by the Spring container. @Qualifier may be used on a field or parameter as a qualifier for candidate beans when autowiring. It may also be used to annotate other custom annotations that can then in turn be used as qualifiers.
In the main and Runner classes, we use the annotations @SprinBootApplication, @ServiceActivator, and @Override. The @SpringBootApplication annotation is a convenience annotation that combines three other annotations, @EnableConfiguration, @ComponentScan, and @Configuration. In other words, the class is marked for auto-configuration, component scan and having the ability to register additional beans and import extra configuration classes. @ServiceActivator indicates that a method is capable of handling a message or message payload. The @Override annotation on an element indicates to the compiler it is meant to override an element in the superclass.
The base class representing a generic product is Product.
Product.java
package org.javacodegeeks.ecom.domain;

import java.io.Serializable;

import lombok.Getter;

@Getter
public class Product implements Serializable {
	char type;
	int price;
}
This class has two attributes: type and price.
Next we will see Book, which is a sub-class of Product.
Book.java
package org.javacodegeeks.ecom.domain;

public class Book extends Product {
	public Book() {
		this.type = 'B';
		this.price = 100;
	}
}
In the constructor, we set the values of the attributes. Type is set to ‘B’ and price is set to 100.
The Perfume class given below is also a sub-class of Product.
Perfume.java
package org.javacodegeeks.ecom.domain;

public class Perfume extends Product {
	public Perfume() {
		this.type = 'P';
		this.price = 200;
	}
}
In the constructor, we set the values of the attributes. Type is set to ‘P’ and price is set to 200.
Given below is the LineItem class.
LineItem.java
package org.javacodegeeks.ecom.domain;

import java.io.Serializable;

import lombok.Getter;
import lombok.Setter;
import lombok.NoArgsConstructor;

@Getter
@Setter
@NoArgsConstructor
public class LineItem implements Serializable {
	private Product product;
	private int qty;
}
A LineItem contains Product and qty attributes.
We will see the Order class next.
Order.java
package org.javacodegeeks.ecom.domain;

import java.io.Serializable;
import java.util.List;

import lombok.NoArgsConstructor;
import lombok.Getter;
import lombok.Setter;

@Getter
@Setter
@NoArgsConstructor
public class Order implements Serializable {
	private String id;
	private List items;
}
This class contains an id and a List of LineItems.
Finally in the domain layer, we have the Invoice, a stand-alone class representing an invoice.
Invoice.java
package org.javacodegeeks.ecom.domain;

import java.util.Date;

import lombok.Getter;
import lombok.Setter;
import lombok.NoArgsConstructor;

@Getter
@Setter
@NoArgsConstructor
public class Invoice {
	private String id;
	private String order_id;
	private Date date;
	private Double value;
	private Double amount;
}
Its attributes are id, order_id, date, value and amount. One invoice is generated for every order and hence it has the corresponding order_id as an attribute.
We will next see code in the sender application. This is a Gradle-based project, so all the application configuration and dependent libraries are specified in build.gradle
build.gradle
buildscript {
    repositories {
        mavenCentral()
    }
    dependencies {
        classpath("org.springframework.boot:spring-boot-gradle-plugin:2.0.5.RELEASE")
    }
}

apply plugin: 'java'
apply plugin: 'eclipse'
apply plugin: 'idea'
apply plugin: 'org.springframework.boot'
apply plugin: 'io.spring.dependency-management'

bootJar {
    baseName = 'gs-messaging-rabbitmq'
    version =  '0.1.0'
}

repositories {
    mavenCentral()
}

sourceCompatibility = 1.8
targetCompatibility = 1.8

dependencies {
    compile("org.springframework.boot:spring-boot-starter-amqp")
    compileOnly("org.projectlombok:lombok:1.18.2")
    testCompile("org.springframework.boot:spring-boot-starter-test")
}
All the bean configuration for the configuration is given in the class SenderConfiguration
SenderConfiguration.java
package org.javacodegeeks.springintegration.sender;

import org.springframework.amqp.core.Binding;
import org.springframework.amqp.core.BindingBuilder;
import org.springframework.amqp.core.Queue;
import org.springframework.amqp.core.TopicExchange;
import org.springframework.amqp.rabbit.connection.ConnectionFactory;
import org.springframework.amqp.rabbit.listener.SimpleMessageListenerContainer;
import org.springframework.amqp.rabbit.listener.adapter.MessageListenerAdapter;
import org.springframework.context.annotation.Bean;
import org.springframework.context.annotation.Configuration;

@Configuration
public class SenderConfiguration {

	static final String topicExchangeName = "ecommExchange";

	static final String queueName = "orders";

	@Bean
	Queue queue() {
		return new Queue(queueName, false);
	}

	@Bean
	TopicExchange exchange() {
		return new TopicExchange(topicExchangeName);
	}

	@Bean
	Binding binding(Queue queue, TopicExchange exchange) {
		return BindingBuilder.bind(queue).to(exchange).with("orders.#");
	}
}
This class defines two String variables. The first topicExchangeName has value "ecommExchange" and the second queueName has value "orders". The main configuration specified is for beans for a TopicExchange, a Queue and a Binding to set up the RabbitMQ components.
We next see the code of the SenderApplication class.
SenderApplication.java
package org.javacodegeeks.springintegration.sender;

import org.springframework.boot.SpringApplication;
import org.springframework.boot.autoconfigure.SpringBootApplication;

@SpringBootApplication
public class SenderApplication {

	public static void main(String[] args) throws InterruptedException {
		SpringApplication.run(SenderApplication.class, args).close();
	}
}
This is the main class of the application, it just invokes SpringApplication.run
Given below is the code for the Runner class.
Runner.java
package org.javacodegeeks.springintegration.sender;

import java.util.ArrayList;
import java.util.concurrent.TimeUnit;

import org.javacodegeeks.ecom.domain.Book;
import org.javacodegeeks.ecom.domain.LineItem;
import org.javacodegeeks.ecom.domain.Order;
import org.javacodegeeks.ecom.domain.Perfume;
import org.javacodegeeks.ecom.domain.Product;
import org.springframework.amqp.rabbit.core.RabbitTemplate;
import org.springframework.boot.CommandLineRunner;
import org.springframework.stereotype.Component;

@Component
public class Runner implements CommandLineRunner {

	private final RabbitTemplate rabbitTemplate;

	public Runner(RabbitTemplate rabbitTemplate) {
		this.rabbitTemplate = rabbitTemplate;
	}

	@Override
	public void run(String... args) throws Exception {

		Product book = new Book();
		Product perfume = new Perfume();

		LineItem l1 = new LineItem();
		l1.setProduct(book);
		l1.setQty(2);

		System.out.println("Sending first order, two Books & three Perfumes");
		LineItem l2 = new LineItem();
		l2.setProduct(perfume);
		l2.setQty(3);

		ArrayList lineItems1 = new ArrayList();
		lineItems1.add(l1);
		lineItems1.add(l2);

		Order order1 = new Order();
		order1.setId("1001");
		order1.setItems(lineItems1);

		rabbitTemplate.convertAndSend(SenderConfiguration.topicExchangeName, "orders.1", order1);

		TimeUnit.SECONDS.sleep(5);

		System.out.println("Sending second order, five books & two Perfumes");
		LineItem l3 = new LineItem();
		l3.setProduct(book);
		l3.setQty(5);

		LineItem l4 = new LineItem();
		l4.setProduct(perfume);
		l4.setQty(2);

		ArrayList lineItems2 = new ArrayList();
		lineItems2.add(l3);
		lineItems2.add(l4);

		Order order2 = new Order();
		order2.setId("1002");
		order2.setItems(lineItems2);

		rabbitTemplate.convertAndSend(SenderConfiguration.topicExchangeName, "orders.2", order2);
	}
}
This class implements CommandLineRunner interface and overrides the run method. Spring Boot will automatically call this method after loading the application context.
In the run method, we first create a Book object and a Perfume object. We then create an order with one LineItem for two Books and another LineItem for three Perfumes. We then create an Order with these two LineItems and send it to RabbitMQ by invoking RabbitTemplate‘s convertAndSend.

The overloaded convertAndSend method basically takes a Java object and sends it to RabbitMQ. We use the 3-argument method that sends our Order object to the exchange "ecommExchange" which transfers to the queue "orders" that has a binding key "orders.#".
We pause the application execution for five seconds after which we create and send another order for five Books and two Perfumes.
Similar to sender, receiver is also a Gradle-based application, so all the application configuration and dependencies are specified in build.gradle
build.gradle
buildscript {
    ext {
        springBootVersion = '2.0.5.RELEASE'
    }
    repositories {
        mavenCentral()
    }
    dependencies {
        classpath("org.springframework.boot:spring-boot-gradle-plugin:${springBootVersion}")
    }
}

apply plugin: 'java'
apply plugin: 'eclipse'
apply plugin: 'org.springframework.boot'
apply plugin: 'io.spring.dependency-management'

group = 'com.example'
version = '0.0.1-SNAPSHOT'
sourceCompatibility = 1.8

repositories {
    mavenCentral()
}


dependencies {
    implementation('org.springframework.boot:spring-boot-starter-amqp')
    implementation('org.springframework.boot:spring-boot-starter-integration')
    testImplementation('org.springframework.boot:spring-boot-starter-test')
    compileOnly("org.projectlombok:lombok:1.18.2")

    compile 'org.springframework.integration:spring-integration-amqp'
}
All the beans configuration of the receiver application is given in the ReceiverConfiguration class.
ReceiverConfiguration.java
package org.javacodegeeks.springintegration.receiver;

import org.springframework.amqp.rabbit.connection.ConnectionFactory;
import org.springframework.amqp.rabbit.listener.SimpleMessageListenerContainer;
import org.springframework.beans.factory.annotation.Qualifier;
import org.springframework.context.annotation.Bean;
import org.springframework.context.annotation.Configuration;
import org.springframework.integration.amqp.inbound.AmqpInboundChannelAdapter;
import org.springframework.integration.channel.DirectChannel;
import org.springframework.messaging.MessageChannel;

@Configuration
public class ReceiverConfiguration {

	@Bean
	public MessageChannel orderChannel() {
		return new DirectChannel();
	}

	@Bean
	public MessageChannel invoiceChannel() {
		return new DirectChannel();
	}

	@Bean
	public AmqpInboundChannelAdapter inbound(SimpleMessageListenerContainer listenerContainer,
			@Qualifier("orderChannel") MessageChannel channel) {
		AmqpInboundChannelAdapter adapter = new AmqpInboundChannelAdapter(listenerContainer);
		adapter.setOutputChannel(channel);
		return adapter;
	}

	@Bean
	public SimpleMessageListenerContainer container(ConnectionFactory connectionFactory) {
		SimpleMessageListenerContainer container = new SimpleMessageListenerContainer(connectionFactory);
		container.setQueueNames("orders");
		return container;
	}
}
In this file, we first configure Beans for two channels called the orderChannel and invoiceChannel. A SimpleMessageListenerContainer variable called listenerContainer is created and configured as a Bean in the container method. We set the queue name to "orders".
The listenerContainer and orderChannel objects are used as arguments to create and configure an AmqpInboundChannelAdapter Bean which hides all the low-level operations to connect and interact with RabbitMQ.
Finally, we see the code of the ReceiverApplication class.
ReceiverApplication.java
package org.javacodegeeks.springintegration.receiver;

import java.util.Date;
import java.util.List;

import org.javacodegeeks.ecom.domain.Invoice;
import org.javacodegeeks.ecom.domain.LineItem;
import org.javacodegeeks.ecom.domain.Order;
import org.springframework.boot.WebApplicationType;
import org.springframework.boot.autoconfigure.SpringBootApplication;
import org.springframework.boot.builder.SpringApplicationBuilder;
import org.springframework.context.annotation.Bean;
import org.springframework.integration.annotation.ServiceActivator;
import org.springframework.integration.annotation.Transformer;
import org.springframework.messaging.Message;
import org.springframework.messaging.MessageHandler;
import org.springframework.messaging.MessagingException;

@SpringBootApplication
public class ReceiverApplication {

	public static void main(String[] args) {
		new SpringApplicationBuilder(ReceiverApplication.class).web(WebApplicationType.NONE).run(args);
	}

	@Transformer(inputChannel = "orderChannel", outputChannel = "invoiceChannel")
	Invoice convertToInvoice(Order order) {

		System.out.println("*****************************");
		System.out.println("..... Received an order .....");
		System.out.println("Order id = " + order.getId());
		System.out.println("Generating Invoice ..........");
		Invoice invoice = new Invoice();
		invoice.setDate(new Date());
		invoice.setOrder_id(order.getId());

		Double value    = 0.0;
		Double amount   = 0.0;
		Double tax_rate = 0.0;
		Double tax      = 0.0;

		List lineItems = order.getItems();
		Double lineItemPrice;

		for (LineItem lineItem : lineItems) {
			lineItemPrice = (double) (lineItem.getProduct().getPrice() * lineItem.getQty());

			// Books are taxed at 5%
			if (lineItem.getProduct().getType() == 'B')
				tax_rate = 0.05;
			// Perfumes are taxed at 8%
			else if (lineItem.getProduct().getType() == 'P')
				tax_rate = 0.08;

			tax = lineItemPrice * tax_rate;

			value  += lineItemPrice;
			amount += lineItemPrice + tax;
		}
		invoice.setValue(value);
		invoice.setAmount(amount);

		return invoice;
	}

	@Bean
	@ServiceActivator(inputChannel = "invoiceChannel")
	public MessageHandler handler() {
		return new MessageHandler() {
			@Override
			public void handleMessage(Message message) throws MessagingException {

				Invoice invoice = (Invoice) message.getPayload();
				System.out.println("Received Invoice ............");
				System.out.println("Order Id = " + invoice.getOrder_id());
				System.out.println("Value = " + invoice.getValue());
				System.out.println("Invoice Amount = " + invoice.getAmount());
			}
		};
	}
}
The convertToInvoice method has our custom transformer code. It takes an Order object as the argument. It then loops through the LineItems in the order, and for each LineItem, it calculates the order value, and tax based on the applicable tax rate. It sets the order value and the total amount in the Invoice object and returns it to its output channel which is the invoiceChannel.
The handler method is the ServiceActivator method for the invoiceChannel. When a message arrives on the channel, it extracts the Invoice object and prints out its order_id, value and amount attributes.
5. How To Run and Test
Open a terminal window, go to the receiver folder and enter
.\gradlew bootRun
Open another terminal window, go to the sender folder and enter
.\gradlew bootRun
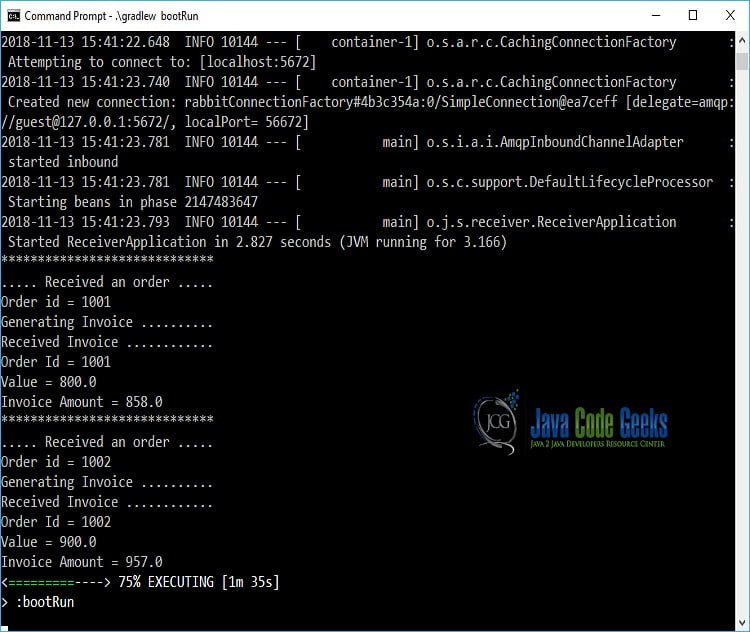
You will see the command run to success. In the first window, you will see messages about the receipt of three orders and generation of the corresponding invoices, with invoice amounts of 858 and 957, as in the screenshot given below.
6. Summary
In this article, we have discussed a working example of sending messages to RabbitMQ using Spring RabbitMQ, receiving the messages using Spring Integration inbound adapter and transforming the messages using a custom converter.
7. Useful Links
- http://www.rabbitmq.com/getstarted.html
- https://spring.io/projects/spring-amqp
- https://docs.spring.io/spring-integration/reference/html/amqp.html#amqp-inbound-channel-adapter
8. Download the Source Code
You can download the full source code of this example here: SpringIntegrationRabbitMQCustomTransformerExample
