In this tutorial, we will be overviewing Selenium automation tool in detail; we will be exploring Selenium WebDriver and discussing about identifying elements on the different Browsers using methods such as XPath, ID, CSS Selector and others.
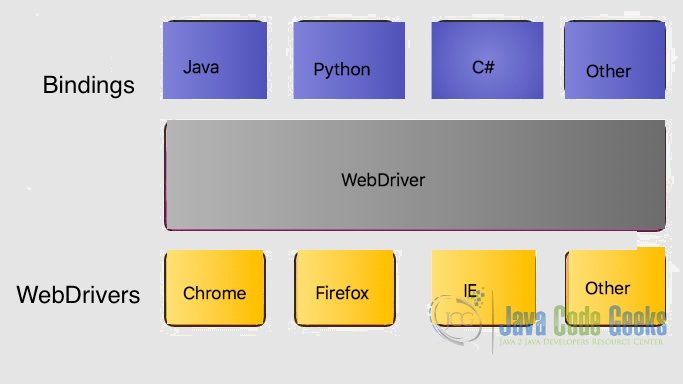
Selenium has three components, Selenium IDE, Selenium WebDriver formally known as Selenium Remote Control (RC) and Selenium Grid. Lastly, we will be also discussing about it’s advantage and some limitations.
Table Of Contents
1.Introduction
Selenium is an open source browser automation tool originally developed by Jason Huggins in 2004 and was initially operated as Selenium RC (Remote Control). Later was released under Apache 2.0 license as Selenium WebDriver.
Selenium IDE is a complete Integrated Development Environment that is integrated in Firefox Browser as an add-on. It supports recording, editing and debugging feature. Scripts are in Selenese, scripting language for selenium and can be written automatically or manually. It has few downsides, it only uses HTML and it also doesn’t support reading files from external sources.
Selenium Grid supports parallel execution of tests on different machines. It consists of Hub and nodes. The hub redirects the incoming request to node and node invokes the WebDriver which then access browser instances to take action. Thus, with Selenium Grid, parallel testing on different machines as well as different instances of browser is possible.
Selenium WebDriver was released under Apache license 2.0 and is the successor of Selenium RC. Selenium WebDriver 2.0 supports all the browser such as Firefox, Chrome, Internet Explorer, Safari, Opera etc. WebDriver API can be implemented in programming languages like Ruby, Java, python and C#. It supports Windows, Mac OS, Linux operating systems. It also includes the lightweight and fastest implementation called HtmlUnitDriver, which is used for testing without GUI.
1.1.Selenium Architecture
2.Getting Started with Selenium WebDriver
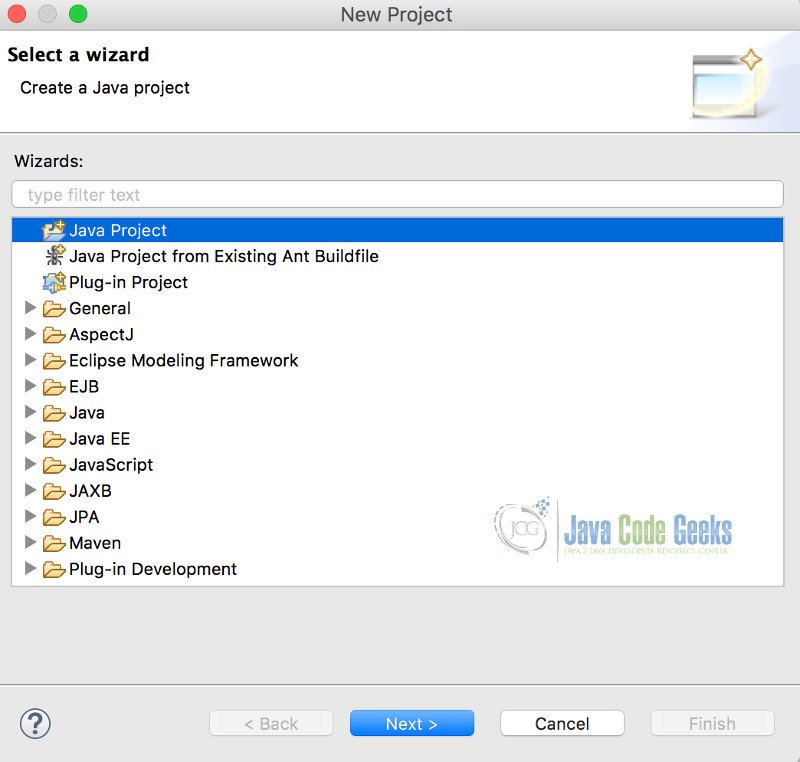
In order to get writing test cases on Selenium, we need to setup project on Eclipse Environment and then import required jars into project directory.
2.1.Setting up Selenium in Eclipse Environment

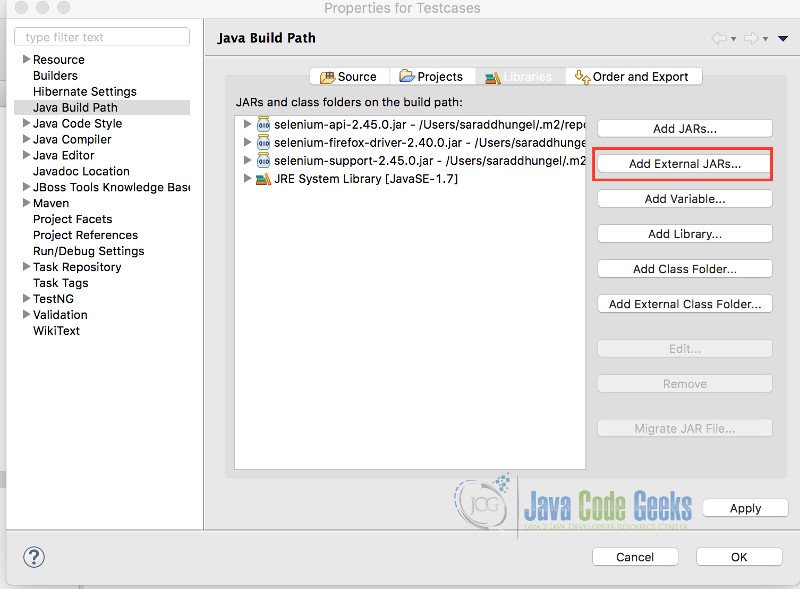
To add the jar of Selenium, we need to configure the build path as below

Then Selenium jar by clicking on “Add External Jars…”
This example will cover the details of Selenium WebDriver in Java and Firefox browser. To get started, I’ll import Selenium jar into Eclipse environment. There are two ways of importing the jar, either manually by downloading the Selenium Jar into Eclipse and then importing into project. You can download the selenium jar by clicking here http://www.seleniumhq.org/download/
The required Jars for Selenium WebDriver are:
1. Selenium Server Standalone.
2. Selenium java jar.
3. JUnit jar.
2.2.Setting up with Maven
We can also configure the jar using Maven to. The dependency for maven is as below:
org.seleniumhq.selenium
selenium-java
2.40.0
Note:
Selenium driver 3.0 and above requires Gecko Driver and needs to be configured in system path similar to Chrome Driver before running tests.
2.3.Project Structure
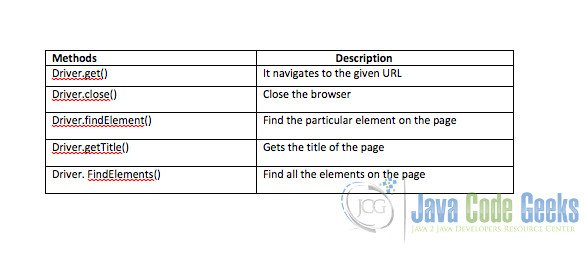
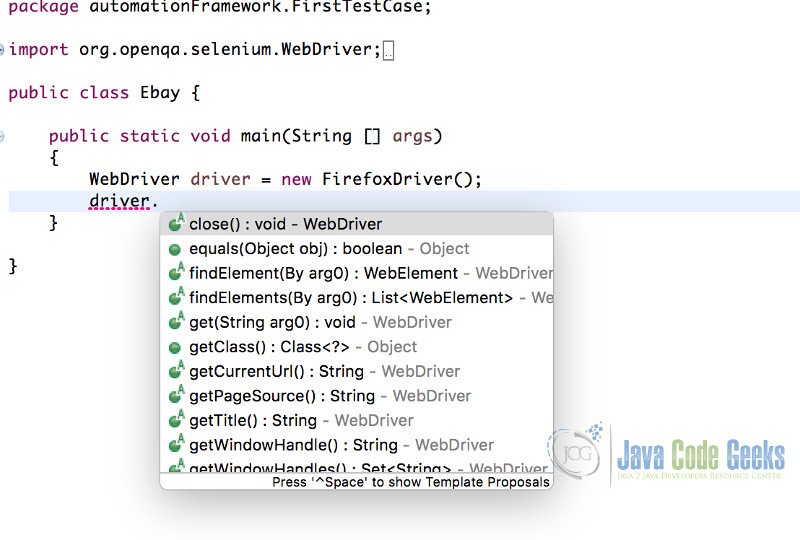
3.Methods available in WebDriver
There are different methods available on the WebDriver API. In order to access them we need to create an instance of the WebDriver.
4.Running Tests on different Browsers
Selenium Supports different kinds of browsers. We need to create an instance of the driver in order to invoke the URL on the browser.
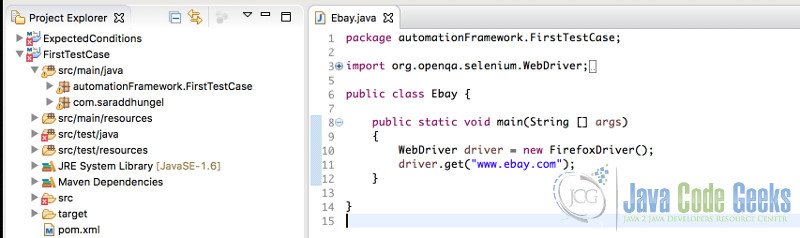
4.1.Working with Firefox
WebDriver driver = new FirefoxDriver();
Note:
For Firefox version 47+, it needs Gecko Driver to be configured in set path.
System.setProperty(“webdriver.gecko.driver”, \\path to gecko driver);
Driver.get(“URL”);
4.2.Working with Chrome
We need to configure set property in order to instantiate the WebDriver object.
String exePath = "/Users/saraddhungel/Downloads/chromedriver";
System.setProperty("webdriver.chrome.driver", exePath);
WebDriver driver = new ChromeDriver();
4.3.Working with Internet Explorer
We need to configure set property similar to Chrome Driver
String exePath = "/Users/saraddhungel/Downloads/chromedriver";
System.setProperty("webdriver.ie.driver", exePath);
InternetExplorerDriver driver = new InternetExplorerDriver();
5. Identifying Elements/Objects on the Web Page
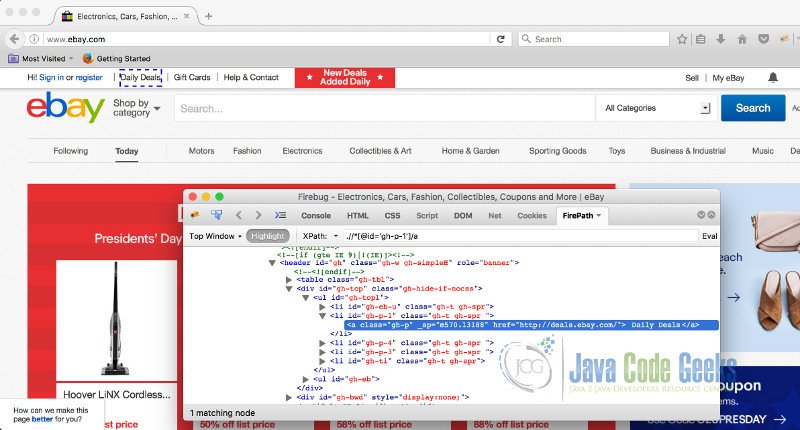
There are few approaches we can take to identify elements or objects on the web page. In Firefox browser, we need add-on called firebug whereas in Chrome and IE browser, the tool is already inbuilt so we don’t need external add-on.
Firebug on Firefox
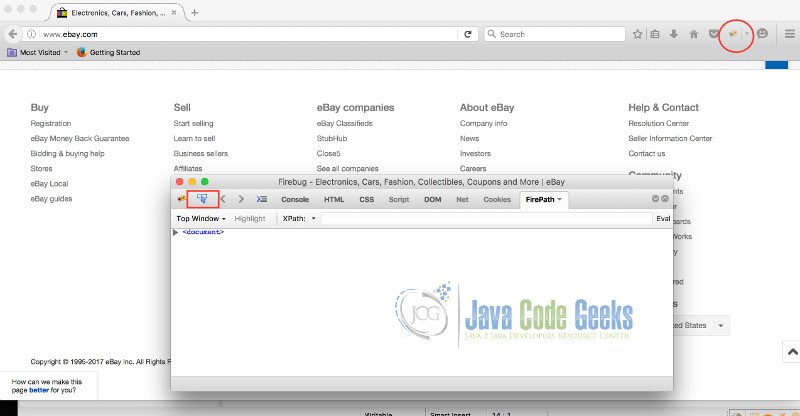
On Chrome Browser, we can inspect the elements by right clicking on the page
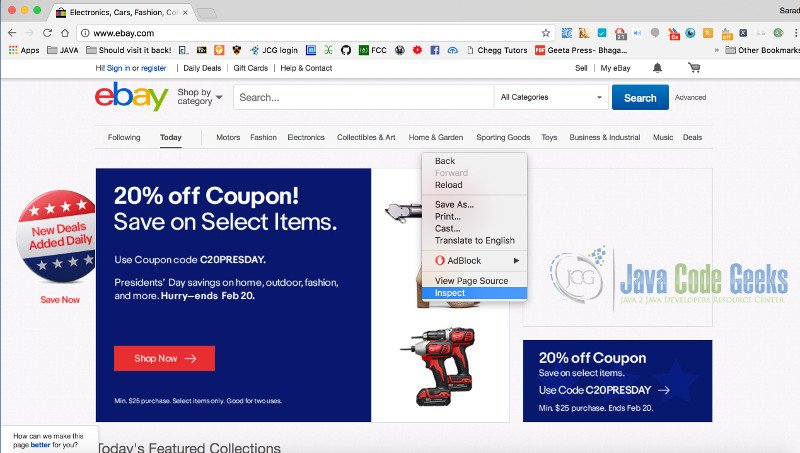
Then a new window will appear on right side with details of the page as below

5.1. By XPath
XPath is most commonly used approach to identify the elements on the page. We can either use Absolute XPath or relative XPath to identify elements. However, relative XPath is most commonly use as it is easier to write custom relative XPath.
The body of XPath looks like below:
.//tagName[@attribute =’value’]
For example :
The tag name of image is img and link is a.
Note:
If we are unsure about tag name we can use ‘*’ instead of tag name as //*[@attribute =’value’]
In this case, the driver would look for that particular attribute in entire page since the tag name is not given.
package automationFramework.FirstTestCase;

import java.util.concurrent.TimeUnit;

import org.openqa.selenium.By;
import org.openqa.selenium.WebDriver;
import org.openqa.selenium.firefox.FirefoxDriver;
import org.testng.annotations.AfterTest;
import org.testng.annotations.BeforeTest;
import org.testng.annotations.Test;

public class Findingelementsbyxpath{

	WebDriver driver = new FirefoxDriver();
	@BeforeTest
	public void setUp(){
		driver.manage().timeouts().implicitlyWait(10, TimeUnit.SECONDS);
		driver.get("https://signin.ebay.com/");
	}
	@Test
	public void findElementbyXpath(){
		driver.findElement(By.xpath(".//*[@id='gh-p-1']/a")).click();
	}
	@AfterTest
	public void doThis(){
		driver.quit();
	}
}
Output
After the test runs, we can see the output as below, where the test successfully passed. As our code contains only one test, it shows number of tests run as 1.
PASSED: findElementbyXpath

===============================================
    Default test
    Tests run: 1, Failures: 0, Skips: 0
===============================================


===============================================
Default suite
Total tests run: 1, Failures: 0, Skips: 0
===============================================

[TestNG] Time taken by [FailedReporter passed=0 failed=0 skipped=0]: 1 ms
[TestNG] Time taken by org.testng.reporters.EmailableReporter2@4e04a765: 28 ms
[TestNG] Time taken by org.testng.reporters.jq.Main@3d8c7aca: 63 ms
[TestNG] Time taken by org.testng.reporters.SuiteHTMLReporter@13969fbe: 24 ms
[TestNG] Time taken by org.testng.reporters.XMLReporter@dfd3711: 10 ms
[TestNG] Time taken by org.testng.reporters.JUnitReportReporter@180bc464: 5005 ms
This code uses TestNG to run the test. As we can see, it creates an instance of Firefox Driver. WebDriver being an interface, we can only instantiate it by creating an object of the FireFox Driver.

@BeforeTest runs before the @Test and on that block, the url gets invoked and also the implicit wait has been used which will make the driver to wait for 10 seconds until it finds the element by given XPath.
@Test In this block the real work happens. the driver will try to find the element by it’s XPath. Once the test runs, @AfterTest will run and the driver will call the quit method to close the browser.
5.2.By ID
This is another better and commonly used approach as most of the time the element on the page will have unique IDs. Ideal for identifying username and password field.
package automationFramework.FirstTestCase;

import java.util.concurrent.TimeUnit;

import org.openqa.selenium.By;
import org.openqa.selenium.WebDriver;
import org.openqa.selenium.firefox.FirefoxDriver;
import org.testng.annotations.AfterTest;
import org.testng.annotations.BeforeTest;
import org.testng.annotations.Test;

public class Findingelementsbyid{

	WebDriver driver = new FirefoxDriver();
	@BeforeTest
	public void setUp(){
		driver.manage().timeouts().implicitlyWait(10, TimeUnit.SECONDS);
		driver.get("https://signin.ebay.com/ws/eBayISAPI.dll?SignIn&ru=http%3A%2F%2Fwww.ebay.com%2F");
	}
	@Test
	public void findElementbyID(){
		driver.findElement(By.id("1628045020")).click();
	}
	@AfterTest
	public void doThis(){
		driver.quit();
	}
}
Output
PASSED: findElementbyID

===============================================
    Default test
    Tests run: 1, Failures: 0, Skips: 0
===============================================


===============================================
Default suite
Total tests run: 1, Failures: 0, Skips: 0
===============================================

[TestNG] Time taken by [FailedReporter passed=0 failed=0 skipped=0]: 1 ms
[TestNG] Time taken by org.testng.reporters.EmailableReporter2@4e04a765: 28 ms
[TestNG] Time taken by org.testng.reporters.jq.Main@3d8c7aca: 63 ms
[TestNG] Time taken by org.testng.reporters.SuiteHTMLReporter@13969fbe: 24 ms
[TestNG] Time taken by org.testng.reporters.XMLReporter@dfd3711: 10 ms
[TestNG] Time taken by org.testng.reporters.JUnitReportReporter@180bc464: 5005 ms
We can see the number of test as 1 and the result as passed. This code also uses TestNG similarly to above code. In this code, @Test block looks for element on the given page with it’s ID instead of XPath. We can also check for the validity of the locator technique by writing corresponding locator technique such as ID or XPath on the firepath; if the element we are looking for is present in DOM, it will highlight the element on DOM as well as on the page.
If it’s not present then search bar on firebug will be red. The best practise to find corresponding element would be to try finding it using firebug, verify there and then write it in our test code so that we can save time.

5.3.By CSS Selector
It is another approach to identify elements and it is comparatively faster than XPath.
The body of CSS Selector looks like this: Tagname[attribute=’value’]
package automationFramework.FirstTestCase;

import java.util.concurrent.TimeUnit;

import org.openqa.selenium.By;
import org.openqa.selenium.WebDriver;
import org.openqa.selenium.firefox.FirefoxDriver;
import org.testng.annotations.AfterTest;
import org.testng.annotations.BeforeTest;
import org.testng.annotations.Test;

public class Findingelementsbycss{

	WebDriver driver = new FirefoxDriver();
	@BeforeTest
	public void setUp(){
		driver.manage().timeouts().implicitlyWait(10, TimeUnit.SECONDS);
		driver.get("https://signin.ebay.com/ws/eBayISAPI.dll?SignIn&ru=http%3A%2F%2Fwww.ebay.com%2F");
	}
	@Test
	public void findElementbyCssselector(){
		driver.findElement(By.CssSelector(input[id=’sgnBt’])).click;
	}
	@AfterTest
	public void doThis(){
		driver.quit();
	}
}
Output
PASSED: findElementbycssselector

===============================================
    Default test
    Tests run: 1, Failures: 0, Skips: 0
===============================================


===============================================
Default suite
Total tests run: 1, Failures: 0, Skips: 0
===============================================

[TestNG] Time taken by [FailedReporter passed=0 failed=0 skipped=0]: 1 ms
[TestNG] Time taken by org.testng.reporters.EmailableReporter2@4e04a765: 28 ms
[TestNG] Time taken by org.testng.reporters.jq.Main@3d8c7aca: 63 ms
[TestNG] Time taken by org.testng.reporters.SuiteHTMLReporter@13969fbe: 24 ms
[TestNG] Time taken by org.testng.reporters.XMLReporter@dfd3711: 10 ms
[TestNG] Time taken by org.testng.reporters.JUnitReportReporter@180bc464: 5005 ms
We can see that the given test has successfully passed. This code performs similar action using TestNG. However, instead of using XPath or ID, it uses CssSelector to find the element on the page. Note the tag for CSS, it looks similar to Xpath but it doesn’t have “//” and “@”. CSS is comparatively faster than XPath.
As we can see on the pic below, when the element is found on the page it highlights the element on the page as well as DOM of the page. Incase, the element is not found it will be red and the element won’t be highlighted.

5.4.By Class Name
This approach is not commonly used as most of time the class names are not used. The method to find element by Class Name is
driver.findElement(By.className("name of class")).click();6.Advantages of Selenium
• The is an open source testing tool unlike other tool like QTP/UFT which requires licenses and is costly.
• It provides API for mobile testing (Appium).
• It supports parallel testing by using Selenium Grids.
• It supports all programming languages and different browsers.
• It uses different methods to expose DOM elements and identifying the elements are easier.
7. Limitations of Selenium
• Selenium is limited to Web Browser testing.
• It doesn’t have default generation tool unlike other automation tool like QPT/UFT.
• It doesn’t support features like Object Repository or Recovery Scenario
8. Conclusion
This tutorial covered all the aspects of getting started with automation tool,Selenium in Java. We covered testing Selenium scripts in popular browsers such as Firefox, Chrome and Internet Explorer. We also covered the techniques used to identifying elements on the browsers and what tools we can use for it. In order to get started with Selenium, one needs some understanding of OOP concept and Java syntax.

thank you. this article helped me so much.
be nice :)
At the command-line about opening Selenium with IE driver you show us the code below:
1 String exePath = “/Users/saraddhungel/Downloads/chromedriver”;
2 System.setProperty(“webdriver.ie.driver”, exePath);
3 InternetExplorerDriver driver = new InternetExplorerDriver();
But, at the line 1 wouldn’t should be:
1 String exePath = “/Users/saraddhungel/Downloads/IEDriverServer”;
Or something like that?
Regards from Brazil.