Maven Tutorial for Beginners
In this tutorial we are going to see how we can install and use maven.
Maven is a build automation tool used mainly for java projects from apache.
We are going to see step by step how you can download and install maven, what are the prerequisites needed in order to do it and a project example.
For this example we use the following technologies:
- Windows 7
- Eclipse Mars.1
- Maven3
- JDK 1.8.0_65 64bits
1. Introduction
Maven is a java tool, so in order to introduce maven we are going to create a simple java project, and build it with maven.
The first thing we are going to do is install maven in your computer, to do that, follow the steps in the next bullet.
Let´s begin!
2. Prerequisites
You must have installed Java in your computer in order to proceed because maven is a java tool. You can download a java JDK here.
Once you have java installed on your system, you must install maven. You can donwload maven from here.
3. Installing maven
In order to install maven you have to follow a few steps:
- Ensure
JAVA_HOMEenvironment variable exists and is set to yourJDKinstallation. - Extract the maven package to any directory you want. If you are under unix system, you can use the following commands:
unzip:unzip apache-maven-3.3.9-bin.zip
or tar:tar xzvf apache-maven-3.3.9-bin.tar.gz
If you are under windows or if you have any extract tool, use it to extract maven.
- Add the
bindirectory to the systemPATHenvironment variable. In unix system you can do the following in a shell session:
export:export PATH=/opt/apache-maven-3.3.9/bin:$PATH
In a windows system, you can access through ‘start + right click on computer’, then choose properties. Click on ‘system avanced configuration’, click on ‘environment variables’ button. Edit
pathenvironment variable and add the mavenbindirectory at the end.
Now you are ready, open a shell window and type mvn -v. You should see the maven version and many other things.
You can follow the full instructions in order to install maven here.
4. Creating an example project
Maven has several archetypes predefined, you can use any of those archetypes and build a basic project in a few seconds. We are going to use a archetype called maven-archetype-quickstart, this archetype will create for us a basic java project with maven directories conventions that will be packaged as a jar file.
To create the project execute the following command in a directory that you will use as workspace
archetype generation:
mvn archetype:generate -DgroupId=com.javacodegeeks.example -DartifactId=jcg-example -DarchetypeArtifactId=maven-archetype-quickstart -DinteractiveMode=false
If you are running maven for the first time, it will take a few seconds to accomplish the generate command because maven has to download all the required plugins and artifacts in order to make the generation task.
Notice now you have a new directory with the same name as the artifactId inside the choosen directory. Below you will see the new directory structure
5. Importing generated project into eclipse
You can build your project in shell environment, but is better work inside of a Java IDE such as eclipse.
To import the generated project into eclipse, open eclipse Mars and choose the workspace directory in which you generated the project in the last bullet.
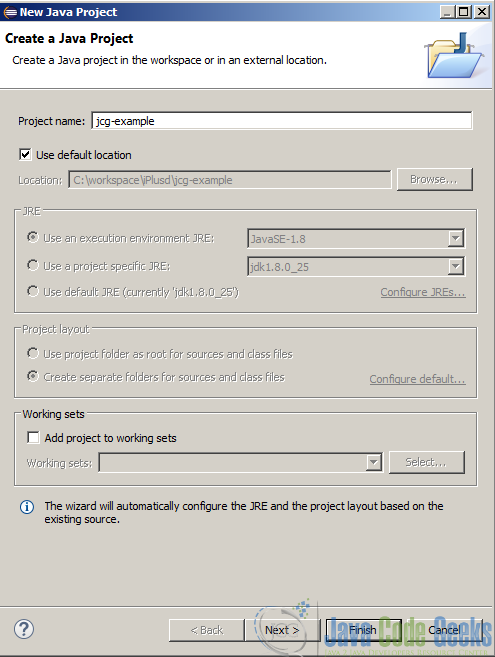
Once eclipse is ready, import the project. Choose File -> New -> Java project. Type jcg-example as project name as you can see in the image below:
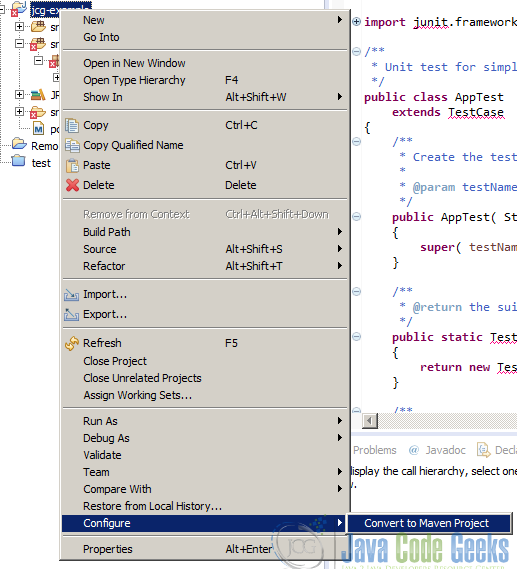
The project is imported but is not under maven nature. Eclipse Mars come out of the box with maven support, so activate it with right click on project and choose Configure -> Convert to Maven project as you can see in the image below:
Now the project is recognized by eclipse as a maven project and all the dependencies will be resolved and added to the classpath automatically.
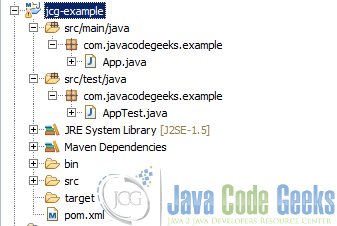
The project structure is the following one:
The dependencies and maven configuration is defined inside the maven configuration file pom.xml, pom means Project Object model. You can see more details about it in the next bullet.
6. Maven config files. POM file
Maven defines a file called pom.xml (Project Object Model) in which you can configure all project features, dependencies, repositories, plugins, etc… to use in order to build your project.
In our example project we have a very simple pom file:
pom.xml file:
<project xmlns="http://maven.apache.org/POM/4.0.0" xmlns:xsi="http://www.w3.org/2001/XMLSchema-instance"
  xsi:schemaLocation="http://maven.apache.org/POM/4.0.0 http://maven.apache.org/maven-v4_0_0.xsd">
  <modelVersion>4.0.0</modelVersion>
  <groupId>com.javacodegeeks.example</groupId>
  <artifactId>jcg-example</artifactId>
  <packaging>jar</packaging>
  <version>1.0-SNAPSHOT</version>
  <name>jcg-example</name>
  <url>http://maven.apache.org</url>
  <dependencies>
    <dependency>
      <groupId>junit</groupId>
      <artifactId>junit</artifactId>
      <version>4.12</version>
      <scope>test</scope>
    </dependency>
  </dependencies>
</project>
The file defines an artifact with com.javacodegeeks.example as groupId, jcg_example as artifactId and 1.0-SNAPSHOT as version.
The pom file tells maven that the project will be packaged as a jar file in the packaging tag.
The pom file defines only one dependency in test scope, that is, junit. You can add all the dependencies you need in the pom file in order to use some other libraries in the desired scope.
You can see more details about de pom.xml file here.
7. Building the project
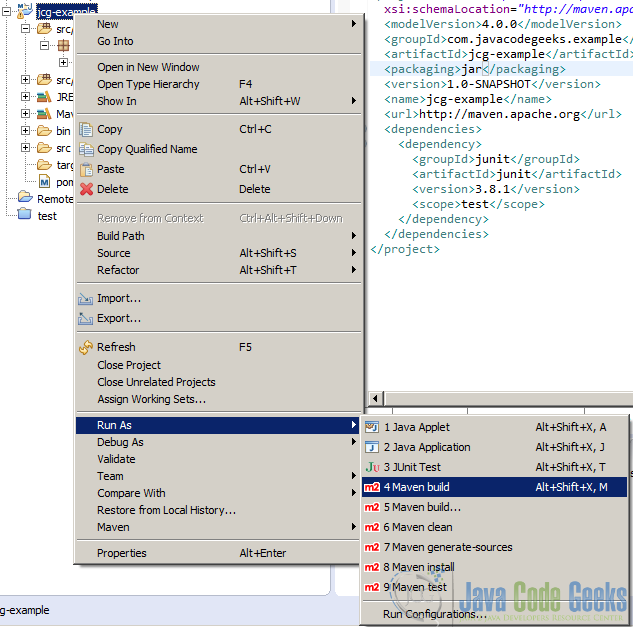
To build the project you only have to do a right-click on the project in eclipse and choose Run as - Maven build as you can see in the image below
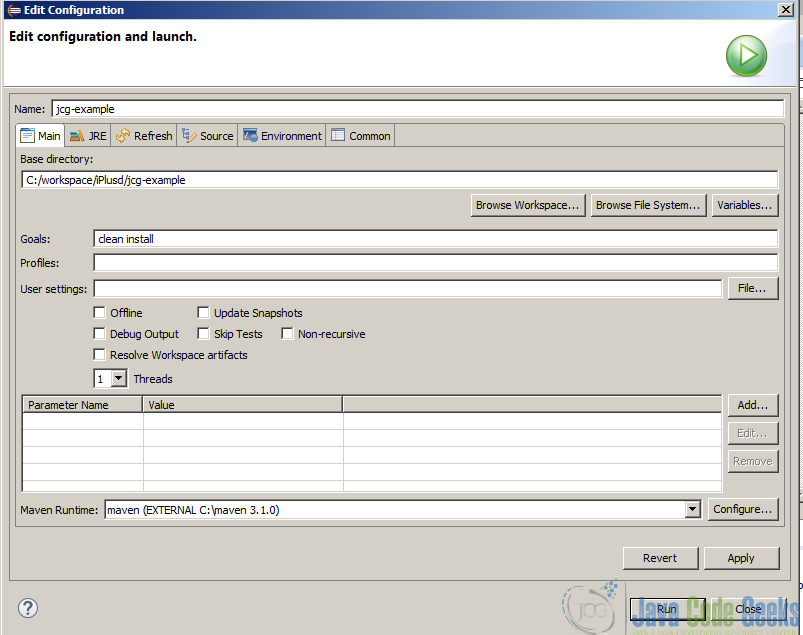
Type clean install as maven goals, the click on run.
You can see a console output like this:
output:
[INFO] Scanning for projects...
[INFO]
[INFO] ------------------------------------------------------------------------
[INFO] Building jcg-example 1.0-SNAPSHOT
[INFO] ------------------------------------------------------------------------
[INFO]
[INFO] --- maven-clean-plugin:2.5:clean (default-clean) @ jcg-example ---
[INFO] Deleting C:\workspace\iPlusd\jcg-example\target
[INFO]
[INFO] --- maven-resources-plugin:2.6:resources (default-resources) @ jcg-example ---
[WARNING] Using platform encoding (Cp1252 actually) to copy filtered resources, i.e. build is platform dependent!
[INFO] skip non existing resourceDirectory C:\workspace\iPlusd\jcg-example\src\main\resources
[INFO]
[INFO] --- maven-compiler-plugin:2.5.1:compile (default-compile) @ jcg-example ---
[WARNING] File encoding has not been set, using platform encoding Cp1252, i.e. build is platform dependent!
[INFO] Compiling 1 source file to C:\workspace\iPlusd\jcg-example\target\classes
[INFO]
[INFO] --- maven-resources-plugin:2.6:testResources (default-testResources) @ jcg-example ---
[WARNING] Using platform encoding (Cp1252 actually) to copy filtered resources, i.e. build is platform dependent!
[INFO] skip non existing resourceDirectory C:\workspace\iPlusd\jcg-example\src\test\resources
[INFO]
[INFO] --- maven-compiler-plugin:2.5.1:testCompile (default-testCompile) @ jcg-example ---
[WARNING] File encoding has not been set, using platform encoding Cp1252, i.e. build is platform dependent!
[INFO] Compiling 1 source file to C:\workspace\iPlusd\jcg-example\target\test-classes
[INFO]
[INFO] --- maven-surefire-plugin:2.12.4:test (default-test) @ jcg-example ---
[INFO] Surefire report directory: C:\workspace\iPlusd\jcg-example\target\surefire-reports

-------------------------------------------------------
 T E S T S
-------------------------------------------------------
Running com.javacodegeeks.example.AppTest
Tests run: 1, Failures: 0, Errors: 0, Skipped: 0, Time elapsed: 0.051 sec

Results :

Tests run: 1, Failures: 0, Errors: 0, Skipped: 0

[INFO]
[INFO] --- maven-jar-plugin:2.4:jar (default-jar) @ jcg-example ---
[INFO] Building jar: C:\workspace\iPlusd\jcg-example\target\jcg-example-1.0-SNAPSHOT.jar
[INFO]
[INFO] --- maven-install-plugin:2.4:install (default-install) @ jcg-example ---
[INFO] Installing C:\workspace\iPlusd\jcg-example\target\jcg-example-1.0-SNAPSHOT.jar to C:\Users\fhernans\.m2\repository\com\javacodegeeks\example\jcg-example\1.0-SNAPSHOT\jcg-example-1.0-SNAPSHOT.jar
[INFO] Installing C:\workspace\iPlusd\jcg-example\pom.xml to C:\Users\fhernans\.m2\repository\com\javacodegeeks\example\jcg-example\1.0-SNAPSHOT\jcg-example-1.0-SNAPSHOT.pom
[INFO] ------------------------------------------------------------------------
[INFO] BUILD SUCCESS
[INFO] ------------------------------------------------------------------------
[INFO] Total time: 3.718s
[INFO] Finished at: Mon Apr 04 20:35:58 CEST 2016
[INFO] Final Memory: 13M/210M
[INFO] ------------------------------------------------------------------------
You can run it from command line, you have to navigate to the project parent directory and type mvn clean install. You will see an output like the previous one.
8. Conclusions
In this tutorial you have seen the basic stuff to create, manage and build a simple jar project with maven. As you have seen, you can quickly create and build a java jar project with maven, delegating some things (like dependency management, life-cycle management, test execution, etc…) to maven so you can focus your efforts in create a very good code in your project.
Hope you enjoy it!

