In this tutorial, we will show you an easy way to run the unit tests of your project, using Apache Maven. Maven is able to execute all declared unit tests, in order to verify that our application works properly, or pop out the appropriate exceptions, in case it doesn’t.
In this example, we use the following tools on a Windows 7 platform:
- Apache Maven 3.1.1
- JDK 1.7
- Eclipse Kepler Service Release 1
We can execute all unit tests with the command:
mvn test
1. Create a sample Application
Please refer to this guide here, in order to verify that you know how to create a Maven Java project. Our main class is called SampleExample. Copy and paste the following code:
SampleExample.java:
package com.javacodegeeks;

import java.util.List;
import java.util.ArrayList;

public class SampleExample {

   private List<Integer> integers = null;

   public SampleExample() {
      integers = new ArrayList<Integer> ();
   }

   public void addInteger(int num) {
      integers.add(num);
   }

   public int getSize() {
      return integers.size();
   }
}
The SampleExample class instantiates and maintains a list of integers. The addInteger method adds a new integer to the list and the getSize method returns the size of the list.
2. Add all Necessary Dependencies
In order to use the jUnit library, we must add the following dependency to our pom.xml file:
<dependency>
   <groupId>junit</groupId>
   <artifactId>junit</artifactId>
   <version>4.11</version>
</dependency>
Also, we must add the following code snippet, in order to specify that JDK 1.7 must be used to compile this project:
<build>
	<sourceDirectory>src</sourceDirectory>
	<plugins>
		<plugin>
			<artifactId>maven-compiler-plugin</artifactId>
			<version>3.1</version>
			<configuration>
				<source>1.7</source>
				<target>1.7</target>
			</configuration>
		</plugin>
	</plugins>
</build>
The final version of our pom.xml file is the following:
pom.xml:
<project xmlns="http://maven.apache.org/POM/4.0.0" xmlns:xsi="http://www.w3.org/2001/XMLSchema-instance"
xsi:schemaLocation="http://maven.apache.org/POM/4.0.0 http://maven.apache.org/xsd/maven-4.0.0.xsd">

   <modelVersion>4.0.0</modelVersion>
   <groupId>com.javacodegeeks</groupId>
   <artifactId>SampleExample</artifactId>
   <version>0.0.1-SNAPSHOT</version>
   <packaging>jar</packaging>

   <dependencies>
      <dependency>
         <groupId>junit</groupId>
         <artifactId>junit</artifactId>
         <version>4.11</version>
      </dependency>
   </dependencies>

   <build>
	<sourceDirectory>src</sourceDirectory>
	<plugins>
		<plugin>
			<artifactId>maven-compiler-plugin</artifactId>
			<version>3.1</version>
			<configuration>
				<source>1.7</source>
				<target>1.7</target>
			</configuration>
		</plugin>
	</plugins>
  </build>
</project>
3. Add some Unit Tests
The next step is to create a couple test cases. Copy and paste the following code:
SampleTest.java:
package com.javacodegeeks;

import org.junit.Assert;
import org.junit.Test;

public class SimpleTest {

   @Test
   public void test() {
      SampleExample example = new SampleExample();
      example.addInteger(10);
      example.addInteger(100);
      Assert.assertEquals(example.getSize(), 2);
   }
}
This test creates an instance of the SampleExample class, adds two integers to its list and verifies that its returned size equals to 2.
AdvancedTest.java:
package com.javacodegeeks;

import org.junit.Assert;
import org.junit.Test;

public class AdvancedTest {

   @Test
   public void test() {
      SampleExample ex1 = new SampleExample();
      ex1.addInteger(10);
      ex1.addInteger(100);

      SampleExample ex2 = new SampleExample();
      ex2.addInteger(10);
      ex2.addInteger(100);
      ex2.addInteger(1000);

      Assert.assertNotEquals(ex1.getSize(), ex2.getSize());
   }
}
This test creates two separate instances of the SampleExample class. We add two and three integers to each instance respectively. Finally, we verify that their sizes are not equal.
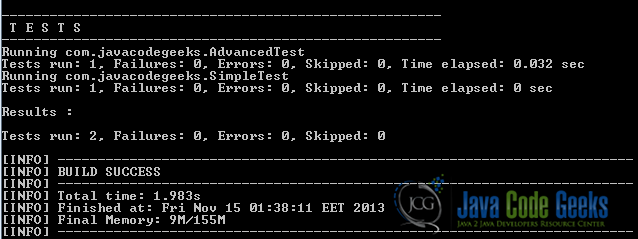
4. Unit Test Execution
In order for all units tests to be executed, we use the command:
mvn test
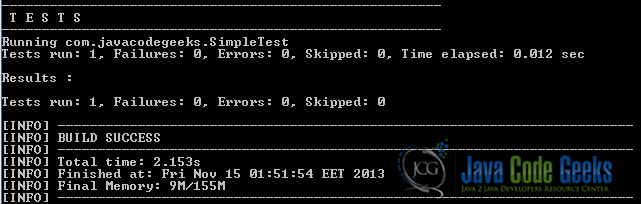
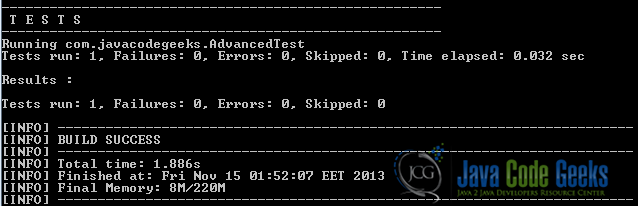
The -Dtest option specifies which unit test shall be executed:
mvn -Dtest=SimpleTest test
mvn -Dtest=AdvancedTest test
5. Download the Eclipse Project
The Eclipse project of this example: SampleExample.zip.
This was a tutorial on how to execute the unit tests of a project, using Apache Maven.
