This is an example that demonstrates how you to use JAX-WS to create a simple Web Service and use Spring Framework to perform Dependency Injection with a bean. There are three ways of exposing Spring POJO services as a JAX–WS web services :
- Exposing Servlet – based web services (suitable for Java EE 5 environments)
- Exporting standalone web services (suitable when utilizing Sun’s JDK 1.6 build–inJAX–WS provider)
- Exporting web services using the JAX–WS RI’s Spring support (similar to the standalone approach, but this time in a Servlet environment. Suitable for non – Java EE environments such as Tomcat, embedding the JAX–WS RI as part of the web application)
In this example we are going to follow the third approach. Sun’s JAX–WS RI, developed as part of the GlassFish project, ships Spring support as part of its JAX–WS Commons project. This allows for defining JAX–WS endpoints as Spring–managed beans, similar to the standalone mode, but this time in a Servlet environment. Note that this is not portable in a Java EE 5 environment; it is mainly intended for non-EE environments such as Tomcat, embedding the JAX–WS RI as part of the web application.
The difference to the standard style of exporting Servlet–based endpoints is that the lifecycle of the endpoint instances themselves will be managed by Spring here, and that there will be only one JAX–WS Servlet defined in web.xml. With the standard Java EE 5 style (as illustrated above), you’ll have one Servlet definition per service endpoint, with each endpoint typically delegating to Spring beans.
So these are the tools we are going to use on a Windows 7 platform:
- JDK 1.7
- Maven 3.1.0
- Eclipse 4.3 Kepler
Because we are going to use Maven to build our project we shall use the Eclipse Maven plugin to create our project. In Eclipse 4.3 Kepler Maven Plugin comes as standard with the IDE.
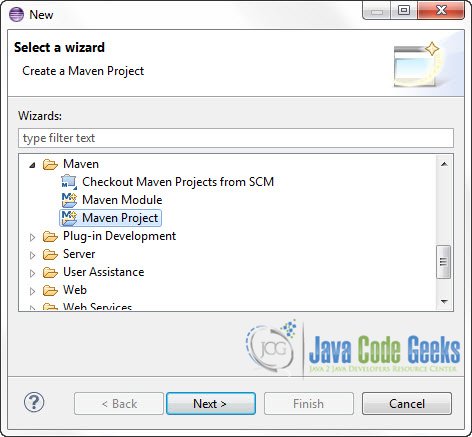
1. Create a new Maven project
Go to File -> Project ->Maven -> Maven Project.
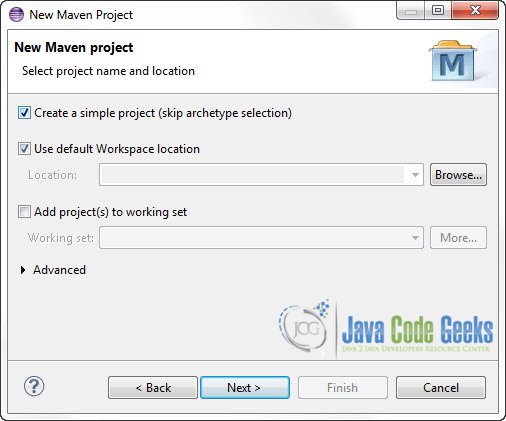
In the “Select project name and location” page of the wizard, make sure that “Create a simple project (skip archetype selection)” option is checked, hit “Next” to continue with default values.
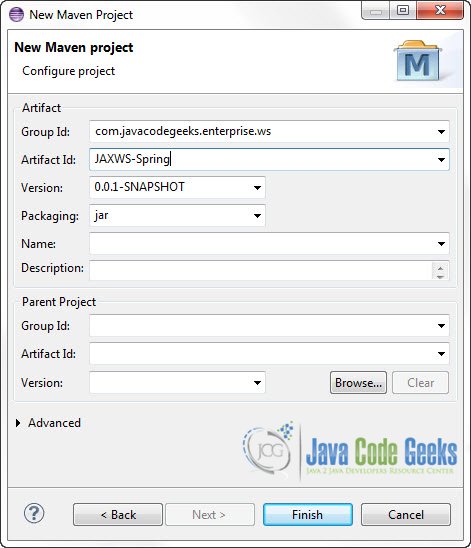
In the “Enter an artifact id” page of the wizard, you can define the name and main package of your project. We will set the “Group Id” variable to "com.javacodegeeks.enterprise.ws" and the “Artifact Id” variable to "JAXWS-Spring". The aforementioned selections compose the main project package as "com.javacodegeeks.snippets.enterprise.ws.JAXWS-Spring" and the project name as "JAXWS-Spring". Hit “Finish” to exit the wizard and to create your project.
The basic Maven project structure consists of the following folders:
- /src/main/java folder, that contains source files for the dynamic content of the application,
- /src/test/java folder contains all source files for unit tests,
- /src/main/resources folder contains configurations files,
- /target folder contains the compiled and packaged deliverables,
- the pom.xml is the project object model (POM) file. The single file that contains all project related configuration.
In our example we are going to use Tomcat to deploy our Web Service. So we need to export out Project in WAR format. As we’ve discussed in JAX-WS Web Services On Tomcat , there are many ways you can generate the WAR file from a Web Application, but we are going to use our IDE for that. So, first of all we need to convert our simple Java project to a Dynamic Web Application. Generating the WAR file is not the only reason you should convert your project, as you can use many Java EE tools that Eclipse offers.
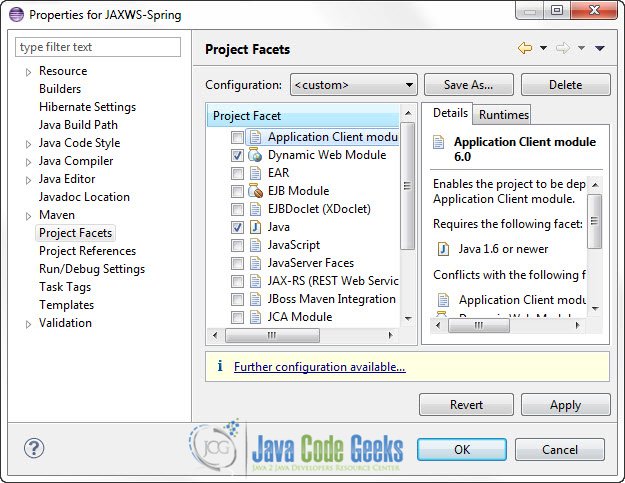
2. Change Project Facet.
Go to the Package Explorer and Right Click on the Project. Go to “Properties”. In the menu on the left go to “Project Facets” and select “Java” and “Dynamic Web Module”:
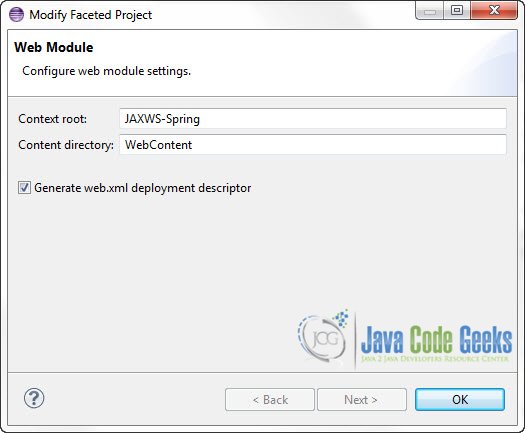
You may also click on “Further configuration available…” link and select ” Generate web.xml deployment descriptor” and “WebContent” as the content directory. Click OK. The click Apply and OK to close the “Properties” window:
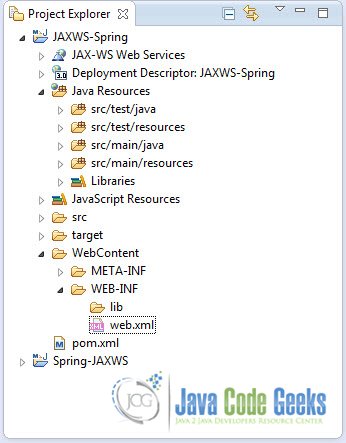
This will convert your Project to a Dynamic Web Module with an auto generated “web.xml” file:
3. Resolve project dependencies in pom.xml
Go to the Package Explorer, navigate to pom.xml file and paste the following code. This will obtain Spring Framwork as well as jaxws-spring library that integrates the two frameworks:
pom.xml:
<project xmlns="http://maven.apache.org/POM/4.0.0" xmlns:xsi="http://www.w3.org/2001/XMLSchema-instance" xsi:schemaLocation="http://maven.apache.org/POM/4.0.0 http://maven.apache.org/xsd/maven-4.0.0.xsd">
  <modelVersion>4.0.0</modelVersion>
  <groupId>com.javacodegeeks.enterprise.ws</groupId>
  <artifactId>JAXWS-Spring</artifactId>
  <version>0.0.1-SNAPSHOT</version>
  <dependencies>
		<dependency>
			<groupId>org.springframework</groupId>
			<artifactId>spring-core</artifactId>
			<version>${spring.version}</version>
		</dependency>
		<dependency>
			<groupId>org.springframework</groupId>
			<artifactId>spring-context</artifactId>
			<version>${spring.version}</version>
		</dependency>

		<dependency>
			<groupId>org.springframework</groupId>
			<artifactId>spring-web</artifactId>
			<version>${spring.version}</version>
		</dependency>

		<dependency>
			<groupId>org.jvnet.jax-ws-commons.spring</groupId>
			<artifactId>jaxws-spring</artifactId>
			<version>1.9</version>
		</dependency>

	</dependencies>

	<properties>
		<spring.version>3.2.3.RELEASE</spring.version>
	</properties>

</project>
As you can see Maven manages library dependencies declaratively. A local repository is created (by default under {user_home}/.m2 folder) and all required libraries are downloaded and placed there from public repositories. Furthermore intra – library dependencies are automatically resolved and manipulated.
4. JAX-WS Web Service Endpoint
Go to the Package Explorer, under “Java Resources/src/main/java” and create a new Package “com.javacodegeeks.enterprise.ws“. In this package we are going to create our JAX-WS Web Service Endpoint Implementation. We are also using Spring to inject a bean in the Web Service Class.
MyWebService.java:
package com.javacodegeeks.enterprise.ws;

import javax.jws.WebMethod;
import javax.jws.WebService;
import javax.jws.soap.SOAPBinding;
import javax.jws.soap.SOAPBinding.Style;
import javax.jws.soap.SOAPBinding.Use;

import com.javacodegeeks.enterprise.bo.MyBObject;

@WebService(serviceName="MyWebService")
@SOAPBinding(style = Style.RPC, use = Use.LITERAL)
public class MyWebService{

	//Dependency Injection (DI) via Spring
	MyBObject myBObject;

	@WebMethod(exclude=true)
	public void setMyBObject(MyBObject bObject) {
		this.myBObject = bObject;
	}

	@WebMethod(operationName="printMessage")
	public String printMessage() {

		return myBObject.printMessage();

	}
}
As you can see we are going to use Spring to inject a bean in our Web Service Class. Some things to notice in the above code:
- We use
serviceName="MyWebService"attribute to the@WebServiceelement. This is to explicitly declare the name of the Web Service. If you don’t use it, the service will be named after the class. - We use
exclude=trueattribute to the@WebMethodelement. This is to state explicitly that this method (setMyBObject) shall not be published in the Web Service. There is no point to publish to the client a method that has to do with our business object MyBObject, as this is only used by Spring for DI purposes. - We use
operationName="printMessage"attribute to the@WebMethodelement. This is to explicitly declare the name of the method on the Web Service. If you don’t use it, the method of the Web Service will be named after the method of the class. - When the client calls printMessage() method, the printMessage() of the business object will be executed.
5. Spring beans
Go to the Package Explorer, under “Java Resources/src/main/java” and create a new Package “com.javacodegeeks.enterprise.bo“. In this package we are going to create our BO interfaces. You may also create “com.javacodegeeks.enterprise.bo.impl“, to put our BO implementations.
MyBObject.java:
package com.javacodegeeks.enterprise.bo;

public interface MyBObject {

	String printMessage();

}
MyBObjectImpl.java:
package com.javacodegeeks.enterprise.bo.impl;

import com.javacodegeeks.enterprise.bo.MyBObject;

public class MyBObjectImpl implements MyBObject {

	@Override
	public String printMessage() {
		return "Hello from Java Code Geeks JAXWS with Spring Tutorial";
	}
}
6. Spring Beans Configuration
Navigate to the “WebConent” folder of the project and create a new “applicationContext.xml” file. This is were we are going to map the /jaxws-spring URL to the com.javacodegeeks.enterprise.ws.MyWebService endpoint (notice that this eliminates the need of the sun-jaxws.xml file). We are also going to wire com.javacodegeeks.enterprise.bo.impl.MyBObjectImpl to MyWebService class using the ref attribute (you could also use the @Autowire annotation in the MyWebService class). This means that the myBObject attribute of the MyWebService class will hold an instance of MyBObjectImpl class.
applicationContext.xml:
<?xml version="1.0" encoding="UTF-8"?>
<beans xmlns="http://www.springframework.org/schema/beans"
       xmlns:xsi="http://www.w3.org/2001/XMLSchema-instance"
       xmlns:ws="http://jax-ws.dev.java.net/spring/core"
       xmlns:wss="http://jax-ws.dev.java.net/spring/servlet"
       xsi:schemaLocation="http://www.springframework.org/schema/beans
       http://www.springframework.org/schema/beans/spring-beans-2.5.xsd
       http://jax-ws.dev.java.net/spring/core
       http://jax-ws.java.net/spring/core.xsd
       http://jax-ws.dev.java.net/spring/servlet
       http://jax-ws.java.net/spring/servlet.xsd">

    <wss:binding url="/jaxws-spring">
        <wss:service>
            <ws:service bean="#myserviceWs"/>
        </wss:service>
    </wss:binding>

    <!-- Web service bean -->
    <bean id="myserviceWs" class="com.javacodegeeks.enterprise.ws.MyWebService">
    	<property name="myBObject" ref="MyBObject" />
    </bean>

    <bean id="MyBObject" class="com.javacodegeeks.enterprise.bo.impl.MyBObjectImpl" />

</beans>
7. web.xml configuration
In web.xml we are going to map /jaxws-spring URL to a com.sun.xml.ws.transport.http.servlet.WSSpringServlet. This would allow your service implementations to receive resource injection via Spring, AOP stuff, logging, etc, etc. This RI extension provides this functionality. You can also register a org.springframework.web.context.ContextLoaderListener. This is an alternative approach to instantiating endpoints inside a servlet container. The Spring context listener provides more flexibility in terms of how an application is wired together. It uses the application’s Spring configuration to determine what object to instantiate and loads the objects into the application context used by the servlet container.
web.xml:
<?xml version="1.0" encoding="UTF-8"?>
<web-app xmlns:xsi="http://www.w3.org/2001/XMLSchema-instance" xmlns="http://java.sun.com/xml/ns/javaee" xsi:schemaLocation="http://java.sun.com/xml/ns/javaee http://java.sun.com/xml/ns/javaee/web-app_3_0.xsd" id="WebApp_ID" version="3.0">
  <display-name>JAXWS-Spring</display-name>

   <servlet>
    	        <servlet-name>jaxws-servlet</servlet-name>
    	       <servlet-class>
    		          com.sun.xml.ws.transport.http.servlet.WSSpringServlet
    	        </servlet-class>
  	</servlet>

	<servlet-mapping>
                <servlet-name>jaxws-servlet</servlet-name>
                <url-pattern>/jaxws-spring</url-pattern>
         </servlet-mapping>

         <!-- Register Spring Listener -->
  	<listener>

        <listener-class>org.springframework.web.context.ContextLoaderListener</listener-class>
    </listener>
</web-app>
8. Set Deployment Assembly
If you try to export the WAR file right now and deploy the Web Service on Tomcat, when starting the Server you will probably get an Exception:
SEVERE: Error configuring application listener of class org.springframework.web.context.ContextLoaderListener
java.lang.ClassNotFoundException: org.springframework.web.context.ContextLoaderListener
	at org.apache.catalina.loader.WebappClassLoader.loadClass(WebappClassLoader.java:1714)
	at org.apache.catalina.loader.WebappClassLoader.loadClass(WebappClassLoader.java:1559)
	at org.apache.catalina.core.DefaultInstanceManager.loadClass(DefaultInstanceManager.java:532)
	at org.apache.catalina.core.DefaultInstanceManager.loadClassMaybePrivileged(DefaultInstanceManager.java:514)
	at org.apache.catalina.core.DefaultInstanceManager.newInstance(DefaultInstan
.
.
.
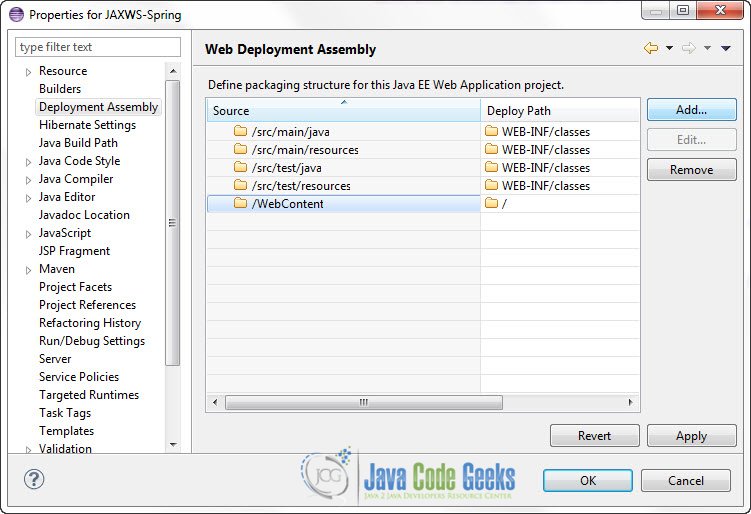
That means that Tomcat cannot find the necessary Spring Libraries in the /WEB-INF/lib folder. In order to export the WAR file with all Maven dependencies in the lib folder you have to go to the Package Explorer, Right click on the Project -> Properties -> Deployment Assembly. Click on the WebContent folder and Click Add:
On the next window click on “Java Build Path Entries” and click “Next”
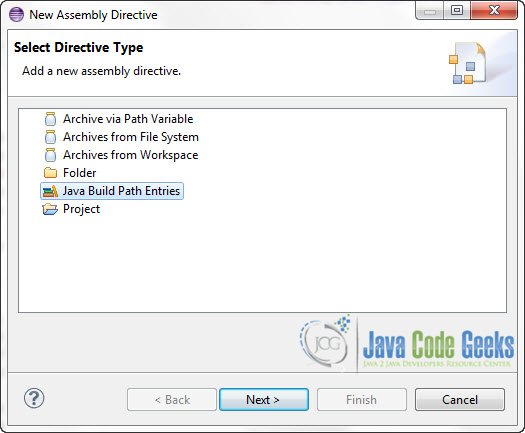
The select all Maven imported libraries:
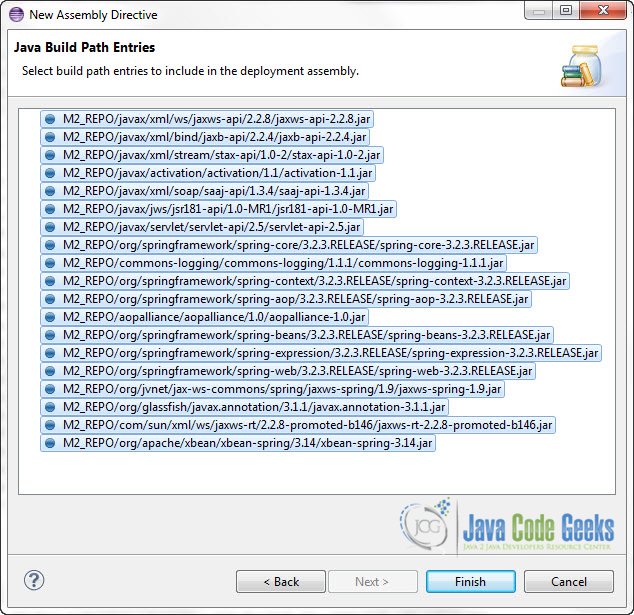
And click “Finish”. Now when you export the WAR file, all of these libraries will be placed in the /WEB-INF/lib folder and thus they become visible to Tomcat.
9. Export WAR file
Now, go to the Package explorer and Right Click on the Project -> Export -> WAR file :
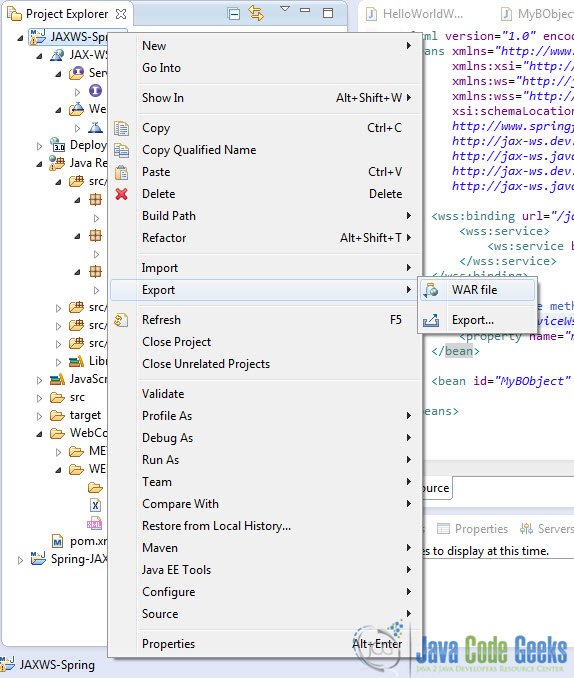
After exporting the WAR file you have to copy it to CATALINA_BASE/webapps folder. There are quite a few ways to create the WAR file. You can use Maven, Ant, or even the jar command line tool.
You should also check out JAX-WS Web Services On Tomcat to see how you can configure Tomcat to to run JAX-WS Web Services.
Now you can start Tomcat. Then put the following URL in your Web Browser :
http://localhost:8080/JAXWS-Spring/jaxws-spring
And:
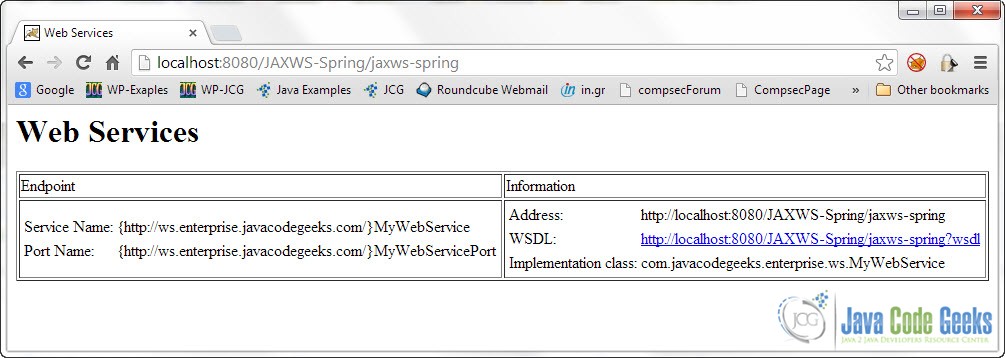
And you can find the WSDL in :
http://localhost:8080/JAXWS-Spring/jaxws-spring?wsdl
WSDL:
<definitions
	xmlns:wsu="http://docs.oasis-open.org/wss/2004/01/oasis-200401-wss-wssecurity-utility-1.0.xsd"
	xmlns:wsp="http://www.w3.org/ns/ws-policy" xmlns:wsp1_2="http://schemas.xmlsoap.org/ws/2004/09/policy"
	xmlns:wsam="http://www.w3.org/2007/05/addressing/metadata" xmlns:soap="http://schemas.xmlsoap.org/wsdl/soap/"
	xmlns:tns="http://ws.enterprise.javacodegeeks.com/" xmlns:xsd="http://www.w3.org/2001/XMLSchema"
	xmlns="http://schemas.xmlsoap.org/wsdl/" targetNamespace="http://ws.enterprise.javacodegeeks.com/"
	name="MyWebService">
	<types />
	<message name="printMessage" />
	<message name="printMessageResponse">
		<part name="return" type="xsd:string" />
	</message>
	<portType name="MyWebService">
		<operation name="printMessage">
			<input
				wsam:Action="http://ws.enterprise.javacodegeeks.com/MyWebService/printMessageRequest"
				message="tns:printMessage" />
			<output
				wsam:Action="http://ws.enterprise.javacodegeeks.com/MyWebService/printMessageResponse"
				message="tns:printMessageResponse" />
		</operation>
	</portType>
	<binding name="MyWebServicePortBinding" type="tns:MyWebService">
		<soap:binding transport="http://schemas.xmlsoap.org/soap/http"
			style="rpc" />
		<operation name="printMessage">
			<soap:operation soapAction="" />
			<input>
				<soap:body use="literal" namespace="http://ws.enterprise.javacodegeeks.com/" />
			</input>
			<output>
				<soap:body use="literal" namespace="http://ws.enterprise.javacodegeeks.com/" />
			</output>
		</operation>
	</binding>
	<service name="MyWebService">
		<port name="MyWebServicePort" binding="tns:MyWebServicePortBinding">
			<soap:address location="http://localhost:8080/JAXWS-Spring/jaxws-spring" />
		</port>
	</service>
</definitions>
This was an example on JAX-WS Spring Integration. Download the Eclipse Project of this example : JAXWS-Spring.zip
