Java JMS “HelloWorld” on JBoss Example
In this article, I am going to show a simple “Hello World” example using JBoss Messaging. Before we get started with it, let me first brief you about JMS. The Java Message Service, JMS in short, is a standard Java API that allows components to communicate with each other using messaging. You have four main components:
JMS Provider is the component that mediates the messages between producer and consumer. It implements the JMS specification and acts as a server. Below are the main components involved:
- Producer sends message to a specific JMS destination
- Consumer listens on a JMS destination to receive the message
- Destination where the message is sent, can be queue or a topic
For this tutorial, we will be use the following tools:
- Eclipse Luna 4.4.1
- JBoss 5.0 AS
- JDK 1.7
You may skip project setup and jump directly to the beginning of the example below.
1. Create a new Java Project
Since we will be creating a producer and consumer, we also need to include ‘JBoss 5.0 Runtime’ to our libraries.
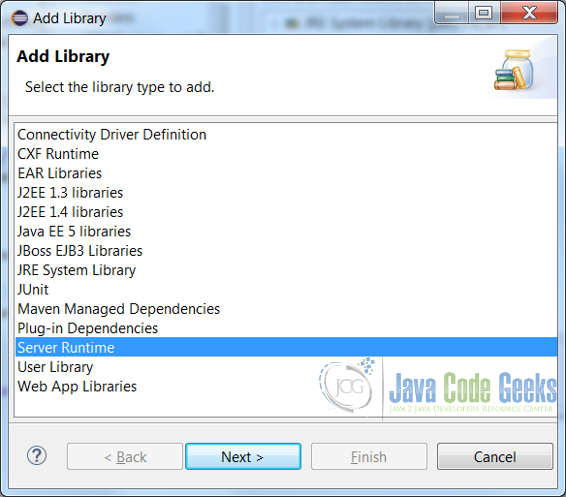
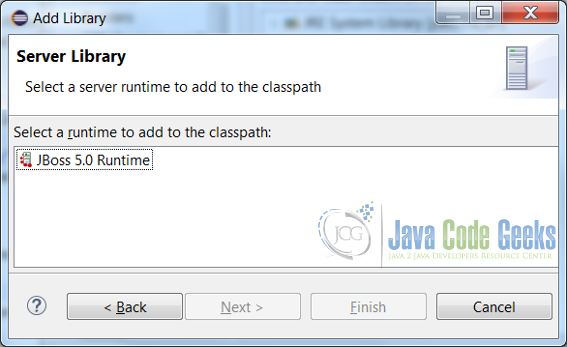
Open ‘Java Build Path’, Click on ‘Add Library’->’Server Runtime’->next->’JBoss 5.0 Runtime’.
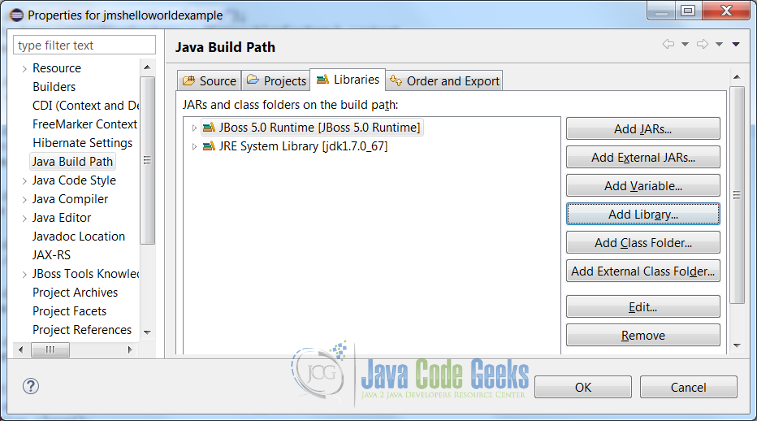
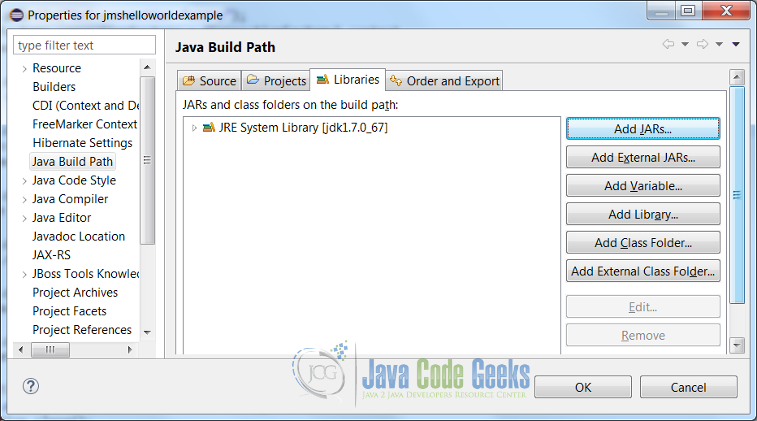
First open ‘Java Build Path’.
Click on ‘Add Library’, select ‘Server Runtime’ and click on ‘Next’

Select ‘JBoss 5.0 Runtime’ and click on finish.

After adding ‘JBoss 5.0 Runtime’, the build path should look like below:

2. Add a new destination queue
Open xml file ${JBOSS_HOME}\server\default\deploy\messaging\destinations-service.xml and copy paste the below mbean element.
   <mbean code="org.jboss.jms.server.destination.QueueService"
      name="jboss.messaging.destination:service=Queue,name=HelloWorldQueue"
      xmbean-dd="xmdesc/Queue-xmbean.xml">
      <depends optional-attribute-name="ServerPeer">jboss.messaging:service=ServerPeer</depends>
      <depends>jboss.messaging:service=PostOffice</depends>
   </mbean>
Notice the name attribute name="jboss.messaging.destination:service=Queue,name=HelloWorldQueue". Since queue will be the Top level domain and HelloWorldQueue will be the middle level domain, our queue name will be combination of both /queue/HelloWorldQueue
3. Start JBoss
Once we have added our own ‘HelloWorldQueue’ queue, we will start the JBoss. You can either start it from eclipse or simply double click on ${JBOSS_HOME}/bin/run.bat.
4. Producer
We will now write our producer.
HellowWorldProducer:
package com.javacodegeeks.examples;

import javax.jms.Connection;
import javax.jms.ConnectionFactory;
import javax.jms.JMSException;
import javax.jms.Message;
import javax.jms.MessageProducer;
import javax.jms.Queue;
import javax.jms.QueueSession;
import javax.jms.Session;
import javax.naming.Context;
import javax.naming.NamingException;

public class HelloWorldProducer {
	public static void main(String[] args) throws NamingException, JMSException {
		Connection connection = null;
		try {
			System.out.println("Create JNDI Context");
			Context context = ContextUtil.getInitialContext();

			System.out.println("Get connection facory");
			ConnectionFactory connectionFactory = (ConnectionFactory) context
					.lookup("ConnectionFactory");

			System.out.println("Create connection");
			connection = connectionFactory.createConnection();

			System.out.println("Create session");
			Session session = connection.createSession(false,
					QueueSession.AUTO_ACKNOWLEDGE);

			System.out.println("Lookup queue");
			Queue queue = (Queue) context.lookup("/queue/HelloWorldQueue");

			System.out.println("Start connection");
			connection.start();

			System.out.println("Create producer");
			MessageProducer producer = session.createProducer(queue);

			System.out.println("Create hello world message");
			Message hellowWorldText = session.createTextMessage("Hello World!");

			System.out.println("Send hello world message");
			producer.send(hellowWorldText);
		} finally {
			if (connection != null) {
				System.out.println("close the connection");
				connection.close();
			}

		}

	}
}
5. JNDI Context
Since both producer and consumer needs JNDI context, the Context creation is in a common utility class. Here is the code that returns us InitialContext. Notice that java.naming.provider.url is set to localhost:1099 as JBossMessaging is running in local machine at port 1099.
ContextUtil:
package com.javacodegeeks.examples;

import java.util.Properties;

import javax.naming.Context;
import javax.naming.InitialContext;
import javax.naming.NamingException;

public class ContextUtil {
	public static Context getInitialContext() throws NamingException {
		Properties props = new Properties();
		props.setProperty("java.naming.factory.initial",
				"org.jnp.interfaces.NamingContextFactory");
		props.setProperty("java.naming.factory.url.pkgs", "org.jboss.naming");
		props.setProperty("java.naming.provider.url", "localhost:1099");
		Context context = new InitialContext(props);
		return context;
	}
}
Before we start coding our consumer, few important points to note from the HelloWorldProducer class.
- We first need a JNDI context
Context context = ContextUtil.getInitialContext(); - Using the context we look up for the
ConnectionFatoryas our goal as a client (producer or consumer) is to first connect to the JMS server.
ConnectionFactory connectionFactory = (ConnectionFactory) context.lookup("ConnectionFactory") - We will ask the
connectionFactoryto create aConnectionobject. - We will use the
Connectionobject to create aSession - In order for the producer to send the message, it needs to know the destination (queue) to which the message should be sent.
- Using our
queuename, we will do a lookup on the context to find ourQueue connection.start()starts the connection. You can imagine this as socket connection from client to server.
Till this point, even consumer will do exactly same as the producer.
session.createProducer(queue)creates the producer. Note that the destination is passed as an argument- Next, we will create a text message
session.createTextMessage("Hello World!") - Finally, we will call
producer.send(hellowWorldText);to send the message.
6. Consumer
Below is the Consumer
HelloWorldConsumer:
package com.javacodegeeks.examples;

import javax.jms.Connection;
import javax.jms.ConnectionFactory;
import javax.jms.JMSException;
import javax.jms.Message;
import javax.jms.MessageConsumer;
import javax.jms.MessageListener;
import javax.jms.Queue;
import javax.jms.QueueSession;
import javax.jms.Session;
import javax.jms.TextMessage;
import javax.naming.Context;
import javax.naming.NamingException;

public class HelloWorldConsumer implements MessageListener {
	public static void main(String[] args) throws NamingException, JMSException {
		Connection connection = null;
		try {
			System.out.println("Create JNDI Context");
			Context context = ContextUtil.getInitialContext();

			System.out.println("Get connection facory");
			ConnectionFactory connectionFactory = (ConnectionFactory) context
					.lookup("ConnectionFactory");

			System.out.println("Create connection");
			connection = connectionFactory.createConnection();

			System.out.println("Create session");
			Session session = connection.createSession(false,
					QueueSession.AUTO_ACKNOWLEDGE);

			System.out.println("Lookup queue");
			Queue queue = (Queue) context.lookup("/queue/HelloWorldQueue");

			System.out.println("Start connection");
			connection.start();

			System.out.println("Create consumer");
			MessageConsumer consumer = session.createConsumer(queue);

			System.out.println("set message listener");
			consumer.setMessageListener(new HelloWorldConsumer());
		} finally {
			if (connection != null) {
				System.out.println("close the connection");
				connection.close();
			}
		}
	}

	@Override
	public void onMessage(Message message) {
		try {
			System.out.println("message received");
			System.out.println(((TextMessage) message).getText());
		} catch (JMSException e) {
			e.printStackTrace();
		}
	}

}
Few points to note:
- We call
session.createConsumer(queue)to create aMessageConsumer - Since the message consumer is going to listen for a new message, we will have to set a
MessageListener - Any class which implements
MessageListenercan act as a listener on the queue for new message - To keep our example simple, we will make our
HelloWorldConsumerimplementMessageListener - The message ‘Hello World!’ is received in
onMessage(message)callback wrapped in typeTextMessage - The actual text message ‘Hello World!’ is retrieved by calling
getText()onTextMessage
7. Run the Example
To test this out, we will first run HelloWorldProducer and then run HelloWorldConsumer
Producer Output
Create JNDI Context
Get connection facory
Create connection
Create session
Lookup queue
Start connection
Create producer
Create hello world message
Send hello world message
close the connection
Consumer Output
Create JNDI Context
Get connection facory
Create connection
Create session
Lookup queue
Start connection
Create consumer
set message listener
close the connection
message received
Hello World!
Download the Eclipse project of this tutorial
This was an example of how to create a JMS ‘Hello World’ example using JBoss Messaging
You can download the full source code of this example here: jmshelloworld.zip


i am getting Exception in thread “main” javax.naming.NameNotFoundException: HelloWorldQueue not bound error while running producer part.
please let me know the solution.