JBoss Drools Spreadsheet Example
This example illustrates JBoss Drools Spreadsheet Example. Before proceeding with this article, we assume readers have a basic knowledge about how a Java n-tier application works. We also assume readers have good understanding of JBoss Drools. For more information on JBoss Drools please refer the article JBoss Drools Best Practices.
1. Introduction
As we already know, Drools is a Rule Engine that uses the rule-based approach to decouple logic from the system. The logic is external to the system in the form of rules which when applied to data, results into the decision making. The rules can be written in .drl files or spreadsheets. In this example, we will see how and when to write rules in a Spreadsheet also called as Decision tables.
2. What is Drools Spreadsheet
Spreadsheets or Decision tables, are a concise visual representation for specifying which actions to perform depending on given conditions. We know rules are defined in a .drl file but if you have lots of similar rules with different values you can make use of Drools Spreadsheet.
Rules that share the same conditions with different parameters can be captured in a Spreadsheet. Drools support managing rules in a spreadsheet format. Supported formats are Excel (XLS), and CSV, which means that a variety of spreadsheet programs (such as Microsoft Excel, OpenOffice.org Calc amongst others) can be utilized.
Decision tables also called Spreadsheets, are a way to generate rules driven from the data entered into a spreadsheet. All the usual features of a spreadsheet for data capture and manipulation can be taken advantage of. Drools Decision Tables are excel based decision tables.
3. When to use Drools Spreadsheet
The main advantage of Drools is that the logic can also be changed by a non technical person. But if we look at the .drl file, any modification will also require technical knowledge. As the .drl becomes more complicated, the more difficult it will become for non technical persons like Business Analysts to edit the .drl file. Also frequent changes to the drools file is a cumbersome task. Hence spreadsheet format decision tables is a very good option to use where something is going to be changed frequently by non-programmers.
4. Drools Spreadsheet example
Lets see an example for Drools Spreadsheet here. We would be needing Java 8, Eclipse Oxygen, and Eclipse Drools plugin in order to proceed. We are using Drools libraries version 6.x for this example. In our previous Drools article we have seen how to install Drools eclipse plugin. Using that plugin, we will be seeing an example of Drools Decision table or spreadsheet here.
4.1 Creating a Drools Project
The Drools project can be created in eclipse by clicking on option File-> New-> Other.
Type Drools in the wizard search box and select “Drools Project”. Click Next.
Enter project name as “JBossDroolsSpreadsheetExample” and click Next.
Select all the checkboxes and click Next.
You might get a warning if the Drools Runtime is not defined like the one below. If so, click on “Configure Workspace Settings” and proceed with configuring the Drools runtime environment.

Select the folder where Drools jar files are downloaded in your local filesystem as explained in previous article.

After clicking OK, select the drools runtime checkbox and click “Apply and Close”.
Click “Finish” and a Drools project is created in the eclipse workspace.
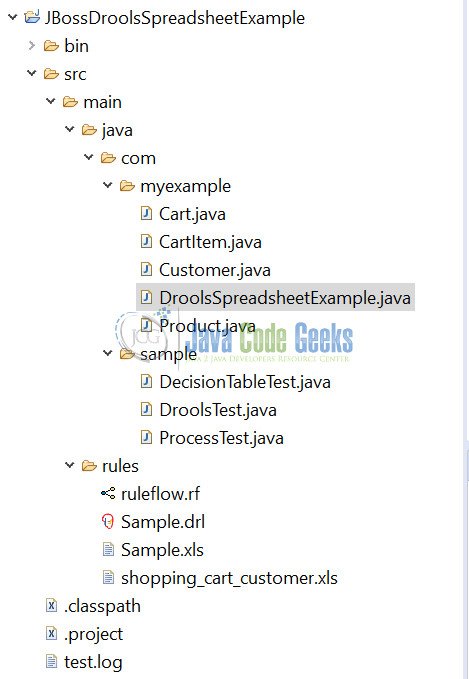
The Drools project looks the one below.

As we see, there are sample files created in the Drools project. The project will automatically create a sample .drl file Sample.drl and a sample xls file Sample.xls, containing a rule. We can als find a java main class DroolsTest to test the rule. We can define the decision tables in an Excel spreadsheet (the .xls file) or a comma separated value (the .csv file) format.
4.2 Writing custom code needed for Drools Spreadsheet example
As we know rules are defined in a .drl file but if we have lots of similar rules with different values we can make use of Drools Decision Tables also called as Drools Spreadsheet. To understand this, lets see an example of Shopping Cart. Once a customer completes his shopping and add all the items to the cart, we will calculate the order price keeping in mind the customer’s attributes.
For example, if the customer has just registered to the site, there will be a 2% discount on the first purchase.
If the customer has a coupon, another 5% discount will be applied on the total price. The coupon code and the percentage amounts may vary. We may also want to add similar rules in future.
Before we start defining the rules in XLS, let’s go through the domain model.
Lets create a package com.myexample and we will be writing the following files to demonstrate our example:
- Product.java – Customer will add one or more products to the cart.
- Customer.java – It has reference to
Cart. The other important attributes are the coupon code and whether the customer is new. - Cart.java – Customer’s cart contain the cart items.
- CartItem.java – Each cart item contains product and quantity ordered.
- shopping_cart_customer.xls – Contains the shopping cart rule in a spreadsheet format.
Here follows the code as described above.
Customer will add one or more products to the cart.
Product.java
package com.myexample;

public class Product {
	private int price;
	private String desc;

	public Product(String desc, int price) {
		this.desc = desc;
		this.price = price;
	}

	public int getPrice() {
		return price;
	}

	public String getDesc() {
		return desc;
	}

	public String toString() {
		return "product: " + desc + ", price: " + price;
	}
}
Customer has reference to Cart. The other important attributes are the coupon code and whether the customer is new.
Customer.java
package com.myexample;

public class Customer {
	private Cart cart;
	private String coupon;
	private boolean isNew;

	public static Customer newCustomer() {
		Customer customer = new Customer();
		customer.isNew = true;
		return customer;
	}

	public boolean getIsNew() {
		return isNew;
	}

	public void addItem(Product product, int qty) {
		if (cart == null) {
			cart = new Cart(this);
		}

		cart.addItem(product, qty);
	}

	public String getCoupon() {
		return coupon;
	}

	public void setCoupon(String coupon) {
		this.coupon = coupon;
	}

	public Cart getCart() {
		return cart;
	}

	public String toString() {
		StringBuilder sb = new StringBuilder();
		sb.append("Customer new? ").append(isNew).append("\nCoupon: ").append(coupon).append("\n").append(cart);

		return sb.toString();
	}
}
Customer’s cart contain the cart items.
Cart.java
package com.myexample;

import java.util.ArrayList;
import java.util.List;

public class Cart {
	private Customer customer;
	private List cartItems = new ArrayList();
	private double discount;

	public Cart(Customer customer) {
		this.customer = customer;
	}

	public void addItem(Product p, int qty) {
		CartItem cartItem = new CartItem(this, p, qty);
		cartItems.add(cartItem);
	}

	public double getDiscount() {
		return discount;
	}

	public void addDiscount(double discount) {
		this.discount += discount;
	}

	public int getTotalPrice() {
		int total = 0;
		for (CartItem item : cartItems) {
			total += item.getProduct().getPrice() * item.getQty();
		}
		return total;
	}

	public Customer getCustomer() {
		return customer;
	}

	public List getCartItems() {
		return cartItems;
	}

	public void setCustomer(Customer customer) {
		this.customer = customer;
	}

	public int getFinalPrice() {
		return getTotalPrice() - (int) getDiscount();
	}

	public String toString() {
		StringBuilder sb = new StringBuilder();
		for (CartItem cartItem : cartItems) {
			sb.append(cartItem).append("\n");
		}
		sb.append("Discount: ").append(getDiscount()).append("\nTotal: ").append(getTotalPrice())
				.append("\nTotal After Discount: ").append(getFinalPrice());

		return sb.toString();
	}

}
Each cart item contains Product and the quantity ordered.
CartItem.java
package com.myexample;

public class CartItem {
	private Cart cart;
	private Product product;
	private int qty;

	public CartItem(Cart cart, Product product, int qty) {
		this.cart = cart;
		this.product = product;
		this.qty = qty;
	}

	public Product getProduct() {
		return product;
	}

	public int getQty() {
		return qty;
	}

	public String toString() {
		return product + ", qty: " + qty;
	}

}
The rule that we want to write in XLS is:
package com.sample;
import com.myexample.Customer;
import com.myexample.Product;

rule "If Coupon==DISC01, apply 5% discount"
when
$customer:Customer(coupon == "DISC01" )
then
$customer.getCart().addDiscount(((double)$customer.getCart().getTotalPrice())*0.05d);
end

rule "If consumer is new, apply 2% discount"
when
$customer:Customer($customer.isNew())
then
$customer.getCart().addDiscount(((double)$customer.getCart().getTotalPrice())*0.02d);
end
We will now write the above in XLS.
4.3 Decision Table in XLS (shopping_cart_customer.xls)
The decision table or spreadsheet has many sections.
The first section (the header section we can say) will include the package, import classes, functions, variables etc. and some notes that we can write.
- RuleSet defines the package
- Import specifies the used classes, including static imported functions
- Notes can be any text
The second section starts with ‘RuleTable’.
- ‘RuleTable’ denotes the start of the decision table.
- It groups rules that operate on the same domain object and conditions.
- The next line defines column types.
- The column types are: NAME, CONDITION and ACTION
- We will use NAME to specify a rule name. If we don’t specify a name, it gets auto-generated.
- CONDITION defines the rule condition
- ACTION is a rule action.
In the next section, we declare the shared objects.
- Our shared object here is
$customer:Customer. - It exposes the
Customerobject as a$customervariable. - Note that the first two columns are merged into one column because they share the same type.
In the next line we define the individual conditions or code blocks (in case of actions).
coupongets converted tocustomer.getCoupon()isNewgets converted tocustomer.getIsNew()- Action contains the code that applies when the condition is satisfied.
$customer.getCart().addDiscount(((double)$customer.getCart().getTotalPrice())*$param);
$paramis substituted by the value provided in the last section
Next, we provide some meaningful description of the column/action.
In the final section, we provide the actual values where each line represents one rule. If a cell doesn’t have a value, then that condition/action is ignored. Please refer the spreadsheet below.

4.4 Running the Spreadsheet Example
To run this example, we will have to create a customer object and add some product items to the cart. Then we will load the spreadsheet in XLS and build the KnowledgeBase to create a stateless knowledge session. The spreadsheet needs a special configuration that is encapsulated in the DecisionTableConfiguration class. This configuration specifies the type of spreadsheet and it is then passed to the knowledge builder. Since the rules are in XLS format, we have to use the DecisionTableInputType.XLS object as the input type.
DecisionTableConfiguration dtconf = KnowledgeBuilderFactory.newDecisionTableConfiguration();
dtconf.setInputType(DecisionTableInputType.XLS);
KnowledgeBuilder knowledgeBuilder = KnowledgeBuilderFactory.newKnowledgeBuilder();
knowledgeBuilder.add(ResourceFactory.newClassPathResource("shopping_cart_customer.xls"),
                ResourceType.DTABLE, dtconf);
Here is the complete code of DroolsSpreadsheetExample class.
DroolsSpreadsheetExample.java
package com.myexample;

import org.kie.api.io.ResourceType;
import org.kie.internal.KnowledgeBase;
import org.kie.internal.KnowledgeBaseFactory;
import org.kie.internal.builder.DecisionTableConfiguration;
import org.kie.internal.builder.DecisionTableInputType;
import org.kie.internal.builder.KnowledgeBuilder;
import org.kie.internal.builder.KnowledgeBuilderFactory;
import org.kie.internal.io.ResourceFactory;
import org.kie.internal.runtime.StatelessKnowledgeSession;

public class DroolsSpreadsheetExample {
	private static StatelessKnowledgeSession session;

	public static void main(String[] args) throws Exception {
		KnowledgeBase knowledgeBase = createKnowledgeBaseFromSpreadsheet();
		session = knowledgeBase.newStatelessKnowledgeSession();

		Customer customer = new Customer();
		Product p1 = new Product("Laptop", 15000);
		Product p2 = new Product("Mobile", 5000);
		Product p3 = new Product("Books", 2000);
		customer.addItem(p1, 1);
		customer.addItem(p2, 2);
		customer.addItem(p3, 5);
		customer.setCoupon("DISC01");
		session.execute(customer);

		System.out.println("First Customer\n" + customer);

		Customer newCustomer = Customer.newCustomer();
		newCustomer.addItem(p1, 1);
		newCustomer.addItem(p2, 2);
		session.execute(newCustomer);

		System.out.println("*********************************");
		System.out.println("Second Customer\n" + customer);
	}

	private static KnowledgeBase createKnowledgeBaseFromSpreadsheet() throws Exception {
		DecisionTableConfiguration dtconf = KnowledgeBuilderFactory.newDecisionTableConfiguration();
		dtconf.setInputType(DecisionTableInputType.XLS);
		KnowledgeBuilder knowledgeBuilder = KnowledgeBuilderFactory.newKnowledgeBuilder();
		knowledgeBuilder.add(ResourceFactory.newClassPathResource("shopping_cart_customer.xls"), ResourceType.DTABLE,
				dtconf);
		if (knowledgeBuilder.hasErrors()) {
			throw new RuntimeException(knowledgeBuilder.getErrors().toString());
		}
		KnowledgeBase knowledgeBase = KnowledgeBaseFactory.newKnowledgeBase();
		knowledgeBase.addKnowledgePackages(knowledgeBuilder.getKnowledgePackages());
		return knowledgeBase;
	}
}
The complete eclipse code structure looks like the screenshot below:

We can now run the Project using Right Click on DroolsSpreadsheetExample class -> Run As -> Java Application. Please see the output as below:

This is the Output Console.

5. Download the Eclipse Project
This example illustrates JBoss Drools Spreadsheet example with code sample.
You can download the full source code of this example here: JBossDroolsSpreadsheetExample


