In this tutorial, I will show you how to setup a Hibernate project with Eclipse.
1. Introduction
Hibernate is an ORM (Object relational mapping) tool for java applications. ORM provides a technique for mapping a data representation from object model to relational data model with an SQL (Structured Query Language) based database schema. Hibernate provides data retrieval facilities, the data query, to reduce development time.
1.1 Hibernate Architecture
There are 4 layers in Hibernate architecture i.e. Java Application Layer, Hibernate Framework Layer, Backhand API Layer and Database Layer. Let’s understand the diagram of hibernate architecture:

For creating the first Hibernate application, we must know the elements of Hibernate architecture. They are as below:
| Element | Description |
|---|---|
| SessionFactory | The SessionFactory is a factory of session and client of Connection Provider. It holds second level cache (optional) of data. |
| Session | The session object provides an interface between the application and data stored in the database. It is a short-lived object and wraps the JDBC connection. It is a factory of Transaction, Query, and Criteria and holds a first-level cache (mandatory) of data. The Session interface provides methods to INSERT, UPDATE and DELETE the object. |
| Transaction | The transaction object specifies the atomic unit of work and is an optional parameter in Hibernate framework. |
| ConnectionProvider | It is a factory of JDBC connections and abstracts the application from Driver Manager or DataSource. It is an optional parameter in Hibernate framework. |
| TransactionFactory | It is a factory of Transaction and is again an optional parameter in Hibernate framework. |
1.2 Hibernate Advantages
There are many advantages of using the hibernate framework, for e.g.
- Hibernate eliminates database dependency from the application. If the application is developed using Hibernate, then it can use any database at any point of time.
- Hibernate increases productivity which has no bounds with application development strategy. We can use either Top-down start with a domain model or bottom-up with an existing database schema.
- An application written in Hibernate is easy to maintain because small pieces of code are more under stable. ORM reduces lines of code because it emphasizes on business logic and as far as object-oriented domain models and business logic in the Java-based middle-tier is concerned Hibernate is a most useful tool.
Now, open up the Eclipse IDE and let’s see how we can create a Hibernate application!
2. Hibernate Example Directory Structure
Here, we are going to create a simple example of Hibernate application using Eclipse IDE. For creating the first Hibernate application in Eclipse IDE, we need to follow the below steps:
- Create the java project.
- Add jar files for hibernate.
- Create the Persistent class.
- Create the mapping file for the Persistent class.
- Create the Configuration file.
- Create the class that retrieves or stores the persistent object.
- Run the application.
2.1 Create a Java project
In Eclipse IDE, go to File -> New -> Java Project. Specify the project details as shown in the below image and click Finish.
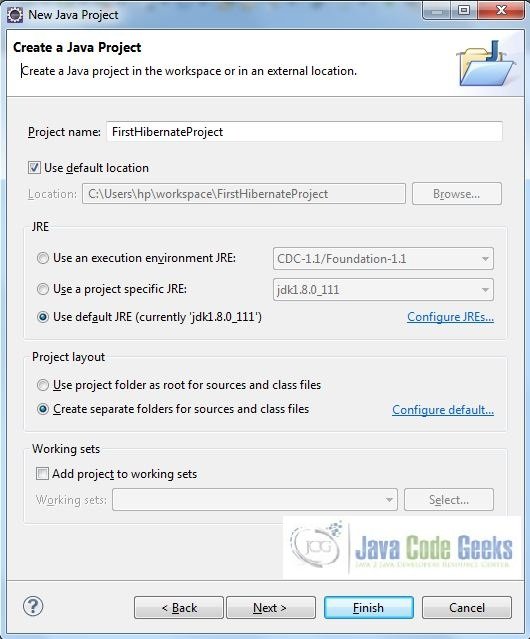
Note: You can select the available Java in your system. In our case, we are using JDK 8 (1.8.0_111).
2.2 Add Jar files for Hibernate
Download the required jar files which contain Hibernate from the official Hibernate website and keep them in an easily identifiable location. To add the jar files, Right click on your project -> Properties -> Java Build Path -> Add External Jars. Now select all the jar files as shown in the image given below and click ok.

Notes:
- In this example, we are connecting the application with MySQL database. So, you must add the MySQL-connector-java-<version>-bin.jar to the project.
- In Dynamic web projects, there are situations where despite adding the required jars to the build path, there would still be a
ClassNotFoundException. To solve this, add all jars again in theprojectRoot/lib folder.
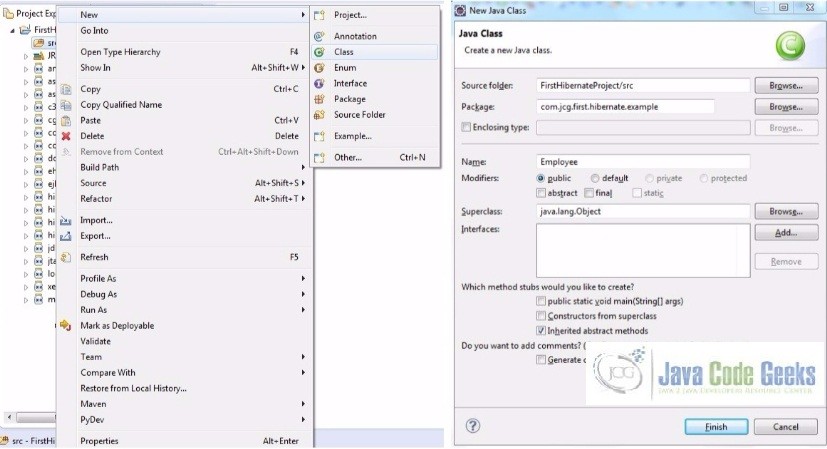
2.3 Create the Persistent class
To create the persistent class, Right click on src -> New -> Class. Specify the class with a package name (for e.g. com.jcg.first.hibernate.example) and click Finish.
Add the following code to it:
Sample Employee.java Code
package com.jcg.first.hibernate.example;

public class Employee {

	private int id;
	private String firstName, lastName;

	public int getId() {
		return id;
	}

	public void setId(int id) {
		this.id = id;
	}

	public String getFirstName() {
		return firstName;
	}

	public void setFirstName(String firstName) {
		this.firstName = firstName;
	}

	public String getLastName() {
		return lastName;
	}

	public void setLastName(String lastName) {
		this.lastName = lastName;
	}
}
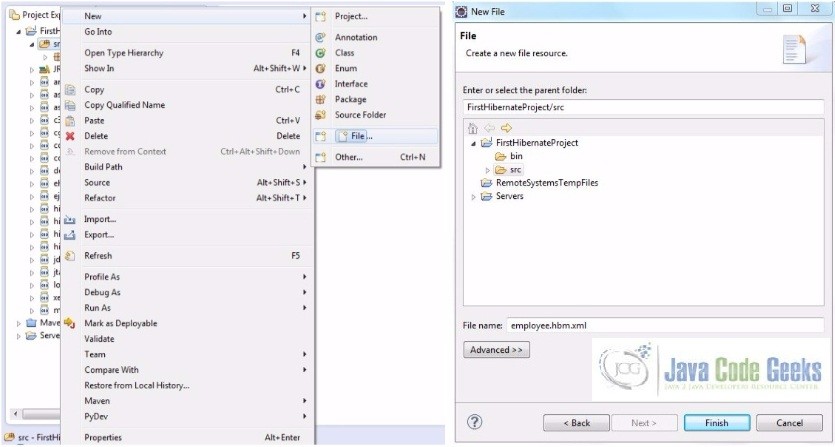
2.4 Create the mapping file for Persistent class
To create the mapping file, Right click on src -> New -> File. Specify the file name (for e.g. employee.hbm.xml) and click Finish. It must be outside the package.
Add the following code to it:
Sample Mapping File
<?xml version='1.0' encoding='UTF-8'?>
<!DOCTYPE hibernate-mapping PUBLIC "-//Hibernate/Hibernate Mapping DTD 3.0//EN" "http://hibernate.sourceforge.net/hibernate-mapping-3.0.dtd">

 <hibernate-mapping>
  <class name="com.jcg.first.hibernate.example.Employee" table="employee">
    <id name="id">
     <generator class="assigned"></generator>
    </id>

    <property name="firstName"></property>
    <property name="lastName"></property>
  </class>
 </hibernate-mapping>
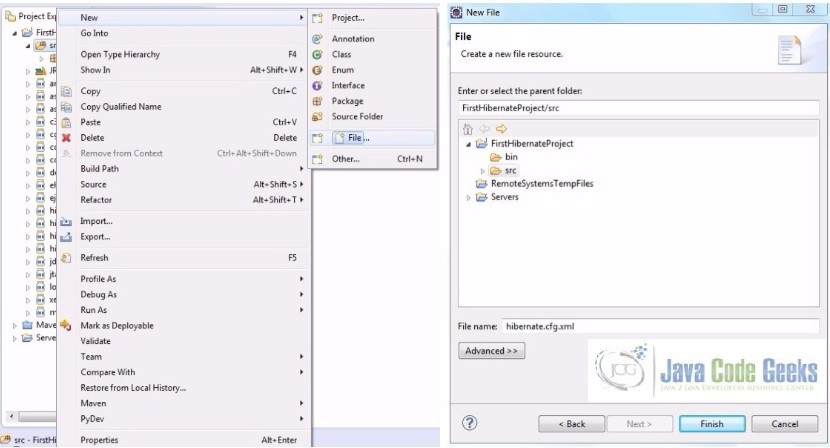
2.5 Create the Hibernate Configuration file
The configuration file contains all the information for the database such as connection_url, driver_class, username, password etc. The hbm2ddl.auto property is used to create the table in the database automatically.

To create the configuration file, Right click on src -> New -> File. Now, specify the configuration file name (for e.g. hibernate.cfg.xml) and click Finish.
Add the following code to it:
Sample Hibernate Configuration File
<?xml version="1.0" encoding="utf-8"?>
<!DOCTYPE hibernate-configuration SYSTEM "http://www.hibernate.org/dtd/hibernate-configuration-3.0.dtd">

<hibernate-configuration>
   <session-factory>
   <property name="hibernate.dialect">org.hibernate.dialect.MySQLDialect</property>
   <property name="hibernate.connection.driver_class">com.mysql.jdbc.Driver</property>

   <!-- Assume testDb Is The Database Name -->
   <property name="hibernate.connection.url">jdbc:mysql://localhost/testDb</property>
   <property name="hibernate.connection.username">root</property>
   <property name="hibernate.connection.password">admin@123</property>

   <!-- List of XML Mapping Files -->
   <mapping resource="employee.hbm.xml"/>

</session-factory>
</hibernate-configuration>
2.6 Create the Hibernate Configuration file
In this class, we are simply storing the employee object to the database. Add the following code to it:
Sample Hibernate Configuration File
package com.jcg.first.hibernate.example;

import org.hibernate.Session;
import org.hibernate.SessionFactory;
import org.hibernate.Transaction;
import org.hibernate.cfg.Configuration;

public class StoreData {

	public static void main(String[] args) {
		// Creating Hibernate Configuration Object
		Configuration cfgObj = new Configuration();
		// Populating the data of the Configuration File
		cfgObj.configure("hibernate.cfg.xml");

		// Creating Session Factory Object
		SessionFactory factoryObj = cfgObj.buildSessionFactory();

		// Creating Session Object
		Session sessionObj = factoryObj.openSession();

		//Creating Transaction Object
		Transaction transObj = sessionObj.beginTransaction();

		Employee empObj = new Employee();
		empObj.setId(101);
		empObj.setFirstName("Java");
		empObj.setLastName("Geek");

		// Persisting The Object
		sessionObj.persist(empObj);

        // Transaction Is Committed To Database
		transObj.commit();
		sessionObj.close();

		System.out.println("Employee Data Successfully Saved In Database!");
	}
}
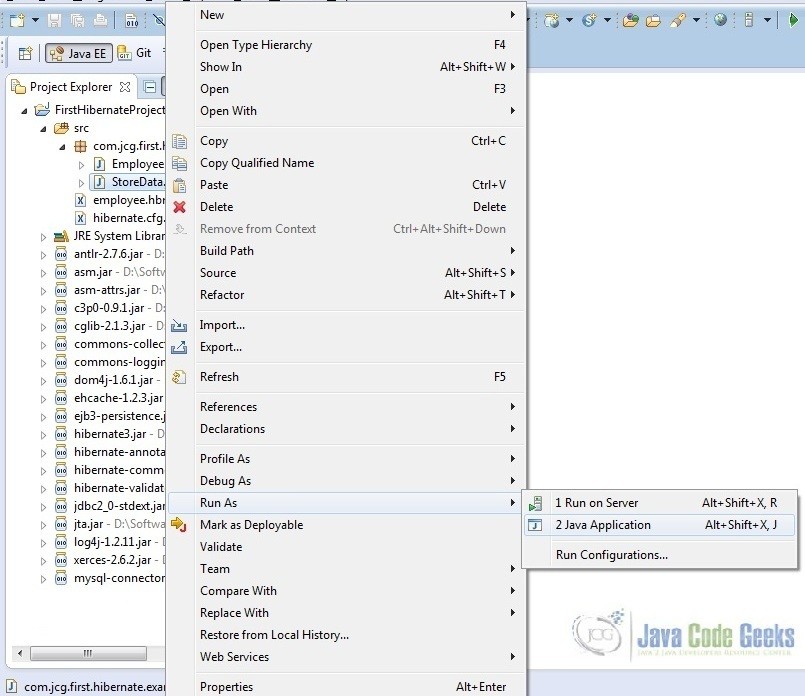
2.7 Run the Application
To run the Hibernate application, Right click on the StoreData class -> Run As -> Java Application.
3. Conclusion
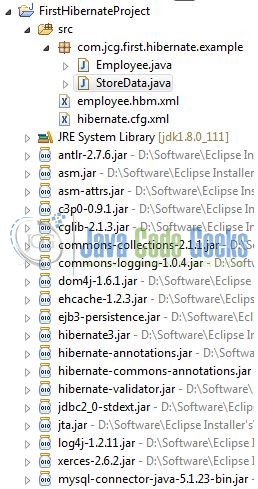
Simple right? Through this example, we learned about the directory structure for a simple Hibernate application. In case you are confused about where you should create the files, you can review the final project structure.
4. Download the Eclipse Project
Download the project from the below link and play around to learn more.
Download
You can download the full source code of this example here: FirstHibernateProject
