Swing is a GUI widget toolkit for Java. It is part of Oracle’s Java Foundation Classes (JFC) – an API for providing a graphical user interface (GUI) for Java programs. Swing was developed to provide a more sophisticated set of GUI components than the earlier Abstract Window Toolkit (AWT). JAVA provides a rich set of libraries to create Graphical User Interface in platform independent way.
1. Introduction
Swing API is set of extensible GUI Components to ease developer’s life to create JAVA based Front End/ GUI Applications. It is build upon top of AWT API and acts as replacement of AWT API as it has almost every control corresponding to AWT controls. Swing component follows a Model-View-Controller architecture to fulfill the following criteria.
- A single API is to be sufficient to support multiple look and feel.
- API is to model driven so that highest level API is not required to have the data.
- API is to use the Java Bean model so that Builder Tools and IDE can provide better services to the developers to use it.
2. JAVA Swing
Unlike AWT, Java Swing provides platform-independent and lightweight components. The javax.swing package provides classes for java swing API such as JButton, JTextField, JTextArea, JRadioButton, JCheckbox, JMenu, JColorChooser etc.
2.1 MVC Architecture
Swing API architecture follows loosely based MVC architecture in the following manner.
- A Model represents component’s data.
- View represents visual representation of the component’s data.
- Controller takes the input from the user on the view and reflects the changes in Component’s data.
- Swing component has Model as a seperate element and View and Controller part are clubbed in User Interface elements. Using this way, Swing has pluggable look-and-feel architecture.
Every user interface considers the following three main aspects:
- UI elements : These are the core visual elements the user eventually sees and interacts with. GWT provides a huge list of widely used and common elements varying from basic to complex.
- Layouts: They define how UI elements should be organized on the screen and provide a final look and feel to the GUI (Graphical User Interface).
- Behavior: These are events which occur when the user interacts with UI elements.
2.2 Swing Features
- Light Weight – Swing components are independent of native Operating System’s API as Swing API controls are rendered mostly using pure JAVA code instead of underlying operating system calls.
- Rich controls – Swing provides a rich set of advanced controls like Tree, TabbedPane, slider, colorpicker, table controls.
- Highly Customizable – Swing controls can be customized in very easy way as visual apperance is independent of internal representation.
- Pluggable look-and-feel– SWING based GUI Application look and feel can be changed at run time based on available values.
2.3 Setup
Popular Java Editors:
To write your java programs you will need a text editor. There are even more sophisticated IDE available in the market. But for now, you can consider one of the following:
- Notepad: On Windows machine you can use any simple text editor like Notepad TextPad.
- NetBeans: is a Java IDE that is open source and free which can be downloaded from http://www.netbeans.org/index.html.
- Eclipse: is also a java IDE developed by the eclipse open source community and can be downloaded from http://www.eclipse.org
Prerequisite
This example is developed on Eclipse therefore a compatible Eclipse IDE is required to be installed on the system.
We also need WindowBuilder tool to be installed on Eclipse IDE for the easiness of the work. To learn how to install WindowBuilder tool please visit the Setup section 2.1 of the following link click here.
3. GridBagLayout Example
GridBagLayout is one of the most flexible — and complex — layout managers the Java platform provides. A GridBagLayout places components in a grid of rows and columns, allowing specified components to span multiple rows or columns. Not all rows necessarily have the same height. Similarly, not all columns necessarily have the same width. Essentially, GridBagLayout places components in rectangles (cells) in a grid, and then uses the components’ preferred sizes to determine how big the cells should be. The resizing behavior is based on weights the program assigns to individual components in the GridBagLayout.
3.1 Specifying Constraints
The following code is typical of what goes in a container that uses a GridBagLayout. You will see a more detailed example in the next section.
GridBagLayoutExample.java
JPanel pane = new JPanel(new GridBagLayout());
GridBagConstraints c = new GridBagConstraints();

//For each component to be added to this container:
//...Create the component...
//...Set instance variables in the GridBagConstraints instance...
pane.add(theComponent, c);
As you might have guessed from the above example, it is possible to reuse the same GridBagConstraints instance for multiple components, even if the components have different constraints. However, it is recommended that you do not reuse GridBagConstraints, as this can very easily lead to you introducing subtle bugs if you forget to reset the fields for each new instance.
You can set the following GridBagConstraints instance variables:
- gridx, gridy: Specify the row and column at the upper left of the component. The leftmost column has address gridx=0 and the top row has address gridy=0. Use GridBagConstraints.RELATIVE (the default value) to specify that the component be placed just to the right of (for gridx) or just below (for gridy) the component that was added to the container just before this component was added. We recommend specifying the gridx and gridy values for each component rather than just using GridBagConstraints.RELATIVE; this tends to result in more predictable layouts.
- gridwidth, gridheight: Specify the number of columns (for gridwidth) or rows (for gridheight) in the component’s display area. These constraints specify the number of cells the component uses, not the number of pixels it uses. The default value is 1. Use GridBagConstraints.REMAINDER to specify that the component be the last one in its row (for gridwidth) or column (for gridheight). Use GridBagConstraints.RELATIVE to specify that the component be the next to last one in its row (for gridwidth) or column (for gridheight). We recommend specifying the gridwidth and gridheight values for each component rather than just using GridBagConstraints.RELATIVE and GridBagConstraints.REMAINDER; this tends to result in more predictable layouts.
- fill:Used when the component’s display area is larger than the component’s requested size to determine whether and how to resize the component. Valid values (defined as GridBagConstraints constants) include NONE (the default), HORIZONTAL (make the component wide enough to fill its display area horizontally, but do not change its height), VERTICAL (make the component tall enough to fill its display area vertically, but do not change its width), and BOTH (make the component fill its display area entirely).
- ipadx, ipady :Specifies the internal padding: how much to add to the size of the component. The default value is zero. The width of the component will be at least its minimum width plus ipadx*2 pixels, since the padding applies to both sides of the component. Similarly, the height of the component will be at least its minimum height plus ipady*2 pixels.
- insets:Specifies the external padding of the component — the minimum amount of space between the component and the edges of its display area. The value is specified as an Insets object. By default, each component has no external padding.
- weightx, weighty: Specifying weights is an art that can have a significant impact on the appearance of the components a GridBagLayout controls. Weights are used to determine how to distribute space among columns (weightx) and among rows (weighty); this is important for specifying resizing behavior.
Unless you specify at least one non-zero value for weightx or weighty, all the components clump together in the center of their container. This is because when the weight is 0.0 (the default), the GridBagLayout puts any extra space between its grid of cells and the edges of the container.
Generally weights are specified with 0.0 and 1.0 as the extremes: the numbers in between are used as necessary. Larger numbers indicate that the component’s row or column should get more space. For each column, the weight is related to the highest weightx specified for a component within that column, with each multicolumn component’s weight being split somehow between the columns the component is in. Similarly, each row’s weight is related to the highest weighty specified for a component within that row. Extra space tends to go toward the rightmost column and bottom row.
3.2 Example
The following code creates the GridBagLayout and the components it manages. You can find the entire source file in GridBagLayoutDemo.java.
GridBagLayoutExample.java
JButton button;
pane.setLayout(new GridBagLayout());
GridBagConstraints c = new GridBagConstraints();
if (shouldFill) {
//natural height, maximum width
c.fill = GridBagConstraints.HORIZONTAL;
}
button = new JButton("Button 1");
if (shouldWeightX) {
c.weightx = 0.5;
}
c.fill = GridBagConstraints.HORIZONTAL;
c.gridx = 0;
c.gridy = 0;
pane.add(button, c);
button = new JButton("Button 2");
c.fill = GridBagConstraints.HORIZONTAL;
c.weightx = 0.5;
c.gridx = 1;
c.gridy = 0;
pane.add(button, c);
button = new JButton("Button 3");
c.fill = GridBagConstraints.HORIZONTAL;
c.weightx = 0.5;
c.gridx = 2;
c.gridy = 0;
pane.add(button, c);
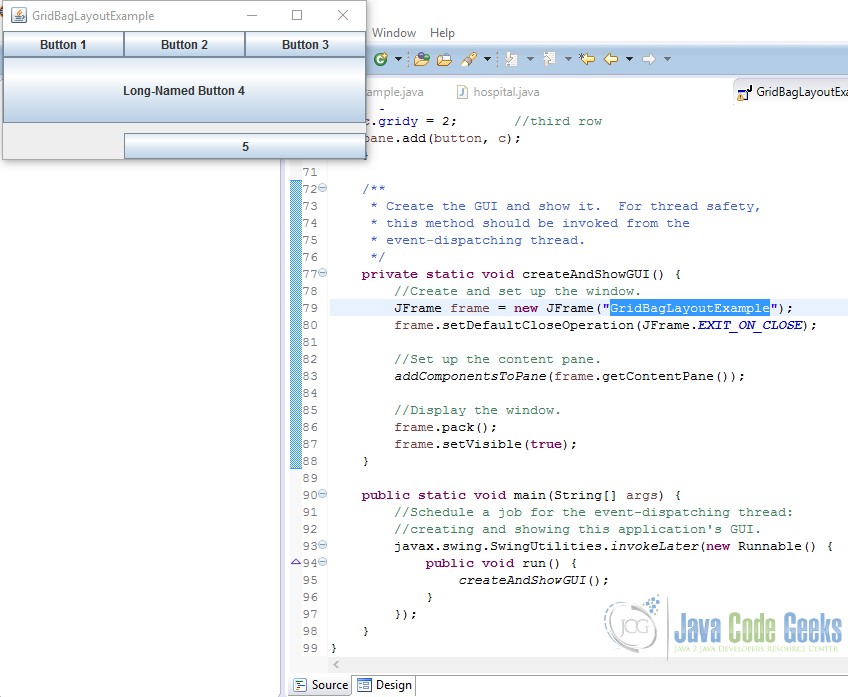
button = new JButton("Long-Named Button 4");
c.fill = GridBagConstraints.HORIZONTAL;
c.ipady = 40; //make this component tall
c.weightx = 0.0;
c.gridwidth = 3;
c.gridx = 0;
c.gridy = 1;
pane.add(button, c);
button = new JButton("5");
c.fill = GridBagConstraints.HORIZONTAL;
c.ipady = 0; //reset to default
c.weighty = 1.0; //request any extra vertical space
c.anchor = GridBagConstraints.PAGE_END; //bottom of space
c.insets = new Insets(10,0,0,0); //top padding
c.gridx = 1; //aligned with button 2
c.gridwidth = 2; //2 columns wide
c.gridy = 2; //third row
pane.add(button, c);
This example uses one GridBagConstraints instance for all the components the GridBagLayout manages, however in real-life situations it is recommended that you do not reuse GridBagConstraints, as this can very easily lead to you introducing subtle bugs if you forget to reset the fields for each new instance.
Just before each component is added to the container, the code sets (or resets to default values) the appropriate instance variables in the GridBagConstraints object. It then adds the component to its container, specifying the GridBagConstraints object as the second argument to the add method.
For example, to make button 4 be extra tall, the example has this code:
GridBagLayoutExample.java
c.ipady = 40;
And before setting the constraints of the next component, the code resets the value of ipady to the default:
GridBagLayoutExample.java
c.ipady = 0;
If a component’s display area is larger than the component itself, then you can specify whereabouts in the display area the component will be displayed by using the GridBagConstraints.anchor constraint. The anchor constraint’s values can be absolute (north, south, east, west, and so on), or orientation-relative (at start of page, at end of line, at the start of the first line, and so on), or relative to the component’s baseline.
3.3 Output
Below is the snapshot of output.
4. Download The Source Code
This was an example of JavaGridBaglayout Example.
Download
You can download the full source code of this example here: GridBagLayoutExample
