Swing is a GUI widget toolkit for Java. It is part of Oracle’s Java Foundation Classes (JFC) – an API for providing a graphical user interface (GUI) for Java programs. Swing was developed to provide a more sophisticated set of GUI components than the earlier Abstract Window Toolkit (AWT). JAVA provides a rich set of libraries to create Graphical User Interface in platform independent way.
Swing API is set of extensible GUI Components to ease developer’s life to create JAVA based Front End/ GUI Applications. It is build upon top of AWT API and acts as replacement of AWT API as it has almost every control corresponding to AWT controls. Swing component follows a Model-View-Controller architecture to fulfill the following criteria.
- A single API is to be sufficient to support multiple look and feel.
- API is to model driven so that highest level API is not required to have the data.
- API is to use the Java Bean model so that Builder Tools and IDE can provide better services to the developers to use it.
2. JAVA Swing
Unlike AWT, Java Swing provides platform-independent and lightweight components.
The javax.swing package provides classes for java swing API such as JButton, JTextField, JTextArea, JRadioButton, JCheckbox, JMenu, JColorChooser etc.
2.1 MVC Architecture
Swing API architecture follows loosely based MVC architecture in the following manner.
- A Model represents component’s data.
- View represents visual representation of the component’s data.
- Controller takes the input from the user on the view and reflects the changes in Component’s data.
- Swing component have Model as a seperate element and View and Controller part are clubbed in User Interface elements. Using this way, Swing has pluggable look-and-feel architecture.
Every user interface considers the following three main aspects:
- UI elements : These are the core visual elements the user eventually sees and interacts with. GWT provides a huge list of widely used and common elements varying from basic to complex.
- Layouts: They define how UI elements should be organized on the screen and provide a final look and feel to the GUI (Graphical User Interface).
- Behavior: These are events which occur when the user interacts with UI elements.
2.2 Swing Features
- Light Weight – Swing component are independent of native Operating System’s API as Swing API controls are rendered mostly using pure JAVA code instead of underlying operating system calls.
- Rich controls – Swing provides a rich set of advanced controls like Tree, TabbedPane, slider, colorpicker, table controls.
- Highly Customizable – Swing controls can be customized in very easy way as visual apperance is independent of internal representation.
- Pluggable look-and-feel– SWING based GUI Application look and feel can be changed at run time based on available values.
2.3 Setup
Popular Java Editors:
To write your java programs you will need a text editor. There are even more sophisticated IDE available in the market. But for now, you can consider one of the following:
- Notepad: On Windows machine you can use any simple text editor like Notepad TextPad.
- NetBeans: is a Java IDE that is open source and free which can be downloaded from http://www.netbeans.org/index.html.
- Eclipse: is also a java IDE developed by the eclipse open source community and can be downloaded from http://www.eclipse.org
Prerequisite
This example is developed on Eclipse therefore a compatible Eclipse IDE is required to be installed on the system.
We also need WindowBuilder tool to be installed on Eclipse IDE for the easiness of the work. To learn how to install WindowBuilder tool please visit the Setup section 2.1 of the following link click here.
3. How to Use FlowLayout
The FlowLayout class provides a very simple layout manager that is used, by default, by the JPanel objects. The FlowLayout class puts components in a row, sized at their preferred size. If the horizontal space in the container is too small to put all the components in one row, the FlowLayout class uses multiple rows. If the container is wider than necessary for a row of components, the row is, by default, centered horizontally within the container.
To specify that the row is to aligned either to the left or right, use a FlowLayout constructor that takes an alignment argument. Another constructor of the FlowLayout class specifies how much vertical or horizontal padding is put around the components.
The code snippet below creates a FlowLayout object and the components it manages.
FlowLayoutDemoExample.java
FlowLayout experimentLayout = new FlowLayout();
final String RtoL = "Right to left";
final String LtoR = "Left to right";
JButton applyButton = new JButton("Apply component orientation");

public FlowLayoutDemo(String name) {
super(name);
}

public void addComponentsToPane(final Container pane) {
final JPanel compsToExperiment = new JPanel();
compsToExperiment.setLayout(experimentLayout);
experimentLayout.setAlignment(FlowLayout.TRAILING);
JPanel controls = new JPanel();
controls.setLayout(new FlowLayout());

LtoRbutton = new JRadioButton(LtoR);
LtoRbutton.setActionCommand(LtoR);
LtoRbutton.setSelected(true);
RtoLbutton = new JRadioButton(RtoL);
RtoLbutton.setActionCommand(RtoL);

//Add buttons to the experiment layout
compsToExperiment.add(new JButton("Button 1"));
compsToExperiment.add(new JButton("Button 2"));
compsToExperiment.add(new JButton("Button 3"));
compsToExperiment.add(new JButton("Long-Named Button 4"));
compsToExperiment.add(new JButton("5"));
Select either the Left to Right or Right to Left option and click the Apply orientation button to set up the component’s orientation. The following code snippet applies the Left to Right components orientation to the Layout.
FlowLayoutDemoExample.java
compsToExperiment.setComponentOrientation(
                ComponentOrientation.LEFT_TO_RIGHT);
3.1 The FlowLayout API
The following table lists constructors of the FlowLayout class.
FlowLayout(): Constructs a newFlowLayoutobject with a centered alignment and horizontal and vertical gaps with the default size of 5 pixels.FlowLayout(int align): Creates a new flow layout manager with the indicated alignment and horizontal and vertical gaps with the default size of 5 pixels. The alignment argument can be FlowLayout.LEADING, FlowLayout.CENTER, or FlowLayout.TRAILING. When the FlowLayout object controls a container with a left-to right component orientation (the default), the LEADING value specifies the components to be left-aligned and the TRAILING value specifies the components to be right-aligned.FlowLayout (int align, int hgap, int vgap):Creates a new flow layout manager with the indicated alignment and the indicated horizontal and vertical gaps. The hgap and vgap arguments specify the number of pixels to put between components.
3.2 Code
The code below describes the Flowlayout example.
FlowLayoutDemoExample.java
package swing_1;

//import java.awt.EventQueue;

import javax.swing.JFrame;

import java.awt.*;
import java.awt.event.*;
import javax.swing.*;
//import java.util.*;

public class FlowLayoutDemo extends JFrame{
JRadioButton RtoLbutton;
JRadioButton LtoRbutton;
FlowLayout experimentLayout = new FlowLayout();
final String RtoL = "Right to left";
final String LtoR = "Left to right";
JButton applyButton = new JButton("Apply component orientation");

public FlowLayoutDemo(String name) {
super(name);
}

public void addComponentsToPane(final Container pane) {
final JPanel compsToExperiment = new JPanel();
compsToExperiment.setLayout(experimentLayout);
experimentLayout.setAlignment(FlowLayout.TRAILING);
JPanel controls = new JPanel();
controls.setLayout(new FlowLayout());

LtoRbutton = new JRadioButton(LtoR);
LtoRbutton.setActionCommand(LtoR);
LtoRbutton.setSelected(true);
RtoLbutton = new JRadioButton(RtoL);
RtoLbutton.setActionCommand(RtoL);

//Add buttons to the experiment layout
compsToExperiment.add(new JButton("Button 1"));
compsToExperiment.add(new JButton("Button 2"));
compsToExperiment.add(new JButton("Button 3"));
compsToExperiment.add(new JButton("Long-Named Button 4"));
compsToExperiment.add(new JButton("5"));
//Left to right component orientation is selected by default
compsToExperiment.setComponentOrientation(
ComponentOrientation.LEFT_TO_RIGHT);

//Add controls to set up the component orientation in the experiment layout
final ButtonGroup group = new ButtonGroup();
group.add(LtoRbutton);
group.add(RtoLbutton);
controls.add(LtoRbutton);
controls.add(RtoLbutton);
controls.add(applyButton);

//Process the Apply component orientation button press
applyButton.addActionListener(new ActionListener(){
public void actionPerformed(ActionEvent e){
String command = group.getSelection().getActionCommand();
//Check the selection
if (command.equals("Left to right")) {
compsToExperiment.setComponentOrientation(
ComponentOrientation.LEFT_TO_RIGHT);
} else {
compsToExperiment.setComponentOrientation(
ComponentOrientation.RIGHT_TO_LEFT);
}
//update the experiment layout
compsToExperiment.validate();
compsToExperiment.repaint();
}
});
pane.add(compsToExperiment, BorderLayout.CENTER);
pane.add(controls, BorderLayout.SOUTH); ;
}

/**
* Create the GUI and show it.  For thread safety,
* this method should be invoked from the
* event dispatch thread.
*/
private static void createAndShowGUI() {
//Create and set up the window.
FlowLayoutDemo frame = new FlowLayoutDemo("FlowLayoutDemo");
frame.setDefaultCloseOperation(JFrame.EXIT_ON_CLOSE);
//Set up the content pane.
frame.addComponentsToPane(frame.getContentPane());
//Display the window.
frame.pack();
frame.setVisible(true);
}

public static void main(String[] args) {
/* Use an appropriate Look and Feel */
try {
//UIManager.setLookAndFeel("com.sun.java.swing.plaf.windows.WindowsLookAndFeel");
UIManager.setLookAndFeel("javax.swing.plaf.metal.MetalLookAndFeel");
} catch (UnsupportedLookAndFeelException ex) {
ex.printStackTrace();
} catch (IllegalAccessException ex) {
ex.printStackTrace();
} catch (InstantiationException ex) {
ex.printStackTrace();
} catch (ClassNotFoundException ex) {
ex.printStackTrace();
}
/* Turn off metal's use of bold fonts */
UIManager.put("swing.boldMetal", Boolean.FALSE);
//Schedule a job for the event dispatchi thread:
//creating and showing this application's GUI.
javax.swing.SwingUtilities.invokeLater(new Runnable() {
public void run() {
createAndShowGUI();
}
});
}
}
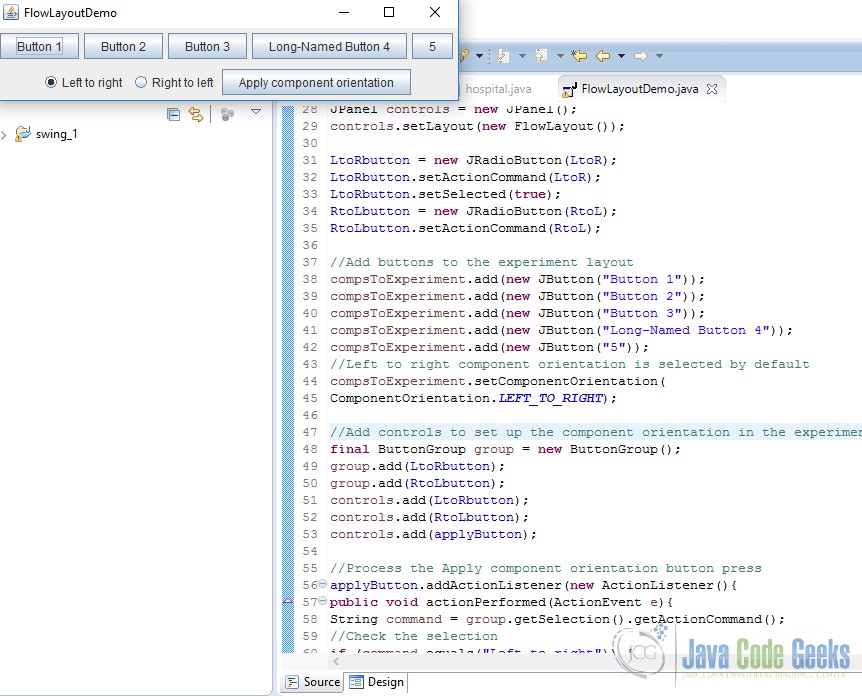
3.3 OutPut
Output for the given code will look like the one below.
4. Download The Source Code
This was an example of Java Flowlayout Example.
You can download the full source code of this example here: FlowLayoutDemo