1. Introduction
In this article, we’ll discuss about Java Swing BoxLayout. In Java Swing, layout manager is in charge of laying out different components in specific positions. In Java Swing and awt package, several layout managers are popularly used, such as BorderLayout, BoxLayout, CardLayout, FlowLayout and GridLayout. In this article, we’ll focus on BoxLayout and go through the basic operation on it.
In BoxLayout, it puts components in a single row or a single column. Only one constructor is used by BoxLayout: BoxLayout(Container target, int axis), which will lay out components along the given axis. For the container target, it can be a frame, a panel or other containers to hold the components. For the axis, four different axes could be chosen: X_AXIS, Y_AXIS, LINE_AXIS, PAGE_AXIS. As X_AXIS and Y_AXIS are more often used, we’ll show only examples with these two axes. If you’re interested in the other two, you can refer to the official doc from Oracle here. Also, the alignment settings of different components will also have influence on the layout of the whole GUI.
2. Swing BoxLayout example with different axis parameters
In this example, we’ll compare the results of BoxLayout with two different axis options: X_AXIS and Y_AXIS. In X_AXIS, components are laid out horizontally from left to right, while in Y_AXIS vertically from top to bottom.
To compare the difference layout between these two settings, a JFrame needs to be created as the largest container. Then a JPanel is added on this frame and we can set the accurate size of it. After this operation, three buttons (Button1, Button2, Button3) are generated and added in the panel. The layout can be defined when the the the panel is added.
Below it the Java code for this example:
swingBoxLayoutAxis.java
package javaCodeGeeks;

/*
 * A swing BoxLayout example with different Boxlayout axis parameters
 * BoxLayout.X_AXIS, BoxLayout.Y_AXIS respectively.
 * Also add spaces between components.
 */

import javax.swing.JFrame;
import javax.swing.JButton;
import javax.swing.BoxLayout;
import javax.swing.Box;
import javax.swing.JPanel;
import javax.swing.border.EmptyBorder;

import java.awt.Insets;
import java.awt.Dimension;

public class swingBoxLayoutAxis {

	public static void main(String[] args) {
		// Create and set up a frame window
		JFrame.setDefaultLookAndFeelDecorated(true);
		JFrame frame = new JFrame("BoxLayout Example X_AXIS");
		frame.setDefaultCloseOperation(JFrame.EXIT_ON_CLOSE);

		// Set the panel to add buttons
		JPanel panel = new JPanel();

		// Set the BoxLayout to be X_AXIS: from left to right
		BoxLayout boxlayout = new BoxLayout(panel, BoxLayout.Y_AXIS);

		// Set the Boxayout to be Y_AXIS from top to down
		//BoxLayout boxlayout = new BoxLayout(panel, BoxLayout.Y_AXIS);

		panel.setLayout(boxlayout);

		// Set border for the panel
		panel.setBorder(new EmptyBorder(new Insets(150, 200, 150, 200)));
		//panel.setBorder(new EmptyBorder(new Insets(50, 80, 50, 80)));

		// Define new buttons
		JButton jb1 = new JButton("Button 1");
		JButton jb2 = new JButton("Button 2");
		JButton jb3 = new JButton("Button 3");

		// Add buttons to the frame (and spaces between buttons)
		panel.add(jb1);
		//panel.add(Box.createRigidArea(new Dimension(0, 60)));
		panel.add(jb2);
		//panel.add(Box.createRigidArea(new Dimension(0, 60)));
		panel.add(jb3);

		// Set size for the frame
		//frame.setSize(300, 300);

		// Set the window to be visible as the default to be false
		frame.add(panel);
		frame.pack();
		frame.setVisible(true);

	}

}
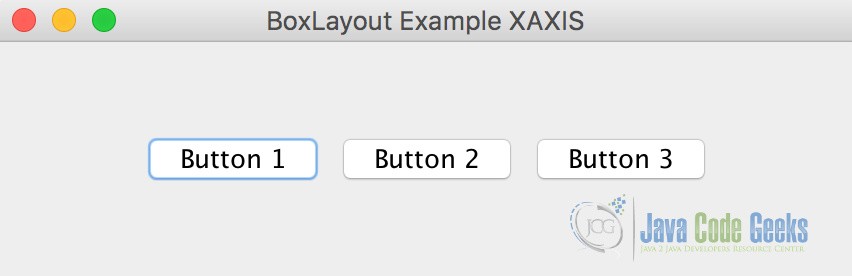
The code above shows the scenario when we use the X_AXIS layout. Run this code in Eclipse and we’ll get the following figure below. From this figure we can see that the three buttons are close to each other and laid out in a horizontal way from left to right.
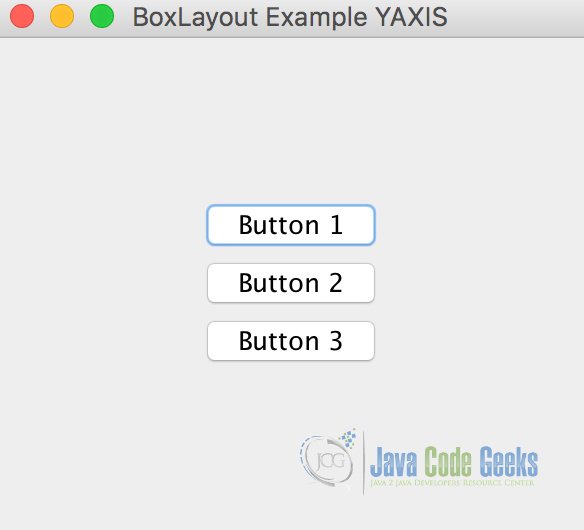
Then we comment the line 31 and uncomment the line 34 to get the layout of Y_AXIS. As we can see the figure below, the three buttons changes from the previous horizontal way to be vertical.
3. Swing BoxLayout example using invisible components as filler
In Java Swing, if you want to have spaces between components, two options could be considered: 1. add empty space to one or more components; 2. insert invisible components to obtain spaces between components. Here Box.Filler class, which is defined in Box class, would be helpful to achieve the second option. Four different methods can be chose to achieve this:
- Rigid area, use Box.createRigidArea(size)
- Glue horizontal, use Box.createHorizontalGlue()
- Glue vertical, use Box.createVerticalGlue()
- Custom Box.Filler, use new Box.Filler(minSize, preSize, maxSize)
In createRigidArea(size) method, it creates an invisible component with a specified size. For the size parameter, it could be defined by new Dimension(int width, int height). For example, if new Dimension(0, 80) is called between two buttons, 80 pixels space is put between this two buttons in a top-to-bottom way. Vise verse, (20, 0) in a left-to-right way. Through this method, rigid invisible area is created. You could use the following code:
container.add(firstComponent);
container.add(Box.createRigidArea(new Dimension(0, 80)));
container.add(secondComponent);
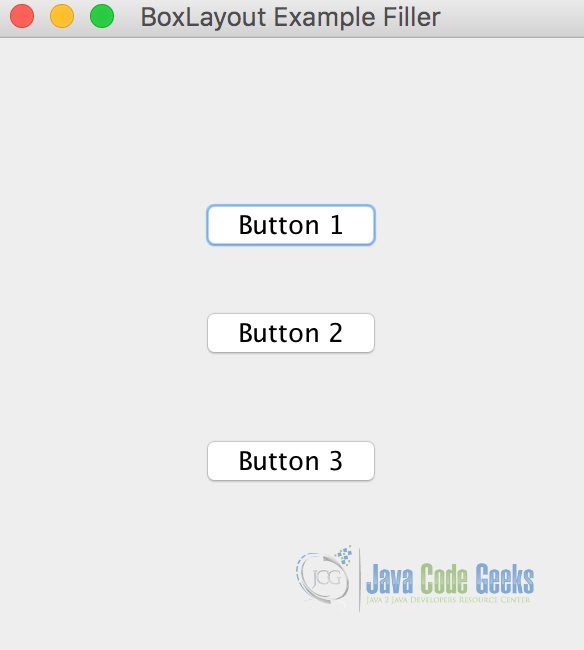
The following figure shows the output when we add rigid area (0, 25) between the three buttons.
In createHorizontalGlue() and createVerticalGlue() methods, they are very similar to each other. The only difference between these two methods are the orientation of the glue to be put. It won’t specify the rigid size of the invisible space. In createHorizontalGlue() method, after calling it, a horizontal glue will be created between two components in a horizontal (left-to-right) way, while in createVerticalGlue() method a vertical glue will be created in a vertical (top-to-bottom) way. These space generated by these two methods will squeeze the two components to be in the border of the container, and take the maximum space between the two components. You could use the following code:
container.add(firstComponent);
container.add(Box.createVerticalGlue());
//container.add(Box.createHorizontalGlue());
container.add(secondComponent);
Box.Filler(minSize, preSize, maxSize) is a custom method to create invisible space. You can specify the minimum, preferred and maximum sizes that you want the space to be. For example, to create a space with 20 pixels in width and 30 pixels in height, you could use the following code. Also, you can defined the minimum size to be 10 by 20 and maximum size to be 50 by 100.
container.add(firstComponent);
Dimension minSize = new Dimension(10, 20);
Dimension prefSize = new Dimension(20, 30);
Dimension maxSize = new Dimension(50, 100);
container.add(new Box.Filler(minSize, prefSize, maxSize));
container.add(secondComponent);
4. Swing BoxLayout example with different alignment settings
In Java Swing, we can also control the alignment of different components. The alignment setting could come into play when the size of the component is smaller than the size of the container. Three different alignment settings could be used:
- Component.LEFT_ALIGNMENT
- Component.CENTER_ALIGNMENT
- Component.RIGHT_ALIGNMENT
For LEFT_ALIGNMENT, which has a value of 0.0, the left sides of all components should be aligned. For CENTER_ALIGNMENT, which has a value of 0.5, the center of all components should be aligned. For RIGHT_ALIGNMENT, which has a value of 1.0, the right sides of all components should be aligned.
Below is the swingBoxLayoutAlignment example to show the difference between the three alignment options:
swingBoxLayoutAlignment.java
package javaCodeGeeks;

/*
 * A swing BoxLayout example with different BoxLayout alignment settings
 * LEFT_ALIGNMENT, CENTER_ALIGNMENT, RIGHT_ALIGNMENT respectively.
 */

import javax.swing.BorderFactory;
import javax.swing.BoxLayout;
import javax.swing.JButton;
import javax.swing.JFrame;
import javax.swing.JPanel;

import java.awt.Component;
import java.awt.FlowLayout;

public class swingBoxLayoutAlignment {

	public static void main(String[] args) {
		// Create and set up a frame window
		JFrame.setDefaultLookAndFeelDecorated(true);
		JFrame frame = new JFrame("BoxLayout Example Alignment");
		frame.setDefaultCloseOperation(JFrame.EXIT_ON_CLOSE);

		// Define new buttons with different width on help of the ---
		JButton jb1 = new JButton("Button 1 -");
		JButton jb2 = new JButton("Button 2 --------");
		JButton jb3 = new JButton("Button 3 -");
		JButton jb4 = new JButton("Button 4 --------");
		JButton jb5 = new JButton("Button 5 -");
		JButton jb6 = new JButton("Button 6 --------");

		// Define the panel to hold the buttons
		JPanel panel1 = new JPanel();
		JPanel panel2 = new JPanel();
		JPanel panel3 = new JPanel();

		// Set up the title for different panels
		panel1.setBorder(BorderFactory.createTitledBorder("LEFT"));
		panel2.setBorder(BorderFactory.createTitledBorder("CENTER"));
		panel3.setBorder(BorderFactory.createTitledBorder("RIGHT"));

		// Set up the BoxLayout
		BoxLayout layout1 = new BoxLayout(panel1, BoxLayout.Y_AXIS);
		BoxLayout layout2 = new BoxLayout(panel2, BoxLayout.Y_AXIS);
		BoxLayout layout3 = new BoxLayout(panel3, BoxLayout.Y_AXIS);
		panel1.setLayout(layout1);
		panel2.setLayout(layout2);
		panel3.setLayout(layout3);

		// Add the buttons into the panel with three different alignment options
		jb1.setAlignmentX(Component.LEFT_ALIGNMENT);
		jb2.setAlignmentX(Component.LEFT_ALIGNMENT);
		panel1.add(jb1);
		panel1.add(jb2);

		jb3.setAlignmentX(Component.CENTER_ALIGNMENT);
		jb4.setAlignmentX(Component.CENTER_ALIGNMENT);
		panel2.add(jb3);
		panel2.add(jb4);

		jb5.setAlignmentX(Component.RIGHT_ALIGNMENT);
		jb6.setAlignmentX(Component.RIGHT_ALIGNMENT);
		panel3.add(jb5);
		panel3.add(jb6);

		// Add the three panels into the frame
		frame.setLayout(new FlowLayout());
		frame.add(panel1);
		frame.add(panel2);
		frame.add(panel3);

		// Set the window to be visible as the default to be false
		frame.pack();
		frame.setVisible(true);

	}

}
The output for this example is shown below:
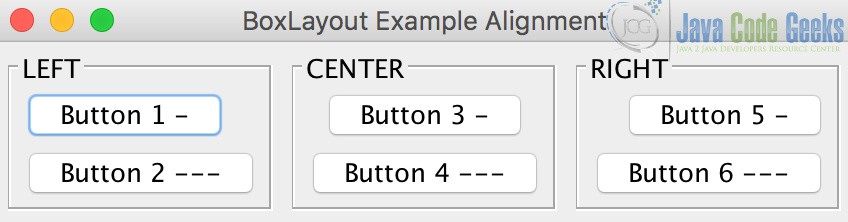
We can see that button1 and button2 are aligned to the left side of the panel, button3 and button4 are in the center of the panel, while button5 and button6 are right side of the panel.
5. Download the Source Code
This was an example of BoxLayout in Java Swing.
You can download the full source code of this example here: swingBoxLayoutExample

In line 31-31:
// Set the BoxLayout to be X_AXIS: from left to right
BoxLayout boxlayout = new BoxLayout(panel, BoxLayout.Y_AXIS);
I believe both axis should be X_AXIS ?