1. Introduction
This article is the last one of a series of three on real-time applications. In part 1, I have created a simple Task management application and implemented the Periodic Refresh AJAX pattern to make it feel as if the UI was updated in real-time when tasks were created. In part 2, I modified the project so only updated (delta) information was sent to the browser and I implemented Long Polling to get a better real-time feel. The plan now in part 3 is to go ahead and try the HTML5 WebSocket.
This example was built using Maven, Spring, Jackson, Gson and Tomcat 8 (JDK8) for the back-end and AngularJS, Bootstrap, HTML5 and Bower for the front-end. You should have a basic knowledge of those technologies.

AngularJS Programming Cookbook
In this ebook, we provide a compilation of AngularJS based examples that will help you kick-start your own web projects. We cover a wide range of topics, from Single Page Apps and Routing, to Data Binding and JSON Fetching. With our straightforward tutorials, you will be able to get your own projects up and running in minimum time. Download the cookbook by joining the Web Code Geeks Newsletter.
2. WebSocket
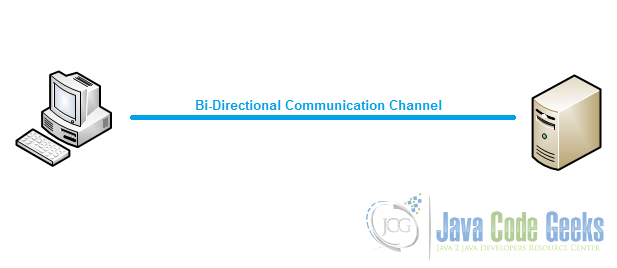
WebSocket is a protocol allowing to have a bi-directional communication channel of a TCP connection. Most of the modern browsers and web servers have implemented the WebSocket protocol. After the initial handshake is done, the socket is opened and stays opened. Both parties can send data through the said socket over a channel (URL).
In this example, we will use the previous part design consisting of a RESTful JSON Web Service using Spring @RestController and Jackson-Mapping from data going from the client to the server through an AJAX call using the $http service of Angular.js, and we will use WebSocket for server updates sent to the clients.
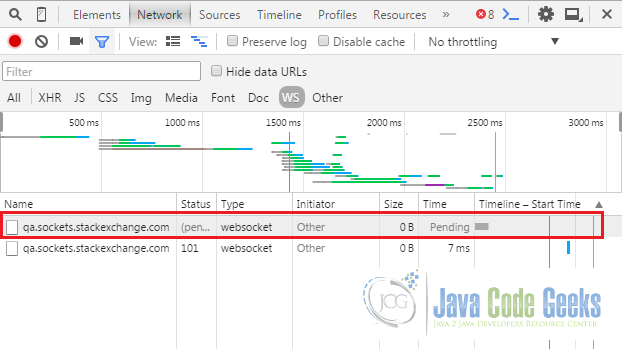
A real life example of this is on the Q&A site StackOverflow. When you look at a specific question, a WebSocket is opened to notify the client in case a new answer is posted on the question. To see that in action, click on any question and hit F12. If you go to the network tab and filter on WebSocket (WS), you will see that a connection of the type WebSocket is opened and pending.
3. High-level architecture
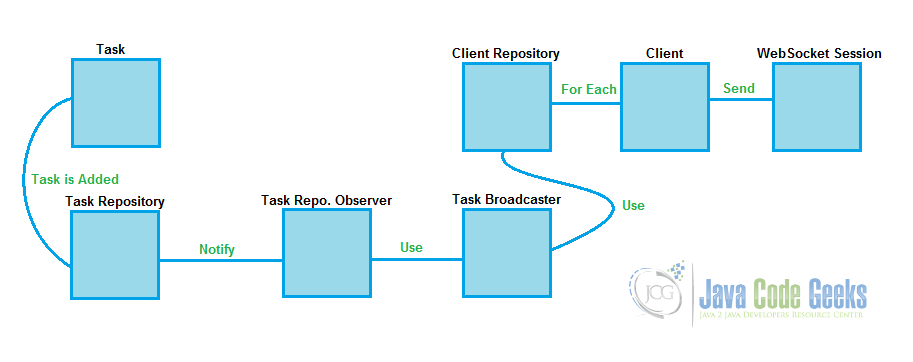
As part of this example, I decided to go to the drawing board and try to have a small and simple design to implement the bi-directional communication. My goal was to send the task objects to all clients as soon as one was added. Since there is a kind of event/reaction process, I implemented the Observable/Observer design pattern on the TaskRepository (observable).
4. The Front-End
4.1. Bower dependencies
Since I used Bower for dependency management, I created a bower.json file in my WebContent folder and added jQuery, Bootstrap and Angular.js to it. Here is the result:
bower.json
{
  "name": "WebContent",
  "version": "1.0.0",
  "description": "For JCG RT App part 3",
  "main": "index.html",
  "authors": [
    "Sylvain Cloutier"
  ],
  "license": "MIT",
  "homepage": "http://examples.javacodegeeks.com",
  "ignore": [
    "**/.*",
    "node_modules",
    "bower_components",
    "test",
    "tests"
  ],
  "dependencies": {
    "jQuery": "~2.1.4",
    "bootstrap": "~3.3.5",
    "angular": "~1.4.7"
  }
}
4.2. Angular module and controller
First, we create the TaskApp module as follow:
taskApp.js
taskApp = angular.module("TaskApp", []);
Then the controller in a separated file. I use Angular.js Dependency Injection to get an instance of the $http service:
taskCtrl.js
taskApp.controller("TaskController", function($http, $scope) {

    $scope.getTasks = function() {
        $http.get("http://localhost:8080/WebSocket/tasks")
            .success(function(data) {
                $scope.tasks = data;
        });
    };

    $scope.addTask = function() {
        $http.post("http://localhost:8080/WebSocket/tasks", $scope.task)
            .success(function() {
                $scope.resetTask();
        });
    };

    $scope.resetTask = function() {
        $scope.task = {
            title: "",
            description: "",
            duration: "",
            universal: true
        };
    };

    $scope.resetTask();
    $scope.getTasks();

    // WebSocket Initialization
    var taskSocket = new WebSocket("ws://localhost:8080/WebSocket/channel/task");

    taskSocket.onmessage = function(message) {
        $scope.tasks = JSON.parse(message.data);
        $scope.$apply();
    };

    taskSocket.onclose = function() {
        $scope.message = {
            type: "danger",
            short: "Socket error",
            long: "An error occured with the WebSocket."
        };
        $scope.$apply();
    }

});
Again, I’ve not been following Angular.js best practices, because I wanted to centralize the code for this example. Note that the part where we establish the WebSocket connection and where we define the methods could have been extracted from the controller and included in a TaskService or such.
At line 30 of the controller file above, we initialize the WebSocket connection. Notice the protocol identifier ws://. This URL will be defined in the back-end as a server endpoint.
4.3. The view
Unlike part 1 and 2, I decided not to include JSF in the project. I wanted to have a pure HTML and JavaScript front-end so Angular is the only thing interacting with the back-end. This shows the real benefit of Angular.js that is to make view code more like HTML is supposed to look like, that is declarative.
That said, the view for this example contains 2 blocs. The first one is the form allowing to create new Task objects through an XHR request by using Angular $http service, and the second bloc is the displaying of the Task objects. At load time, the controller will fetch the list of Task objects from the server and Angular will populate the list. Then a WebSocket is initialized so when a new Task object is created in the TaskRepository, it will be added in the list.
index.html
<!DOCTYPE html>
<html>
	<head>
		<title></title>
		<script src="js/angular/angular.min.js"></script>
        <script src="js/jQuery/dist/jquery.min.js"></script>
        <script src="js/bootstrap/dist/js/bootstrap.min.js"></script>

        <link rel="stylesheet" type="text/css"
            href="js/bootstrap/dist/css/bootstrap.min.css" />
        <script src="js/taskApp/taskApp.js"></script>
        <script src="js/taskApp/taskCtrl.js"></script>

	</head>
	<body>
        <div class="container" ng-app="TaskApp" ng-controller="TaskController">
            <h1>Real-time application <small>part 3</small></h1>

            <div ng-show="message" class="alert alert-{{message.type}}">
                <strong>
                    {{message.short}}: {{message.long}}
                </strong>
            </div>
            <div class="container-fluid">
                <div class="col-md-6 col-sm-12">
                    <h2>Add task</h2>
                    <form>
                        <div class="row">
                            <div class="form-group">
                                <label for="taskTitleFieldId">Title: </label>
                                <input type="text" id="taskTitleFieldId"
                                       ng-model="task.title"
                                       class="form-control"/>
                            </div>
                        </div>

                        <div class="row">
                            <div class="form-group">
                                <label for="taskDescriptionFieldId">
                                    Description:
                                </label>
                                <textarea id="taskDescriptionFieldId"
                                          ng-model="task.description"
                                          class="form-control">
                                </textarea>
                            </div>
                        </div>

                        <div class="row">
                            <div class="form-group">
                                <label for="durationFieldId">
                                    Duration (in seconds):
                                </label>
                                <input type="number" id="durationFieldId"
                                       class="form-control"
                                       ng-model="task.duration"/>
                            </div>
                        </div>

                        <div class="row">
                            <div class="col-md-6">
                                <div class="checkbox">
                                    <label>
                                        <input type="checkbox"
                                               id="taskUniversalCheckId"
                                               ng-model="task.universal"/>
                                        Public task
                                    </label>
                                </div>
                            </div>

                            <div class="col-md-6">
                                <button type="button"
                                        class="btn btn-success"
                                        ng-click="addTask()">
                                    Add task
                                </button>
                                <button type="button"
                                        class="btn btn-default"
                                        ng-click="resetTask()">
                                    Reset form
                                </button>
                            </div>
                        </div>
                    </form>
                </div>

                <div class="col-md-6 col-sm-12">
                    <h2>Listing</h2>
                    <ul class="list-group" ng-hide="tasks.length == 0">
                        <li ng-repeat="curTask in tasks track by $index"
                                class="list-group-item">
                            <strong>{{curTask.title}}</strong> - {{curTask.description}}
                            <span class="badge">{{curTask.duration}}</span>
                        </li>
                    </ul>
                    <p ng-show="tasks.length == 0" class="text-info">
                        No tasks to display.
                    </p>
                </div>
            </div>
        </div>
	</body>
</html>
5. The Java Back-end
5.1. Maven dependencies
As part of this example, we need Spring-WebMVC, Spring-WebSocket, Google Gson and Jackson-DataBind. Here is the result:
pom.xml
<dependencies>
  <dependency>
    <groupId>org.springframework</groupId>
    <artifactId>spring-webmvc</artifactId>
    <version>4.2.1.RELEASE</version>
  </dependency>
  <dependency>
    <groupId>org.springframework</groupId>
    <artifactId>spring-websocket</artifactId>
    <version>4.2.1.RELEASE</version>
  </dependency>
  <dependency>
    <groupId>com.google.code.gson</groupId>
    <artifactId>gson</artifactId>
    <version>2.3.1</version>
  </dependency>
  <dependency>
    <groupId>com.fasterxml.jackson.core</groupId>
    <artifactId>jackson-databind</artifactId>
    <version>2.6.2</version>
  </dependency>
</dependencies>
5.2. The TaskWebSocketHandler
This class is the Server Endpoint. The implementation of the WebSocket API is provided by Tomcat since version 7. The way to deploy the WebSocket was made really simple. All you need to do is to add the @ServerEndpoint annotation to your class and define the URL on which the WebSocket will be listening.
TaskWebSocketHandler.java
@ServerEndpoint(value = "/channel/task", configurator = SpringConfigurator.class)
public class TaskWebSocketHandler implements WebSocketHandler {
  @Autowired
  private ClientRepository clientRepository;

  @OnOpen
  public void onOpen(Session session) {
    this.clientRepository.add(new Client(session));
  }

  @OnClose
  public void onClose(CloseReason reason, Session session) {
    this.clientRepository.remove(new Client(session));
  }
}
I would like to bring your attention to the configurator property of the annotation. Since the handler is managed by the container, it was not instantiated by Spring so I was not able to inject the ClientRepository dependency. By adding the SpringConfigurator, Spring takes control of the initialization and performs the injection. That way, I can use the @Autowired annotation to inject the ClientRepository.
In order to keep track of the active sessions, I added two event functions that are triggered when the connection is established or closed. Those are annotated with @OnOpen and @OnClose.
5.3. The ClientRepository
Like I said above, in order to send the Task objects to the client, we need to keep track of the active sessions. This was implemented in the ClientRepository. I decided to wrap the session in a Client object just in case we need to add information regarding the client (name, avatar, etc.).
Client.java
public class Client {
  private final String id;
  private final Session session;

  public Client(Session session) {
    this.id = this.toString();
    this.session = session;
  }

  public void sendText(String text) throws IOException {
    this.session.getBasicRemote().sendText(text);
  }

  public String getId() {
    return id;
  }

  // hashCode() and equals()

}
The sendText() method here simply wraps the call to the WebSocket session sendText() method. That helps customizing the way we communicate through the WebSocket if necessary. Regarding the repository itself, I simply created a class containing a List of Client. Notice that I added synchronization on the List to avoid ConcurrentModificationException.
ClientRepositoryImpl.java
@Repository
@Scope("singleton")
public class ClientRepositoryImpl extends ClientRepository {
  private List<Client> clients = new LinkedList<>();

  @Override
  public void add(Client session) {
    synchronized (this.clients) {
      this.clients.add(session);
    }
  }

  @Override
  public void remove(Client session) {
    synchronized (this.clients) {
      this.clients.remove(session);
    }
  }

  @Override
  public void forEach(Consumer<Client> clientConsume) {
    synchronized (this.clients) {
      this.clients.forEach(clientConsume);
    }
  }

  @Override
  public List<Client> getAll() {
    return new LinkedList<>(this.clients);
  }

}
5.4. The TaskRepository
The Task object is a little bit different from the last two parts of this example. In part 2, I pointed that Task where not owned by a single client, they were shared. I added here the Client that is the owner of the Task and a flag called universal that would make the Task visible to all clients. For simplicity’s sake, I did not implement that, but I wanted to show you a way to achieve that in case you want to modify the example to make it a bit better and experiment with it.
Task.java
public class Task {
  private String id;
  private Client owner;
  private String title;
  private String description;
  private long duration;
  private boolean universal;

  public Task() {
    this.id = this.toString();
  }

  // Getters and setters

}
Regarding the repositories, I created an abstract and generic version of them that extends the Observable class from the Java API. The TaskRepository extends this abstract class so we can connect any repositories with an Observer.
TaskAppRepository.java
public abstract class TaskAppRepository<K, T> extends Observable {
  public abstract void add(T type);
  public abstract void remove(T type);
  public abstract void forEach(Consumer<T> typeConsumer);
  public abstract List<T> getAll();

  protected void publish() {
    this.setChanged();
    this.notifyObservers();
  }
}
The main feature here is the publish() method that calls the setChanged() and notifyObservers() methods of the Observable class. This calls the update() method of the registered Observer.
Regarding the TaskRepository itself, I decided that the simplest way to register the Observer was to inject it and add it to the observers in the initialization method. The rest is pretty much like the ClientRepository.
TaskRepositoryImpl.java
@Repository
@Scope("singleton")
public class TaskRepositoryImpl extends TaskRepository {
  @Autowired
  private TaskRepositoryObserver observer;

  private List<Task> tasks = new LinkedList<>();

  @PostConstruct
  public void init() {
    this.addObserver(observer);
  }

  @Override
  public void add(Task task) {
    synchronized (tasks) {
      this.tasks.add(task);
    }

    this.publish();
  }

  @Override
  public void remove(Task task) {
    synchronized (tasks) {
      this.tasks.remove(task);
    }

    this.publish();
  }

  @Override
  public void forEach(Consumer<Task> typeConsumer) {
    synchronized (tasks) {
      this.tasks.forEach(typeConsumer);
    }
  }

  public List<Task> getAll() {
    return new LinkedList<>(this.tasks);
  }
}
You see now that everything is linked up. When the TaskRepository is initialized, the Observer is registered in the init() method. When a Task is added or removed from the List, the publish() method is called which sets the state of the TaskRepository as changed and it notifies the Observer that will retrieve the list of Client from the ClientRepository and send the Task objects through the WebSocket session directly to the browser. The onmessage() method of the Angular.js TaskController will be fired and the view will be updated!
TaskRepositoryObserver.java
@Component
public class TaskRepositoryObserver implements Observer {
  @Autowired
  private TaskBroadcaster broadcaster;

  @Override
  public void update(Observable repository, Object param) {
    TaskRepository repo = (TaskRepository) repository;
    this.broadcaster.broadcast(repo.getAll());
  }

}
TaskBroadcaster.java
@Component
@Component
public class TaskBroadcaster implements Broadcaster<Task> {
  @Autowired
  private ClientRepository clients;
  private Gson gson;

  @PostConstruct
  public void init() {
    this.gson = new Gson();
  }

  @Override
  public void broadcast(List<Task> task) {
    this.clients.forEach(client -> {
      try {
        client.sendText(this.gson.toJson(task));
      } catch (Exception e) {
        e.printStackTrace();
      }
    });
  }
}
Here, the best thing would have been to implement a converter (Task to String) before calling the sendText() method. That way, we could have more that one converters and change it at will, but for this example, it suites the needs.
Regarding the web service, it’s basically the same as in the previous parts. We use Spring annotation @RestController.
TaskRestController.java
@RestController
public class TaskRestController {
  @Autowired
  private TaskRepository taskRepository;

  @RequestMapping(path = "/tasks", method = RequestMethod.GET)
  public @ResponseBody List getTasks() {
    return this.taskRepository.getAll();
  }

  @RequestMapping(path = "/tasks", method = RequestMethod.POST)
  public void addTask(@RequestBody Task task) {
    this.taskRepository.add(task);
  }
}
6. Conclusion
This concludes the final part on real-time applications. You must know that I made personal choices regarding the implementation and the technologies I used. Those choices were made based on my personal experience and on my desire to challenge myself by integrating new technologies all together. There are infinite ways of doing this, some might be better, but I think you get the point and understand how to achieve this real-time feel in an application that makes it less static.
An example of other tools you could use is a module for WebSocket called Angular-WebSocket that can be used instead of the native WebSocket. PrimeFaces also offers an implementation that is good (PrimeFaces Push) and that is based on the Atmosphere Framework. This one would be a good alternative for production applications in case your users don’t have a browser that supports WebSocket. It has a fallback to Long Polling.
Now you tell me! What do you think of this series of articles? Send me a tweet with your comments, your suggestions or even your questions. My Twitter handle is @syl20TOS. I will try to answer every Tweet.
Thanks for reading!
7. Download the Eclipse project
You can download the full source code of this example here: WebSocket
