1. Introduction
A JUnit Test suite is used to bundle multiple test cases together in a single run. This is usually used if you want to integrated several JUnit Test cases that makes up a specific functionality from the integration. The developer uses the @RunWith and @SuiteClasses to run Suite tests for this purposes.
In this example, I’ll be showing a simple approach on how you’ll create a Test Suite that will call 3 test cases.
2. Sources
We first prepare our test cases. In this example, we created 3 different test case classes.
JUnitTest1Suite1.java
package com.areyes1.jgc.test.suite;

import static org.junit.Assert.assertTrue;

import org.junit.Before;
import org.junit.Test;

public class JUnitTest1Suite1 {

	int totalNumberOfApplicants = 0;
	int totalNumberOfAcceptableApplicants = 10;

	@Before
	public void setData(){
		this.totalNumberOfApplicants = 9;
	}

	@Test
	public void testAssertions() {
		assertTrue((this.totalNumberOfApplicants != this.totalNumberOfAcceptableApplicants));
	}

	@Test
	public void testAssertFalse() {
		assertTrue((this.totalNumberOfApplicants == this.totalNumberOfAcceptableApplicants));
	}

	@Test
	public void testAssertTrueWithMessage(){
		assertTrue("Is total number of applicants acceptable?",(this.totalNumberOfApplicants != this.totalNumberOfAcceptableApplicants));
	}
}
JUnitTest2Suite1.java
package com.areyes1.jgc.test.suite;

import static org.hamcrest.CoreMatchers.is;
import static org.hamcrest.CoreMatchers.isA;
import static org.junit.Assert.assertThat;

import java.util.ArrayList;

import org.junit.Before;
import org.junit.Test;

public class JUnitTest2Suite1 {
	int totalNumberOfApplicants = 0;
	int totalNumberOfAcceptableApplicants = 10;
	ArrayList listOfValidStrings = new ArrayList();

	@Before
	public void setData(){
		this.totalNumberOfApplicants = 9;
		listOfValidStrings.add("object_1");
		listOfValidStrings.add("object_2");
		listOfValidStrings.add("object_3");
	}

	@Test
	public void testAssertThatEqual() {
		assertThat("123",is("123"));
	}

	@Test
	public void testAssertThatNotEqual() {
		assertThat(totalNumberOfApplicants,is(123));
	}

	@Test
	public void testAssertThatObject() {
		assertThat("123",isA(String.class));
	}


	@Test
	public void testAssertThatWMessage(){
		assertThat("They are not equal!","123",is("1234"));
	}
}
JUnitTest3Suite1.java
package com.areyes1.jgc.test.suite;

import static org.junit.Assert.assertEquals;
import static org.junit.Assert.assertNotNull;
import static org.junit.Assert.assertNull;

import org.junit.After;
import org.junit.Before;
import org.junit.Test;

import com.jgc.areyes1.junit.AccountService;
import com.jgc.areyes1.junit.obj.Account;

public class JUnitTest3Suite1 {

	private AccountService accountService = new AccountService();
	private Account dummyAccount;


	@Before // setup()
	public void before() throws Exception {
		System.out.println("Setting it up!");
		dummyAccount = accountService.getAccountDetails();
	}

	@Test
	public void testDummyAccount() {
		System.out.println("Running: testDummyAccount");
		assertNotNull(dummyAccount.getAccountCode());
	}
	@Test
	public void testDummyAccountTransactions() {
		System.out.println("Running: testDummyAccountTransactions");
		assertEquals(dummyAccount.getAccountTransactions().size(),3);
	}

	@After // tearDown()
	public void after() throws Exception {
		System.out.println("Running: tearDown");
		dummyAccount = null;
		assertNull(dummyAccount);
	}
}
After creating or identifying our JUnit test cases that we want to include on this suite, we then create our JUnit Test case suite that will call the 3 tests case classes. Take note of the usage of @RunWith and@SuiteClasses as per below.
JUnitSuite1.java
package com.areyes1.jgc.test.suite;

import org.junit.runner.RunWith;
import org.junit.runners.Suite;
import org.junit.runners.Suite.SuiteClasses;

@RunWith(Suite.class)
@SuiteClasses({
	JUnitTest1Suite1.class,
	JUnitTest2Suite1.class,
	JUnitTest3Suite1.class
})
public class JUnitSuite1 {

}
The @RunWith annotation is used to tag a class that it should run with a specific class. In this example, we are running this class with a Suite.class to tell our runner that we required that class for this run. The @SuiteClasses is the annotation that is used to specify the JUnit Test cases that this suite will be composed of. As specified, we called the 3 unit test case class we created.

These are all test cases that we want to run in this suite. As we can see, we have different test case scenarios for each. The purpose of us creating a test suite for them is so that we can consolidate their execution and results into one.
3. Running the JUnit Test Suite
You can run the test case by:
- Eclipse JUnit Test case run
- Create a Runner class from your main entry point
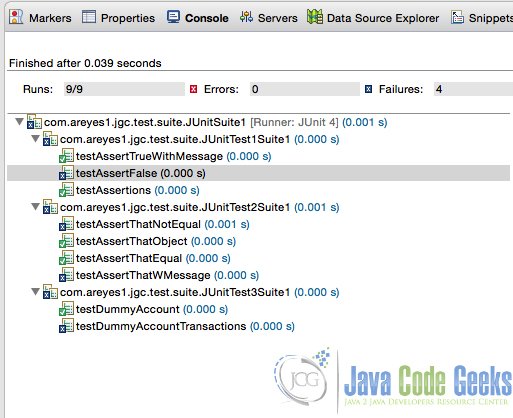
3.1 Eclipse JUnit Test case run
The eclipse way is straight forward, we right click on the JUnitSuite1.java > Run As > JUnit Test.
3.2 Create a Runner class from your main entry point
We can also run the test case using a Runner class. Code of the runner below
TestRunnerForTestSuite.java
package com.areyes1.jgc.test.suite.runner;
import org.junit.runner.JUnitCore;
import org.junit.runner.notification.Failure;
import com.areyes1.jgc.test.suite.JUnitSuite1;
public class TestRunnerForTestSuite {

	public static void main(String[] args) {
		org.junit.runner.Result result = JUnitCore.runClasses(JUnitSuite1.class);
		for (Failure failure : result.getFailures()) {
			System.out.println(failure.toString());
		}
		System.out.println(result.wasSuccessful());
	}

}
Result of running the runner below
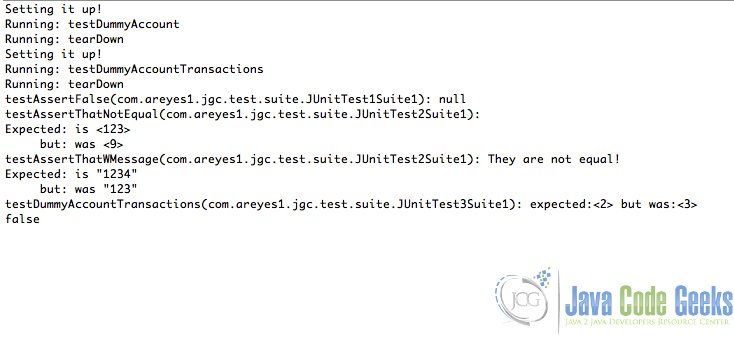
As you might have observe, the test suite runs all the test case class that’s associated to it. It’s grouping all of these test case to come up with a unified results of specific scenarios of the system. This is extremely a valuable feature especially if we need to test different scenarios of integrated services for a common functional requirement. A great example would be if there is a separate module/service for account opening and account cash transfer. With this feature, we can combine the test cases of these two functional requirements and come up with a unified test case of an end to end account opening to cash transfer process.
4. Download the Eclipse project
This was an example of JUnit Test Suite.
You can download the full source code of this example here: junit-testsuite-example
