OOPS Concepts Java Tutorial
In this post, we feature a comprehensive OOPS Concepts Java Tutorial. We will take a look at the OOPS concepts in Java and provide code examples for each one of them.
1. Introduction
Object-Oriented Programming System in Java, also known as OOPS, is a programming paradigm where the main concept of a program is based on objects that communicate with each other. OOPS has become the most popular programming paradigm for large and complex programs. Java is one of the most widely used OOPS languages.
To run the examples we will use the following technologies:
- Java 8
- Eclipse 4.10.0
Before we dive into the concepts, let’s see first the definition of the Object in OOPS.
Table Of Contents
2. What is an Object?
In OOPS concepts in Java, an object is an entity that contains data and functions. Objects are created by classes and the association is that one class can create as many objects as we like. A class is defined as the blueprint from which different objects are created. Objects are also called instances of the class, so the process of creating an object is also called instantiation. In Java, the data and functions of an object are usually called fields and methods respectively.
Let’ see an example to better understand the notion of the object and class. If we want to design a program to store the personal data of all the employees of a company, then the term Employee is the class and the actual people (employees) are the objects. Below we find an example of such a class.
Employee.java
public class Employee {

    String name;
    int salary;
    int bonus;
    String department;

}
Above we created a class called Employee which contains 4 fields, the name, salary, bonus and department. So far we haven’t assigned values for those fields, as this will be done when we create the objects from the Employee class. Below we see how to do that.
EmployeeExample.java
Employee emp = new Employee();
emp.name = "Keith Henderson";
emp.salary = 50000;
emp.bonus = 3000;
emp.department = "Engineering";
The code above creates one object called emp from the Employee class and assigns values to all of its fields. If we output this object we can see its fields:
EmployeeExample.java
System.out.printf("%s belongs to the %s department earning an annual salary of $%d with bonus $%d",
                emp.name, emp.department, emp.salary, emp.bonus);
The above prints all the fields of the emp object in a nicely formatted output:
Output
Keith Henderson belongs to the Engineering department earning an annual salary of $50000 with bonus $3000
We successfully printed all the fields of the emp object in the above output.
3. OOPS in Java Main Concepts
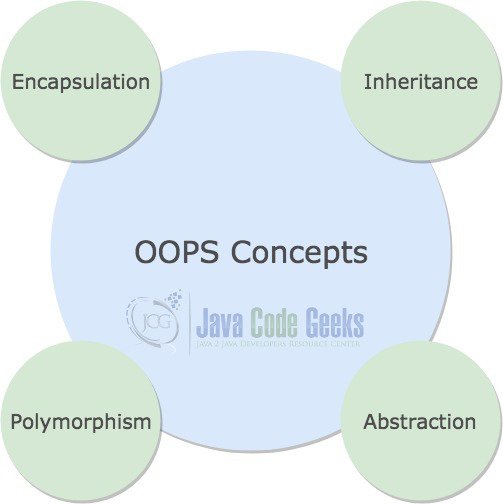
OOPS in Java consists of four main concepts:
- Encapsulation
- Inheritance
- Polymorphism
- Abstraction
We will look into each OOPS Concept in the following sections and provide code examples.
3.1 Encapsulation
Encapsulation is about restricting the access of the fields of an object to the outside world and making them available only through methods. In Java, we can restrict the access of the fields of an object by declaring them private and expose them through methods that we call the getters and setters. Let’s see below an updated version of the Employee class we created in the previous section which hides all of its fields.
com.javacodegeeks.encapsulation.Employee
public class Employee {

    private String name;
    private int salary;
    private int bonus;
    private String department;

    public String getName() {
        return name;
    }

    public void setName(String name) {
        this.name = name;
    }

    public int getSalary() {
        return salary;
    }

    public void setSalary(int salary) {
        this.salary = salary;
    }

    public int getBonus() {
        return bonus;
    }

    public void setBonus(int bonus) {
        this.bonus = bonus;
    }

    public String getDepartment() {
        return department;
    }

    public void setDepartment(String department) {
        this.department = department;
    }

}
In the above Employee class, we declared all the fields private to restrict the direct access to the fields from any other object. Now each field can only be accessed through its set and get method. For example, the name field can’t be accessed anymore from outside the class and it can only be set by the setName method and retrieved by the getName method. Let’s create a new object below and see how to access its fields:
com.javacodegeeks.encapsulation.EmployeeExample
Employee emp = new Employee();
emp.setName("Keith Henderson");
emp.setSalary(50000);
emp.setBonus(3000);
emp.setDepartment("Engineering");

System.out.printf("%s belongs to the %s department earning an annual salary of $%d with bonus $%d",
        emp.getName(), emp.getDepartment(), emp.getSalary(), emp.getBonus());
In the code above, we create the exact same object we created in the previous example, but now its fields are set by the setter methods. Similarly, we print the exact same output of the object we did before, using its getter methods.
The question that arises now is why we should use getters and setters and not access the fields of an object directly, as it is easier and reduces a lot of code. Below we will see why encapsulation is so important.
The importance of Encapsulation
As we said before, encapsulation is about hiding the fields of an object and making them available only through setters and getters. There are use cases where we would want to restrict the access of a field to specific objects using the protected or package access modifiers in the setters. Alternatively, we might not want to ever change the field of an object after it is initialized in the constructor of the class.
As an example, we will take our favourite Employee class and restrict the update of the name field.
com.javacodegeeks.encapsulation.hidenamesetter.Employee
public class EmployeeHideNameSetter {

    private final String name;
    private int salary;
    private int bonus;
    private String department;

    public EmployeeHideNameSetter(String name) {
        this.name = name;
    }

    public String getName() {
        return name;
    }

    public int getSalary() {
        return salary;
    }

    public void setSalary(int salary) {
        this.salary = salary;
    }

    public int getBonus() {
        return bonus;
    }

    public void setBonus(int bonus) {
        this.bonus = bonus;
    }

    public String getDepartment() {
        return department;
    }

    public void setDepartment(String department) {
        this.department = department;
    }

}
As we see from the above class, the setName method has been removed. There is no way to change the name field after it is initialized in the constructor. We have declared the name field final, which means that it will never change as such we must provide a value during the instantiation of object. That is a way to never forget to assign values to important fields. Find below the instantiation of an object for the above class.
com.javacodegeeks.encapsulation.hidenamesetter.EmployeeExample
Employee emp = new Employee("Keith Henderson");
emp.setSalary(50000);
emp.setBonus(3000);
emp.setDepartment("Engineering");
In the code above, during the instantiation of the emp object we assigned a value to its name field and then we set the remaining fields using the setters. There isn’t a no-argument constructor anymore and during the creation of objects, we must pass a value for the name field.
3.2 Inheritance
Inheritance is the ability of a class to inherit the characteristics of another class. In Java, that is achieved when the child class, also called the sublass, inherits the fields and methods of the parent class, also called the superclass, using the extends keyword. When a class inherits and implements a method of a superclass, we also say that it overrides the method. In order for the inheritance to work, the fields or methods of a superclass must not be declared private, as this will restrict the access from the outside world. Usually, they are declared protected, a keyword that is used to access the field and method of a class only from:
- Within the class itself
- Any class that resides in the same package of the superclass
- Any class that extends it regardless of the package it resides
In Java, there is a class called Object which is the root of the class hierarchy. Every class that we create has Object as a superclass, even if we don’t explicitly specify it with the extends keyword. Every object inherits and implements the methods of the Object class. The most common method from the Object class that every class should implement, is the toString method which returns a string representation of the object. Finally, Java supports Single Inheritance when it comes to class implementation, meaning that a class can extend one and only one class.
In the example below, the Director class extends an updated version of the Employee class.
com.javacodegeeks.inheritance.Employee
public class Employee {

    private final String name;
    protected double salary;
    protected double bonus;
    protected String department;
    private final String role;

    public Employee(String name, String role) {
        this.name = name;
        this.role = role;
    }

    public String getName() {
        return name;
    }

    public double getSalary() {
        return salary;
    }

    public void setSalary(double salary) {
        this.salary = salary;
    }

    public String getDepartment() {
        return department;
    }

    public void setDepartment(String department) {
        this.department = department;
    }

    public String getRole() {
        return role;
    }

    public double getBonus() {
        return bonus;
    }

    public void giveBonus() {
        this.bonus = salary * 0.2;
    }

    @Override
    public String toString() {
        return getName() + " is a " + getRole() + " at the " + getDepartment()
                + " department earning an annual salary of $" + salary + " with bonus $" + getBonus();
    }

}
We have declared all the fields of the above Employee class protected, apart from the name and role fields which are initialized in the constructor. We also added a giveBonus method, which sets the bonus field to a percentage of the salary, and a toString method which returns a nicely formatted representation of the object. Let’s see below the subclass Director which extends the Employee class.
com.javacodegeeks.inheritance.Director
public class Director extends Employee {

    public Director(String name) {
        super(name, "Director");
    }

    @Override
    public void giveBonus() {
        this.bonus = getSalary() * 0.5;
    }

}
As we see from the above code, the Director class is the subclass and it inherits the fields and methods of the Employee class which is the superclass. The Director class cannot inherit the name and role fields as these are declared private. The role field is initalized from within the class and cannot change. Also we override the giveBonus method which sets the bonus to a different value from its superclass method. The toString method is not overriden in the Director class, so when we invoke it the toString method of the Employee class will be called.
Below, we create one Employee and one Director object.
com.javacodegeeks.inheritance.DirectorExample
Employee emp = new Employee("Keith Henderson", "Backend Developer");
emp.setSalary(50000);
emp.setDepartment("Engineering");
emp.giveBonus();

Employee dir = new Director("Tori Hicks");
dir.setSalary(150000);
dir.setDepartment("Engineering");
dir.giveBonus();

System.out.println(emp);
System.out.println(dir);
In the above example, we created 2 different object that are both of type Employee. Here we don’t print anything in the System.out.println method but we only pass the objects. When this method gets invoked it will call the toString method of the objects which contains the nicely formatted output. Let’s run the example and check the output.
Output
Keith Henderson is a Backend Developer at the Engineering department earning an annual salary of $50000 with bonus $10000.0
Tori Hicks is a Director at the Engineering department earning an annual salary of $150000 with bonus $75000.0
In the output above, we see that the toString method is invoked when printing the objects.
3.3 Polymorphism
Polymorphism is the ability of a field or a method to have multiple forms. In Java, we achieve polymorphism by method overloading or overriding. We saw how to override a method in the previous example, where we managed to override the giveBonus and toString methods. Overloading is achieved by having the same method name with different arguments. The example below overloads the giveBonus method of the Employee class.
com.javacodegeeks.polymorphism.Employee
public void giveBonus() {
    this.bonus = salary * 0.2;
}

public void giveBonus(double multiplier) {
    this.bonus = salary * multiplier;
}
In the code above, we see 2 methods with the name giveBonus but with different arguments. The giveBonus(double multiplier) method is used when we want to give a different bonus to the employee, than the basic one we give in the no-argument method.
Below we create 2 Employeeinstances, like we did before, but now we give a different bonus to the director.
com.javacodegeeks.polymorphism.DirectorExample
Employee emp = new Employee("Keith Henderson", "Backend Developer");
emp.setSalary(50000);
emp.setDepartment("Engineering");
emp.giveBonus();

Employee dir = new Director("Tori Hicks");
dir.setSalary(150000);
dir.setDepartment("Engineering");
dir.giveBonus(0.8);

System.out.println(emp);
System.out.println(dir);
In the code above, the emp object gets a basic bonus from the giveBonus method, whereas the dir object gets a better bonus using the giveBonus(double multiplier) method. As you have already guessed the output would look like:
Output
Keith Henderson is a Backend Developer at the Engineering department earning an annual salary of $50000.0 with bonus $10000.0
Tori Hicks is a Director at the Engineering department earning an annual salary of $150000.0 with bonus $120000.0
We do confirm from the output above, that the director got a better bonus than the other employee.
3.4 Abstraction
Abstraction is about hiding the implementation details of a method to the outside world. In Java, abstraction can be achieved in two ways:
- Interfaces
- Abstract Classes
Let’s see some examples for both ways of abstraction.
3.4.1 Interface
An interface contains abstract methods that have an empty body and no implementation at all. We can create an interface using the interface keyword and provide only the signature for its methods. An interface cannot be instantiated, as such, we need to create a class which implements the methods of an interface, using the implements keyword. Java supports Multiple Inheritance of interfaces, as opposed to the Single Inheritance of classes, as we saw in the previous section. That means that a class can implement multiple interfaces. Additionally, an interface can also extend multiple interfaces. Below we create an example of an interface.
com.javacodegeeks.abstractinterface.Employee
public interface EmployeeInterface {

    String getName();
    double getSalary();
    double getBonus();
    String getDepartment();
    String getRole();
    void giveBonus();

}
The above interface has methods with no implementation. One thing to notice here is that all the methods of an interface are public even if we don’t explicitly add this access modifier. Let’s see below how a class can implement this interface.
com.javacodegeeks.abstractinterface.Employee
public class Employee implements EmployeeInterface {

    private String name;
    private double salary;
    private double bonus;
    private String department;
    private String role;

    public Employee(String name, double salary, String department, String role) {
        this.name = name;
        this.salary = salary;
        this.department = department;
        this.role = role;
    }

    @Override
    public String getName() {
        return name;
    }

    @Override
    public double getSalary() {
        return salary;
    }

    @Override
    public double getBonus() {
        return bonus;
    }

    @Override
    public String getDepartment() {
        return department;
    }

    @Override
    public String getRole() {
        return role;
    }

    @Override
    public void giveBonus() {
        this.bonus = salary * 0.2;
    }

    @Override
    public String toString() {
        return getName() + " is a " + getRole() + " at the " + getDepartment()
                + " department earning an annual salary of $" + salary + " with bonus $" + getBonus();
    }

}
The above Employee class implements all the methods of the EmployeeInterface by providing implementation details. For the sake of the example, we initialise the fields in the constructor and do not provide any setter. Now any Employee object is also a EmployeeInterface as well. This is confirmed in the below instantiation of a new object.
com.javacodegeeks.abstractinterface.EmployeeExample
EmployeeInterface emp = new Employee("Keith Henderson", 50000, "Engineering", "Backend Developer");
emp.giveBonus();
Default Method in Java8
Java 8 introduced the option to add a default implementation for a method of an interface, without having to provide implementation details for it, in any class that implements the interface. Below we see how this is achieved.
com.javacodegeeks.abstractdefaultinterface.EmployeeInterface
public interface EmployeeInterface {

    String getName();

    double getSalary();

    default double getBonus() {
        return getSalary() * 0.2;
    }

    String getDepartment();

    default String getRole() {
        return "Employee";
    }

}
In the above interface, we see that the getBonus and getRole methods have a default implementation. Let’s create a class that implements this interface and provide implementation only for one of those default method.
com.javacodegeeks.abstractdefaultinterface.Employee
public class Employee implements EmployeeInterface {

    private String name;
    private double salary;
    private String department;
    private String role;

    public Employee(String name, double salary, String department, String role) {
        this.name = name;
        this.salary = salary;
        this.department = department;
        this.role = role;
    }

    @Override
    public String getName() {
        return name;
    }

    @Override
    public double getSalary() {
        return salary;
    }

    @Override
    public String getDepartment() {
        return department;
    }

    @Override
    public String getRole() {
        return role;
    }

    @Override
    public String toString() {
        return getName() + " is a " + getRole() + " at the " + getDepartment()
                + " department earning an annual salary of $" + salary + " with bonus $" + getBonus();
    }

}
In the above class, we do not provide any implementation for the getBonus method, as it is not required anymore, due to the default implementation that we provided in the interface. We do provide an implementation of the getRole method though, which means that the default implementation of this method in the interface will be ignored. Below we create an object and print its output.
com.javacodegeeks.abstractdefaultinterface.EmployeeExample
EmployeeInterface emp = new Employee("Keith Henderson", 50000, "Engineering", "Backend Developer");
System.out.println(emp);
Output
Keith Henderson is a Backend Developer at the Engineering department earning an annual salary of $50000.0 with bonus $10000.0
From the above output, we see that the default implementation of the getRole method is ignored, whereas the default implementation of the getBonus method is the one that was invoked.
3.4.2 Abstract Class
The second way to achieve abstraction in Java is the abstract classes. An abstract class is a class which is declared abstract and can contain either abstract methods without implementation details or methods that have implementation details. Similar to an interface, an abstract class cannot be instantiated, as such, we need to create a class and extend the abstract class. A class that extends an abstract class must provide implementation details for the abstract methods and can optionally do the same for the non-abstract methods. Below we find an example of a class that extends an abstract class.
com.javacodegeeks.abstractclass.AbstractEmployee
public abstract class AbstractEmployee {

    private static final double BONUS_PERCENTAGE = 0.2;

    abstract String getName();

    abstract double getSalary();

    abstract String getDepartment();

    double getBonus() {
        return calcBonus();
    }

    String getRole() {
        return "Employee";
    }

    private double calcBonus() {
        return getSalary() * BONUS_PERCENTAGE;
    }

}
com.javacodegeeks.abstractclass.Employee
public class Employee extends AbstractEmployee {

    private String name;
    private double salary;
    private String department;
    private String role;

    public Employee(String name, double salary, String department, String role) {
        this.name = name;
        this.salary = salary;
        this.department = department;
        this.role = role;
    }

    @Override
    public String getName() {
        return name;
    }

    @Override
    public double getSalary() {
        return salary;
    }

    @Override
    public String getDepartment() {
        return department;
    }

    @Override
    public String getRole() {
        return role;
    }

    @Override
    public String toString() {
        return getName() + " is a " + getRole() + " at the " + getDepartment()
                + " department earning an annual salary of $" + salary + " with bonus $" + getBonus();
    }

}
In the above code, we create the abstract class AbstractEmployee which provides abstract methods without any implementation details, using the abstract prefix on the methods. We also provide implementation for the getBonus and getRole methods, like we did in a previous example. The main difference between this abstract class and the interface we created before, is that the abstract class also contains private fields and methods.
4. Java OOPS Other Concepts
In the previous section we took a look at the four OOPS main concepts. In this section we will look at three other concepts which are very important to OOPS:
- Association
- Aggregation
- Composition
4.1 Association
Association refers to the relationship between different objects and how they are related to each other. To achieve association, one object must hold a reference to another object. It is advised not to have a bi-directional association of two objects.
The two types of association that we will look into are aggregation and composition.
4.2 Aggregation
Aggregation is the weak type of association, where an object a that is referenced by an object b can exist even without b. For example, an employee can belong to a department but if a department holds no employees (all fired!), then the department can still exist. This is demonstrated in the example below.
com.javacodegeeks.aggregation.Department
public class Department {

    private String name;

    public void setName(String name) {
        this.name = name;
    }

    public String getName() {
        return name;
    }

}
com.javacodegeeks.aggregation.Employee
public class Employee {

    private String name;
    private int salary;
    private Department department;

    public String getName() {
        return name;
    }

    public void setName(String name) {
        this.name = name;
    }

    public int getSalary() {
        return salary;
    }

    public void setSalary(int salary) {
        this.salary = salary;
    }

    public Department getDepartment() {
        return department;
    }

    public void setDepartment(Department department) {
        this.department = department;
    }

}
In the example above, the Employee class holds a reference to the Department class, as an employee must always belong to a department. The department, on the other hand, can exist as an entity even without any employee in it.
4.3 Composition
Composition is the strong type of association, where an object a that is referenced by an object b cannot exist without b. For example, an employee gets an identity in a company when hired. This identity is unique to each employee and cannot exist if the employee leaves the company. Let’s see an example of this below.
com.javacodegeeks.composition.Identity
public class Identity {

    private String id;

    public String getId() {
        return id;
    }

    public void setId(String id) {
        this.id = id;
    }

}
com.javacodegeeks.composition.Employee
public class Employee {

    private Identity identity;
    private String name;
    private int salary;
    private String department;

    public Identity getIdentity() {
        return identity;
    }

    public void setIdentity(Identity identity) {
        this.identity = identity;
    }

    public String getName() {
        return name;
    }

    public void setName(String name) {
        this.name = name;
    }

    public int getSalary() {
        return salary;
    }

    public void setSalary(int salary) {
        this.salary = salary;
    }

    public String getDepartment() {
        return department;
    }

    public void setDepartment(String department) {
        this.department = department;
    }

}
As we see from the above code, the Employee class holds a reference to the Identity class. The Identity objects cannot exist in the system if the Employee objects they are referenced to no longer exist.
5. Advantages of OOPS in Java
After examining the concepts of OOPS, we will take a look at the advantages of using OOPS in large and complex programs:
- Clear modular structure
- Objects can be reused by other modules
- Easy to maintain and change the existing code
- Implementation details are hidden from other modules
- Breaks down solution into smaller real-life models
- Program can be extended and support new features much easier
6. Eclipse Source Actions
In the previous sections, we created several classes that all had constructors, getters, setters, and toString methods. Eclipse has built-in actions to make our life easier and generate all those for us without having to write a single line of code. Sounds exciting? Before we see those actions, let’s see first the class that we will be created after Eclipse generates all those.
com.javacodegeeks.sourceactions.Employee
public class Employee {

    private String name;
    private double salary;
    private String department;
    private String role;

    public Employee(String name, double salary, String department, String role) {
        this.name = name;
        this.salary = salary;
        this.department = department;
        this.role = role;
    }

    public String getName() {
        return name;
    }

    public void setName(String name) {
        this.name = name;
    }

    public double getSalary() {
        return salary;
    }

    public void setSalary(double salary) {
        this.salary = salary;
    }

    public String getDepartment() {
        return department;
    }

    public void setDepartment(String department) {
        this.department = department;
    }

    public String getRole() {
        return role;
    }

    public void setRole(String role) {
        this.role = role;
    }

    @Override
    public String toString() {
        return "Employee [name=" + name + ", salary=" + salary + ", department=" + department + ", role=" + role + "]";
    }

}
The above class does not differ from any class we have created so far. It has a constructor, setters, getters and toString methods.
Let’s now generate all those, by starting with the Employee class in which we have added only the fields. To view the actions we open the class in Eclipse, we right click on it and select Source, as shown below.
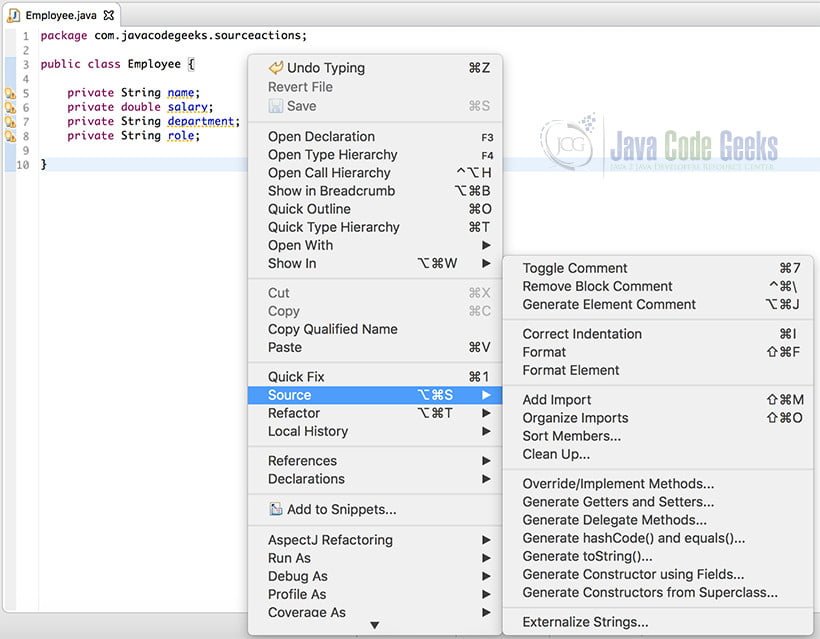
In the following sections, we will select the actions we are interested in one by one.
6.1 Generate Constructor
To generate the constructor of the Employee class, we select the Generate Constructor using Fields action. There we can select any field that we would want to be added to the constructor. We select all the fields and click OK.
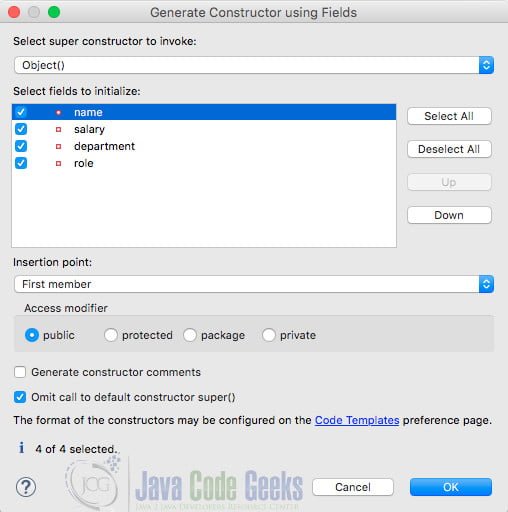
When this action is finished it generates a public constructor with all the fields of our class.
6.2 Generate Getters and Setters
Similar to the previous action, the getters and setters can be generated by selecting Generate Getters and Setters. Most of the times we want to select all the fields so we do that and click OK.
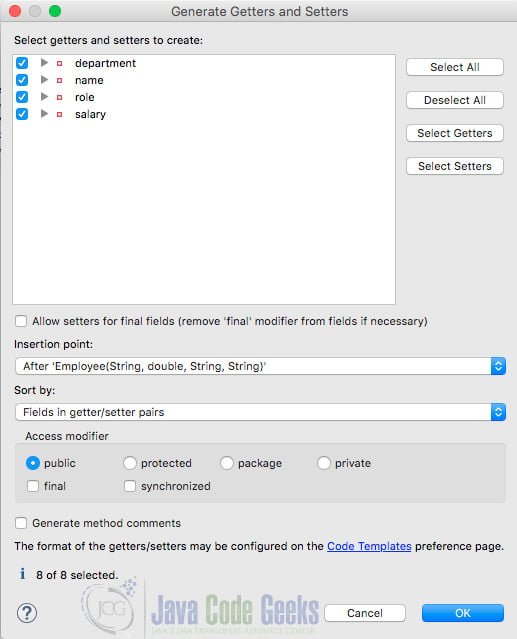
This action generates public getters and setters for all the fields of the class and places them after the constructor.
6.3 Generate toString()
As we have mentioned the toString() method is a very popular method which should be implemented by almost all classes, as it’s very important to print the objects in a program. To generate this method select Generate toString(), select all the fields and click OK.
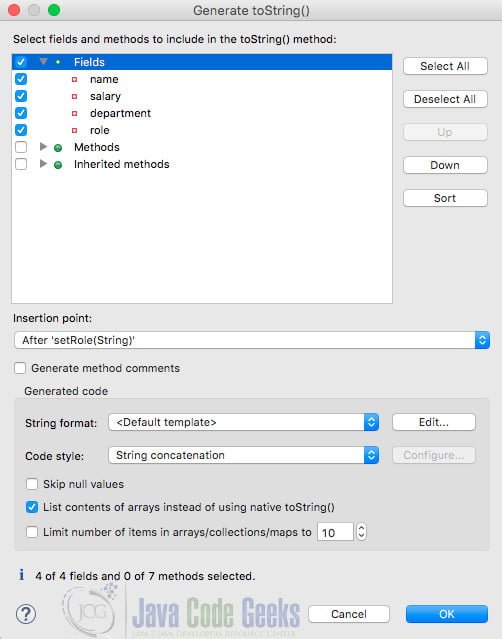
This action generates the toString method which is overridden by the Object class. The default template of Eclipse is good enough but we can also provide a custom one.
7. Java OOPS Concepts – Conclusion
In this post, we examined the four main OOPS concepts in Java: Encapsulation, Inheritance, Polymorphism, and Abstraction. We saw other OOPS concepts in Java such as Association, Aggregation, and Composition. Also, we took a look at the advantages of using OOPS in large and complex programs and how to make our life easier in OOPS with Eclipse.
8. Download the Eclipse project
That was an OOPS Consepts Java Tutorial.
You can download the full source code of the above examples here: OOPS Concepts Java Tutorial


