Google’s HTTP Client Library for Java is a one-stop shop for all your HTTP client needs, irrespective of the Java platform (application server, Android, App Engine etc.). It offers a well-designed abstraction layer over a number of lower level HTTP client implementations (we’ll talk more about this later). The only downside is that the official documentation on it is minimal & only covers the major points. A gentle introduction to the use of the library it is not, and that is the gap that this article fills.
1. Choose Your Transport
When you start to use Google’s HTTP client library, the first choice you have to make is which client implementation to use (remember, this client library is just an abstraction). Your choice might be dictated by the limitations/issues of your Java platform (if any). The available choices are:
java.net.HttpURLConnection,- Apache
HttpClient, or, - URL Fetch (for Google App Engine)
java.net.HttpURLConnection might be the weapon of choice if you don’t want to add any dependencies. Apache’s HttpClient is a well-known and popular choice and if you are writing code for running on App Engine, then Url Fetch is your only choice.
One of the beauties of Google’s HTTP library is that as your code moves from one Java platform to another, all you might have to change is your choice of HttpTransport: the rest of your code remains unchanged!
2. Setup the Project
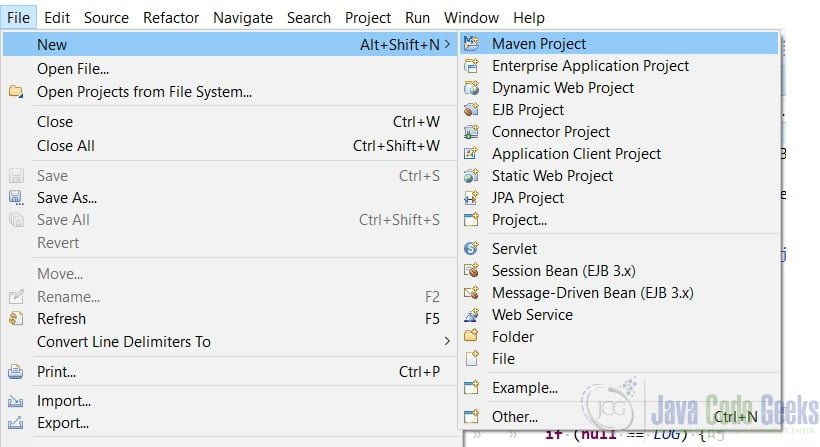
We’ll be using Eclipse as our IDE of choice and Maven for dependency management. Let’s start by creating a new Maven project (you have the m2e plugin installed, right?).
You will see a dialog box for creating a new Maven project asking you for the groupId, artifactId and a few other details. This dialog box can be filled-up as follows:
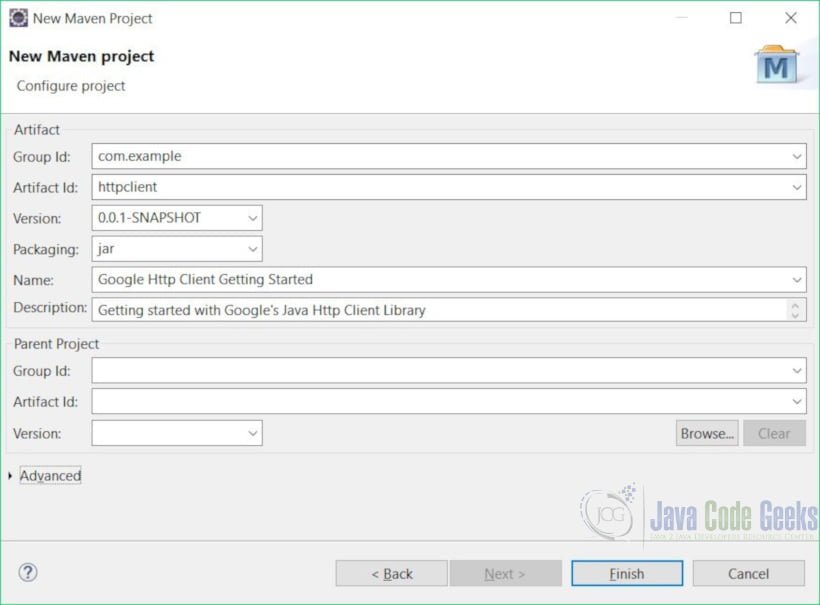
After clicking on Finish, Eclipse will create the Maven project for you.
The following step may not be required for all Eclipse versions/installations, but it is a good idea at this early stage to ensure that you are targeting the correct version of Java (JDK 8) in your project. Right-click on the project > Properties. When the project-specific properties dialog opens, click on Java Compiler. Make sure Enable project specific settings is enabled, then set Compiler compliance level to 1.8 and click Apply and Close.

Next step will be to test whether the project was created successfully. For that, right-click on pom.xml > Run as > Maven build… .

Enter clean verify in the Goals field and click Run. When you run this configuration the console output should clearly show your project being processed:

The end of a successful run looks like this:

2.1. Adding Dependencies
At a minimum you will need to add the core HTTP client library:
pom.xml
    <dependency>
        <groupId>com.google.http-client</groupId>
        <artifactId>google-http-client</artifactId>
        <version>1.23.0</version>
    </dependency>
For the purposes of this example we will add a couple more libraries: google-http-client-jackson2 and com.google.code.gson:gson. There is an easy way to add a Maven dependency using Eclipse:
- Double-click on
pom.xmlto open it. - Click on the Dependencies tab in the editor.
- Then click on Add… button.
- In the Select Dependency dialog, highlight the text field in the middle and start typing the
groupId:artifactIdof the library you want to add. - As you type, Eclipse performs searches in the background & keeps narrowing the list of available options. When you see the one you want to add, clicking on it fills in the fields above.
- Click OK.
This is what the Select Dependency dialog looks like when we search for and add the google-http-client-jackson2 dependency:
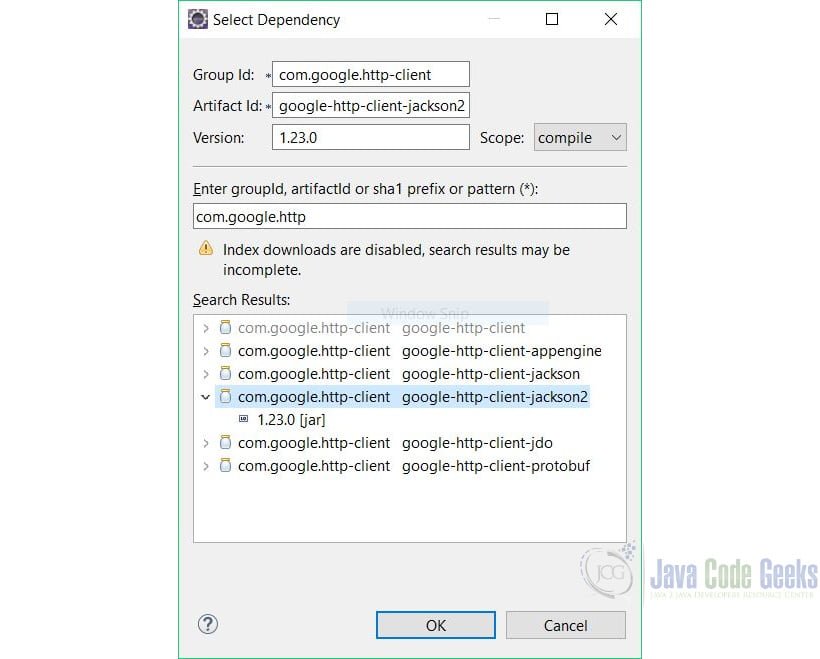
Now we are ready to start writing our code.
3. The Code
Let’s start by choosing our transport. We will keep things super-simple:
Choose transport
    private static HttpTransport TRANSPORT;

    private static HttpTransport transport() {
        if (null == TRANSPORT) {
            TRANSPORT = new NetHttpTransport();
        }
        return TRANSPORT;
    }
For our simple example we don’t really need lazy initialization, but it’s a good idea to get the HttpTransport from a method as that allows us to change the logic inside the method at a later stage and be confident in the cohesion of that change.
Once we have chosen our transport layer, we can create our HttpRequestFactory:
Setup HttpRequestFactory
    private static HttpRequestFactory REQ_FACTORY;

    private static HttpRequestFactory reqFactory() {
        if (null == REQ_FACTORY) {
            REQ_FACTORY = transport().createRequestFactory();
        }
        return REQ_FACTORY;
    }
The initialization of HttpRequestFactory is somewhat slow, so it is best to initialize it once and then keep it around.
3.1 GET Request With Query Parameters
We will start off with perhaps the simplest thing to do: generate a GET request. To make things a little more interesting we add a couple of dummy query parameters:
getRequestWithQueryParameters()
    private static final String TEST_URL = "http://httpclient.requestcatcher.com/test";

    private static void getRequestWithQueryParameters() throws IOException {
        GenericUrl url = new GenericUrl(TEST_URL);
        url.put("arg1", true);
        url.put("arg2", 45);
        HttpRequest req = reqFactory().buildGetRequest(url);
        @SuppressWarnings("unused")
        HttpResponse resp = req.execute();
    }
We create a new GenericUrl, add some query parameters to it (for this purpose the GenericUrl exposes a Map-like interface), build a GET request (line 7) and then execute it (line 9). Executing the HttpRequest gives us an HttpResponse object (provided there were no exceptions). All further interaction is typically with this HttpResponse. We can:
- parse it as a string,
- as a specific
Type, - or we can call
getContent()on it to get anInputStream& then we can process it however we want.
The raw HTTP request for the code above looks like this:

Notice the User-Agent in the request.
3.2 POST Submission of an x-www-form-urlencoded Form
The basics of making a POST reqeust are the same as that of making a GET request with one exception: we have to provide the content to be sent (via HttpContent):
postRequestFormUrlencoded()
    private static void postRequestFormUrlencoded() throws IOException {
        GenericUrl url = new GenericUrl(TEST_URL);
        Map<String, Object> data = new LinkedHashMap<>();
        data.put("arg1", true);
        data.put("arg2", 45);
        HttpContent content = new UrlEncodedContent(data);
        reqFactory().buildPostRequest(url, content).execute();
    }
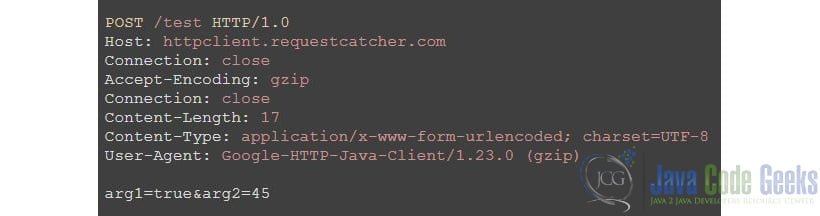
To submit x-www-form-urlencoded form data, we create an instance of UrlEncodedData and pass it an object holding the data to be sent. The rest remains the same: this is the beauty of a good abstraction. Let’s take a look at the raw HTTP request:
3.3 POST Request with a Simple JSON Payload
As the popularity of JSON as a data interchange format has grown, so has the need for sending JSON-formatted data in a POST request. The Google Http Client library makes this really simple:
postSimpleJsonData()
    private static final JsonFactory JSON_FACTORY = new JacksonFactory();

    private static void postSimpleJsonData() throws IOException {
        GenericUrl url = new GenericUrl(TEST_URL);
        Map<String, Object> data = new LinkedHashMap<>();
        data.put("arg1", true);
        data.put("arg2", 45);
        HttpContent content = new JsonHttpContent(JSON_FACTORY, data);
        reqFactory().buildPostRequest(url, content).execute();
    }
Instead of using UrlEncodedData as in the previous example, we have used JsonHttpContent to send a JSON-formatted payload. We added the google-http-client-jackson2 dependency to take advantage of this feature of HTTP Client library. The raw HTTP request looks like this:

3.4 POST Request With a Complex JSON Payload
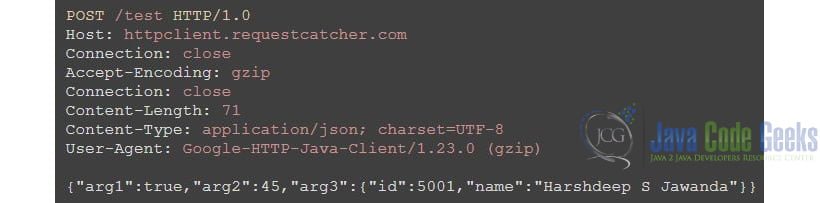
Imagine the previous scenario, but add the complication that the JSON data to be sent is not represented by a flat structure where each property has a primitive (boolean, string, number etc.) value. Instead, one or more of the values are themselves non-primitive objects, leading to a nested data structure. No problem, the google-http-client-jackson2 library can handle this situation as well just by being given a hint (via the @Key annotation):
postComplexJsonData()
    private static void postComplexJsonData() throws IOException {
        GenericUrl url = new GenericUrl(TEST_URL);
        Map<String, Object> data = new LinkedHashMap<>();
        data.put("arg1", true);
        data.put("arg2", 45);
        CustomObj customDto = new CustomObj();
        customDto.id = 5001;
        customDto.name = "Harshdeep S Jawanda";
        data.put("arg3", customDto);
        HttpContent content = new JsonHttpContent(JSON_FACTORY, data);
        reqFactory().buildPostRequest(url, content).execute();
    }

    private static class CustomObj {

        @Key
        private int id;

        @Key
        private String name;

    }
It doesn’t matter whether the CutomObj POJOs fields are private or public, whether there are getters or setters: the @Key annotation tells the JSON processor that these are the fields the coder is interested in serializing/de-serializing. The service receiving this request correctly sees it as:
3.5 Parsing an API’s JSON Response
Very often a developer these days needs to query an API and then parse the JSON returned in the response. Rather than using getContent() to acquire an InputStream & then struggle with reading & parsing the data, the Jackson module of the HTTP library makes it much easier to parse the response. Here we use GitHub’s public users API to get a response with JSON content (the GithubUsers class used here is available in the source code):
parsePublicApiJsonResponse()
    private static void parsePublicApiJsonResponse() throws IOException {
        GenericUrl url = new GenericUrl("https://api.github.com/users");
        url.put("per_page", 5);
        HttpRequest req = reqFactory().buildGetRequest(url);
        // Set the parser to use for parsing the returned JSON data
        req.setParser(new JsonObjectParser(JSON_FACTORY));

        // Use GSON's TypeToken to let the parser know to expect a List<GithubUser>
        Type type = new TypeToken<List<GithubUser>>() {
        }.getType();

        @SuppressWarnings("unchecked")
        List<GithubUser> users = (List<GithubUser>) req.execute().parseAs(type);
        if (null != users && !users.isEmpty()) {
            System.out.println("GithubUser 0: " + users.get(0));
        }
    }
This prints out:
User 0: User [login=mojombo, id=1, htmlUrl=https://github.com/mojombo, site_admin=false]
How simple is that!?
4. Conclusion
Given the current-day developer’s need to send data “over the wire” and/or get data from numerous REST APIs, using Google’s HTTP Client library for Java offers the developer a convenient one-stop-shop for all sorts of HTTP client usage across various Java platforms. The effort put in to learning how to use this library is indeed time very well spent.
5. Download the Source Code
This was an example of using Google’s HTTP Client Library for Java in various ways.
You can download the full Eclipse project for this example here: httpclient.zip

good one..
Thank you!
Hey, how did you get the “RAW Http XXX request” on each section? Is there an implemented function to get this code? I am having problems with a WordPress REST API post call that for some JSON works, but not for others, and was willing to check what my request is outputting when executed. Thanks!