In this tutorial, we will explore how to effectively consume Page Entity Response From RestTemplate using the Jackson library. When building Java applications that interact with RESTful services, one common task is to use RestTemplate to make HTTP requests and handle the corresponding responses. We’ll follow a step-by-step approach to set up a basic RESTful endpoint, create a client class to consume the endpoint, handle potential exceptions, and write an integration test to verify the behavior.
1. Introduction
In modern web development, the interaction between applications often involves consuming RESTful APIs. RestTemplate simplifies this process by providing an abstraction to make HTTP requests and process responses. Our tutorial will focus on using RestTemplate to fetch data from a RESTful endpoint and deserialize it into a Page of entities. Additionally, we will utilize Jackson, a popular JSON library, for deserialization.
2. Create a Spring Boot Project
You can start by creating a new Spring Boot project using your preferred IDE or by using Spring Initializr online.
- Visit the Spring Initializr website: https://start.spring.io/
- Select the necessary project options, such as project type, language, and packaging.
- Add the required dependencies:
- Web
- Jackson
- Lombok (optional, but recommended for cleaner code)
- H2 Database (if needed for storing data)
- Generate the project and download the ZIP file.
3. Configure Dependencies
If you’re using Maven, your pom.xml should contain the following dependencies:
    <dependencies>
        <dependency>
            <groupId>org.springframework.boot</groupId>
            <artifactId>spring-boot-starter-web</artifactId>
        </dependency>

        <dependency>
            <groupId>com.h2database</groupId>
            <artifactId>h2</artifactId>
            <scope>runtime</scope>
        </dependency>
        <dependency>
            <groupId>org.projectlombok</groupId>
            <artifactId>lombok</artifactId>
            <optional>true</optional>
        </dependency>
        <dependency>
            <groupId>org.springframework.boot</groupId>
            <artifactId>spring-boot-starter-test</artifactId>
            <scope>test</scope>
        </dependency>
        <dependency>
            <groupId>org.springframework.boot</groupId>
            <artifactId>spring-boot-starter-data-jpa</artifactId>
            <version>RELEASE</version>
            <scope>compile</scope>
        </dependency>
        <!-- https://mvnrepository.com/artifact/com.fasterxml.jackson.core/jackson-databind -->
        <dependency>
            <groupId>com.fasterxml.jackson.core</groupId>
            <artifactId>jackson-databind</artifactId>
            <version>2.15.2</version>
        </dependency>

    </dependencies>
4. Create Entity and Repository
Let’s assume you’re working with an Employee entity. Create the entity class in the src/main/java/com/example/demo directory:
package org.example;

import com.fasterxml.jackson.annotation.JsonProperty;
import jakarta.persistence.Entity;
import jakarta.persistence.GeneratedValue;
import jakarta.persistence.GenerationType;
import jakarta.persistence.Id;
import lombok.Data;

@Entity
@Data
public class Employee {

    @Id
    @GeneratedValue(strategy = GenerationType.IDENTITY)
    private Long id;
    @JsonProperty("firstName")
    private String firstName;
    @JsonProperty("lastName")
    private String lastName;

    public Employee(String firstName, String lastName) {
        this.firstName = firstName;
        this.lastName = lastName;
    }

    public Employee() {

    }

    public Long getId() {
        return id;
    }

    public void setId(Long id) {
        this.id = id;
    }

    public String getFirstName() {
        return firstName;
    }

    public void setFirstName(String firstName) {
        this.firstName = firstName;
    }

    public String getLastName() {
        return lastName;
    }

    public void setLastName(String lastName) {
        this.lastName = lastName;
    }
}
This Java class represents an Employee entity, typically used in a Spring Boot application with database persistence. Let’s break down the key components and annotations in this class:
@EntityAnnotation:- This annotation is from the Java Persistence API (JPA) and marks this class as a JPA entity. In the context of Spring Boot and JPA, it means that instances of this class can be mapped to database records.
@DataAnnotation:- The
@Dataannotation is from the Lombok library. It generates common boilerplate code for getter and setter methods,toString(),equals(), andhashCode()methods, which are typically required for Java classes. - With
@Data, you don’t need to write these methods explicitly; Lombok generates them during compilation.
- The
- Fields:
id: This field represents the unique identifier for an employee. It is annotated with@Id, indicating that it’s the primary key for database purposes.@GeneratedValue(strategy = GenerationType.IDENTITY): This annotation is used in conjunction with@Idto specify that theidfield’s values should be generated by the database using an identity strategy. This typically corresponds to auto-incrementing primary keys in relational databases.firstNameandlastName: These fields represent the first name and last name of an employee. They are annotated with@JsonProperty, which is typically used to specify the names of properties when serializing and deserializing JSON. In this case, it ensures that the JSON keys for these properties will be “firstName” and “lastName.”
- Constructors:
- The class defines two constructors:
public Employee(String firstName, String lastName): This constructor allows you to create anEmployeeobject with the first name and last name provided as parameters. It is likely used for creating new employee records.public Employee(): This is a no-argument constructor, which is typically required for JPA entities. It allows for the creation of instances without specifying initial values.
- The class defines two constructors:
- Getter and Setter Methods:
- For each field (
id,firstName, andlastName), there are corresponding getter and setter methods. Lombok’s@Dataannotation generates these methods automatically. These methods allow you to access and modify the values of the fields.
- For each field (
This class defines the structure of an Employee entity with three properties: id, firstName, and lastName. It also provides constructors and getter/setter methods for interacting with instances of this class. In a Spring Boot application with JPA, instances of this class can be mapped to database records, allowing you to perform database operations such as saving, updating, and retrieving employee data. Additionally, the @JsonProperty annotations ensure proper JSON serialization and deserialization when working with this entity in RESTful services.
Create a repository interface in the same directory:
import org.springframework.data.jpa.repository.JpaRepository;

public interface EmployeeRepository extends JpaRepository<Employee, Long> {
}
This code defines a Spring Data JPA repository interface named EmployeeRepository. Spring Data JPA simplifies the process of creating data repositories (commonly used for database access) by providing a set of conventions and a framework for generating repository implementations at runtime.
5. Create RestController
Create a EmployeeController class in the src/main/java/com/example directory:
package org.example;

import org.springframework.data.domain.Page;
import org.springframework.data.domain.PageImpl;
import org.springframework.data.domain.PageRequest;
import org.springframework.http.ResponseEntity;
import org.springframework.web.bind.annotation.GetMapping;
import org.springframework.web.bind.annotation.RequestParam;
import org.springframework.web.bind.annotation.RestController;

import java.util.ArrayList;
import java.util.List;

@RestController
public class EmployeeController {

    private EmployeeRepository employeeRepository;

    public EmployeeController(EmployeeRepository employeeRepository) {
        this();
        this.employeeRepository = employeeRepository;
    }

    public EmployeeController() {

    }

    @GetMapping("/employee/data")
    public ResponseEntity<Page<Employee>> getData(@RequestParam(defaultValue = "0") int page,
                                                     @RequestParam(defaultValue = "10") int size) {
        List<Employee> empList = listImplementation();


        int totalSize = empList.size();
        int startIndex = page * size;
        int endIndex = Math.min(startIndex + size, totalSize);

        List<Employee> pageContent = empList.subList(startIndex, endIndex);

        Page<Employee> employeeDtos = new PageImpl<>(pageContent, PageRequest.of(page, size), totalSize);

        return ResponseEntity.ok()
                .body(employeeDtos);
    }

    private static List<Employee> listImplementation() {
        List<Employee> empList = new ArrayList<>();
        empList.add(new Employee("Jane", "Finance"));
        empList.add(new Employee("Sarah", "IT"));
        empList.add(new Employee("John", "IT"));
        return empList;
    }

}
This is a Java class annotated with @RestController, which indicates that it’s a Spring MVC controller class responsible for handling HTTP requests and providing responses. Let’s break down the key components and functionality of this EmployeeController class:
- Constructor Injection:
- The class has two constructors. One constructor takes an
EmployeeRepositoryas a parameter, implying that it can be used for dependency injection. Dependency injection allows you to provide the controller with the necessary dependencies (in this case, anEmployeeRepository) when it’s created. - The other constructor (
public EmployeeController()) is a no-argument constructor. It’s typically used when you want to create an instance of the class without any dependencies explicitly injected. In this case, it seems to be empty and does nothing.
- The class has two constructors. One constructor takes an
- Endpoint Mapping:
- The class defines an HTTP GET endpoint mapped to the path “/employee/data”. This means that when a GET request is made to this path, the
getDatamethod will be executed to handle the request. - The
@GetMappingannotation specifies that this method should handle GET requests.
- The class defines an HTTP GET endpoint mapped to the path “/employee/data”. This means that when a GET request is made to this path, the
getDataMethod:- This method takes two optional query parameters: “page” and “size,” which have default values of 0 and 10, respectively. These parameters are commonly used for pagination, allowing clients to request specific pages of data.
- Inside the method:
listImplementation()is called to generate a list ofEmployeeobjects. This is a simplified implementation, likely used for testing purposes. In a real application, you would typically retrieve data from a database using the injectedEmployeeRepository.- It calculates the total size of the data and determines the range of elements to include on the requested page.
- It creates a
Page<Employee>usingPageImpl, specifying the content (data on the current page), thePageRequest(containing the page number and size), and the total size of data. - Finally, it returns an HTTP response with the
Page<Employee>as the response body and a status code of 200 (OK).
listImplementationMethod:- This private method generates a list of
Employeeobjects. It’s used as a placeholder for generating sample data. In a real application, you would replace this method with code to retrieve data from a database or another data source.
- This private method generates a list of
- Employee Entity:
- It appears that there is an
Employeeentity class used in this controller. However, its definition is not provided in the code snippet. Typically, an entity class would represent data stored in a database and might have fields like name, department, etc.
- It appears that there is an
This EmployeeController class handles GET requests to “/employee/data” by returning paginated data in the form of a Page<Employee>. In a real-world scenario, you would replace the sample data generation with actual data retrieval from a database using the EmployeeRepository.
6. Configure RestTemplate Bean
In your main application class (typically named DemoApplication), create a RestTemplate bean:
import org.springframework.boot.SpringApplication;
import org.springframework.boot.autoconfigure.SpringBootApplication;
import org.springframework.context.annotation.Bean;
import org.springframework.web.client.RestTemplate;

@SpringBootApplication
public class DemoApplication {

    public static void main(String[] args) {
        SpringApplication.run(DemoApplication.class, args);
    }

    @Bean
    public RestTemplate restTemplate() {
        return new RestTemplate();
    }
}
This code defines a Spring Boot application with a main method that can be used to run the application. It also configures a RestTemplate bean, which can be used for making HTTP requests within the application. The @SpringBootApplication annotation brings together various Spring Boot features, making it easier to develop and run Spring applications with minimal configuration.
@Bean public RestTemplate restTemplate(): This method is annotated with @Bean, indicating that it defines a Spring Bean of type RestTemplate. A RestTemplate is a class provided by Spring for making HTTP requests to external services or APIs. By defining it as a bean, you make it available for injection into other parts of your application.
The method name restTemplate is the name by which the RestTemplate bean can be accessed within the Spring application context.
The RestTemplate bean is created and returned by this method.
7. Create Integration Test
Create an integration test class named EmployeeClientIntegrationTest in the src/test/java/com/example directory:
package org.example;

import org.junit.jupiter.api.Test;
import org.springframework.beans.factory.annotation.Autowired;
import org.springframework.boot.test.context.SpringBootTest;
import org.springframework.boot.test.web.client.TestRestTemplate;
import org.springframework.core.ParameterizedTypeReference;
import org.springframework.http.HttpMethod;
import org.springframework.http.HttpStatus;
import org.springframework.http.ResponseEntity;
import org.springframework.test.context.ActiveProfiles;

import java.util.List;

import static org.junit.jupiter.api.Assertions.assertEquals;
import static org.junit.jupiter.api.Assertions.assertNotNull;

@SpringBootTest(webEnvironment = SpringBootTest.WebEnvironment.RANDOM_PORT)
@ActiveProfiles("test")
public class EmployeeClientIntegrationTest<T> {

    @Autowired
    private TestRestTemplate restTemplate;

    @Test
    public void testFetchEmployeeData() {
        ResponseEntity<CustomPageImpl<EmployeeController>> responseEntity = restTemplate.exchange(
                "/employee/data?page=0&size=10",
                HttpMethod.GET,
                null,
                new ParameterizedTypeReference<CustomPageImpl<EmployeeController>>() {
                }
        );

        assertEquals(HttpStatus.OK, responseEntity.getStatusCode());
        CustomPageImpl<EmployeeController> employeePage = responseEntity.getBody();
        assertNotNull(employeePage);

        List<EmployeeController> content = employeePage.getContent();
        assertNotNull(content);
        assertEquals(10, content.size());
    }

}
Here’s what’s happening in this integration test:
- Package and Imports: The test class is located in the
org.examplepackage. It imports various Spring Boot and JUnit classes necessary for testing. - Annotations:
@SpringBootTest: This annotation tells Spring Boot to set up a test application context. It uses a random web port (WebEnvironment.RANDOM_PORT) for testing.@ActiveProfiles("test"): This annotation activates a Spring profile named “test.” Profiles are typically used to configure different environments, and in this case, it’s likely used to configure test-specific settings.
- Autowired TestRestTemplate: An instance of
TestRestTemplateis injected using@Autowired. This allows you to make HTTP requests to your application as if it were running. - Test Method –
testFetchEmployeeData:- This method defines a test case that fetches employee data from an endpoint.
restTemplate.exchange: It uses theTestRestTemplateto make an HTTP GET request to the “/employee/data” endpoint with query parameters for pagination.ParameterizedTypeReference: It’s used to capture the generic type of the response, which isCustomPageImpl<EmployeeController>. This is necessary because generic type information is erased at runtime.- Assertions: The test asserts that:
- The HTTP status code of the response is
HttpStatus.OK. - The response body is not null.
- The content of the response, representing employee data, is not null.
- The size of the content list is 10, indicating that the pagination is working correctly.
- The HTTP status code of the response is
This integration test verifies the behavior of the “/employee/data” endpoint in your Spring Boot application by making an HTTP request and checking the response. It ensures that the endpoint returns the expected HTTP status code and that the pagination is functioning as expected, delivering a page of 10 employee records. This type of test helps ensure that your application’s API endpoints work correctly in a real-world scenario.
8. CustomPageImpl Class
The CustomPageImpl class appears to be a custom implementation of the Spring Data Page interface used in a Spring Boot application. It’s typically used when you want to customize the behavior of pagination responses in your application, particularly when working with Spring Data JPA or other data sources. Let’s explain its usage and some key methods within the class:
8.1 Usage of CustomPageImpl Class
In a Spring Boot application, when you retrieve a list of data that might be paginated (e.g., a list of records from a database), Spring Data often returns the results as a Page<T> object. The Page interface represents a page of data along with metadata like the total number of items and the number of items per page.
Here’s how the CustomPageImpl class is used:
- Custom Pagination Response:
CustomPageImplis a custom implementation of thePageinterface that allows you to customize the behavior of pagination responses. It’s particularly useful when you need to customize the deserialization of pagination responses from JSON. - Custom Constructors:
CustomPageImplprovides custom constructors that are used for deserializing JSON responses into instances of this class. These constructors take various parameters, including the content of the page, page number, page size, total elements, and more. - @JsonCreator Annotation: The
@JsonCreatorannotation is used on one of the constructors to indicate that this constructor should be used for deserialization. It specifies the mode asJsonCreator.Mode.PROPERTIES, which means that Jackson will use the provided properties (e.g., “content,” “number,” “size,” “totalElements”) to map the JSON data to the constructor’s parameters. - Flexibility: By creating a custom
CustomPageImplclass, you can add custom logic to the constructors, modify how pagination data is deserialized, or even add additional metadata to the pagination response.
8.2 Key Methods of CustomPageImpl Class
While the CustomPageImpl class primarily consists of constructors for deserialization purposes, it also inherits methods from the Page interface provided by Spring Data. Some key methods from the Page interface that you can expect to find in the CustomPageImpl class include:
| Method | Description |
getContent() | Returns the content of the current page as a List. |
getNumber() | Returns the page number (0-based) of this page. |
getSize() | Returns the size (number of items) of the page. |
getTotalElements() | Returns the total number of elements available across all pages. |
getTotalPages() | Returns the total number of pages. |
hasPrevious() | Checks if there is a previous page. |
hasNext() | Checks if there is a next page. |
8.3 CustomPageImpl
Create the CustomPageImpl class in the same directory as your test class:
package org.example;

import java.util.ArrayList;
import java.util.List;

import org.springframework.data.domain.PageImpl;
import org.springframework.data.domain.PageRequest;
import org.springframework.data.domain.Pageable;

import com.fasterxml.jackson.annotation.JsonCreator;
import com.fasterxml.jackson.annotation.JsonIgnoreProperties;
import com.fasterxml.jackson.annotation.JsonProperty;
import com.fasterxml.jackson.databind.JsonNode;

@JsonIgnoreProperties(ignoreUnknown = true)
public class CustomPageImpl<T> extends PageImpl<T> {
    @JsonCreator(mode = JsonCreator.Mode.PROPERTIES)
    public CustomPageImpl(@JsonProperty("content") List<T> content, @JsonProperty("number") int number,
                          @JsonProperty("size") int size, @JsonProperty("totalElements") Long totalElements,
                          @JsonProperty("pageable") JsonNode pageable, @JsonProperty("last") boolean last,
                          @JsonProperty("totalPages") int totalPages, @JsonProperty("sort") JsonNode sort,
                          @JsonProperty("numberOfElements") int numberOfElements) {
        super(content, PageRequest.of(number, 1), 10);
    }

    public CustomPageImpl(List<T> content, Pageable pageable, long total) {
        super(content, pageable, total);
    }

    public CustomPageImpl(List<T> content) {
        super(content);
    }

    public CustomPageImpl() {
        super(new ArrayList<>());
    }
}
9. Run the Application and Test
Now, you can run your Spring Boot application by executing the main method in your DemoApplication class.
For testing, you can run the EmployeeClientIntegrationTest class as a JUnit test. This test will start a test server, send an HTTP request to the /employee/data endpoint, and verify the response.
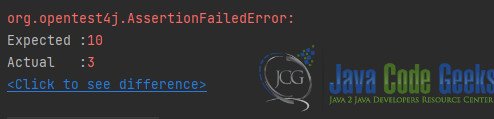
Here is the result of our test:
10. Conclusion
By following these steps, you have set up a Spring Boot project with RestTemplate and Jackson for consuming a RESTful endpoint and handling JSON deserialization. This will allow you to effectively fetch data from RESTful APIs and integrate it into your Java application. Remember to customize the code according to your specific use case and requirements.
11. Download the Source Code
This was an example of how to consume Page Entity Response From RestTemplate!
You can download the full source code of this example here: Consuming Page Entity Response From RestTemplate
