This is an article to see Colors in Java through a JavaFX Color Example. In JavaFX, you can specify the color for text and background color for regions. You can specify a color as a uniform color, an image pattern, or a color gradient.
A uniform color uses the same color to fill the entire region. An image pattern lets you fill a region with an image pattern. A color gradient defines a color pattern in which the color varies along a straight line from one color to another. The variation in color in the java gradient can be linear or radial.
The following table shows an overview of the whole article:
Table Of Contents
The following examples uses Java SE 7 and JavaFX 2.2.
1. Using the Color Class in Java
1.1 The Code
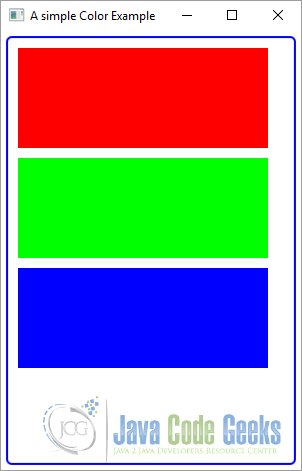
FxColorExample1.java
01 02 03 04 05 06 07 08 09 10 11 12 13 14 15 16 17 18 19 20 21 22 23 24 25 26 27 28 29 30 31 32 33 34 35 36 37 38 39 40 41 42 43 44 45 46 47 48 49 50 51 52 53 54 55 56 | import javafx.application.Application;import javafx.scene.Scene;import javafx.scene.layout.VBox;import javafx.scene.paint.Color;import javafx.scene.shape.Rectangle;import javafx.stage.Stage;public class FxColorExample1 extends Application{ public static void main(String[] args) { Application.launch(args); } public void start(Stage stage) { // Create the Colors Color red = new Color(1.0, 0.0, 0.0, 1.0); Color green = Color.web("rgb(0, 255, 0)"); Color blue = Color.web("0X0000FF"); // Create the Rectangles Rectangle rectangle1 = new Rectangle(250,100); Rectangle rectangle2 = new Rectangle(250,100); Rectangle rectangle3 = new Rectangle(250,100); // Set the Color of the Rectangle rectangle1.setFill(red); rectangle2.setFill(green); rectangle3.setFill(blue); // Create the VBox VBox root = new VBox(); // Add the details to the VBox root.getChildren().addAll(rectangle1,rectangle2,rectangle3); // Set the vertical spacing between children to 10px root.setSpacing(10); // Set the Style-properties of the VBox root.setStyle("-fx-padding: 10;" + "-fx-border-style: solid inside;" + "-fx-border-width: 2;" + "-fx-border-insets: 5;" + "-fx-border-radius: 5;" + "-fx-border-color: blue;"); // Create the Scene Scene scene = new Scene(root,300,400); // Add the scene to the Stage stage.setScene(scene); // Set the title of the Stage stage.setTitle("A simple Color Example"); // Display the Stage stage.show(); }} |
The Color class in java represents a solid uniform color from the RGB color space. Every color has an alpha value defined between 0.0 to 1.0 or 0 to 255. An alpha value of 0.0 or 0 means the color is completely transparent, and an alpha value of 1.0 or 255 denotes a completely opaque color. By default, the alpha value is set to 1.0.
You can have an instance of the Color class in three ways:
- Using the constructor
- Using one of the factory methods
- Using one of the color constants declared in the Color class
The Color class has only one constructor that lets you specify the RGB and opacity in the range of 1,0 and 1.0:
1 | public Color(double red, double green, double blue, double opacity) |
The following snippet of code creates a completely opaque blue color:
1 | Color blue = new Color(0.0, 0.0, 1.0, 1.0); |
You can use the following static methods in the Color class to create Color objects. The double values need to be between 0.0 and 1.0 and int values between 0 and 255:
- Color color(double red, double green, double blue)
- Color color(double red, double green, double blue, double opacity)
- Color hsb(double hue, double saturation, double brightness)
- Color hsb(double hue, double saturation, double brightness, double opacity)
- Color rgb(int red, int green, int blue)
- Color rgb(int red, int green, int blue, double opacity)
The valueOf() and web() factory methods let you create java color objects from strings in web color value formats. The following snippet of code creates blue Color objects using different string formats:
1 2 3 4 5 6 | Color blue = Color.valueOf("blue");Color blue = Color.web("blue");Color blue = Color.web("#0000FF");Color blue = Color.web("0X0000FF");Color blue = Color.web("rgb(0, 0, 255)");Color blue = Color.web("rgba(0, 0, 255, 0.5)"); |
1.2 The GUI
2. Using the ImagePattern Class
2.1 The Code
FxColorExample2.java
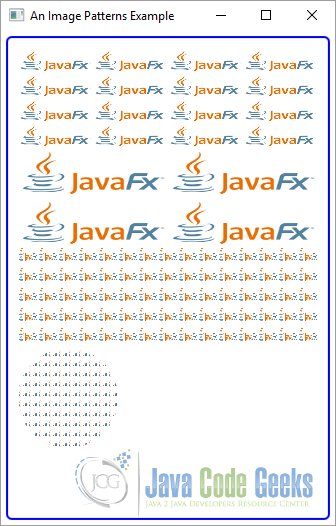
01 02 03 04 05 06 07 08 09 10 11 12 13 14 15 16 17 18 19 20 21 22 23 24 25 26 27 28 29 30 31 32 33 34 35 36 37 38 39 40 41 42 43 44 45 46 47 48 49 50 51 52 53 54 55 56 57 58 59 60 61 62 63 64 65 66 67 68 69 70 71 72 | import javafx.application.Application;import javafx.scene.Scene;import javafx.scene.image.Image;import javafx.scene.layout.VBox;import javafx.scene.paint.ImagePattern;import javafx.scene.shape.Circle;import javafx.scene.shape.Rectangle;import javafx.stage.Stage;public class FxColorExample2 extends Application{ private Image image; public static void main(String[] args) { Application.launch(args); } public void init() { // Create an Image object String file = "file:///C:/Workspaces/Workspace_Entrepreneur/JavaFXProjects/src/FXColor/javafx-logo.png"; image = new Image(file); } public void start(Stage stage) { // Create an anchor rectangle at (0, 0) that is 25% wide and 25% tall // relative to the rectangle to be filled ImagePattern pattern1 = new ImagePattern(image, 0, 0, 0.25, 0.25, true); Rectangle rectangle1 = new Rectangle(300, 100); rectangle1.setFill(pattern1); // Create an anchor rectangle at (0, 0) that is 50% wide and 50% tall // relative to the rectangle to be filled ImagePattern pattern2 = new ImagePattern(image, 0, 0, 0.5, 0.5, true); Rectangle rectangle2 = new Rectangle(300, 100); rectangle2.setFill(pattern2); // Using absolute bounds for the anchor rectangle ImagePattern pattern3 = new ImagePattern(image, 40, 15, 20, 20, false); Rectangle rectangle3 = new Rectangle(300, 100); rectangle3.setFill(pattern3); // Create a Circle ImagePattern pattern4 = new ImagePattern(image, 0, 0, 0.1, 0.1, true); Circle circle = new Circle(100, 100, 50); circle.setFill(pattern4); // Create the VBox VBox root = new VBox(); // Add the details to the VBox root.getChildren().addAll(rectangle1, rectangle2, rectangle3, circle); // Set the Style-properties of the VBox root.setStyle("-fx-padding: 10;" + "-fx-border-style: solid inside;" + "-fx-border-width: 2;" + "-fx-border-insets: 5;" + "-fx-border-radius: 5;" + "-fx-border-color: blue;"); // Create the Scene Scene scene = new Scene(root); // Add the Scene to the Stage stage.setScene(scene); // Set the Title stage.setTitle("An Image Patterns Example"); // Show the Stage stage.show(); }} |
An image pattern lets you fill a shape with an image. The image may fill the entire shape or use a tiling pattern. Here are the steps you would use to get an image pattern:
- 1. Create an Image object using an image from a file.
- 2. Define a rectangle, known as the anchor rectangle, relative to the upper left corner of the shape to be filled.
The image is shown in the anchor rectangle and is then resized to fit the anchor rectangle. If the bounding box for the shape to be filled is bigger than that of the anchor rectangle, the anchor rectangle with the image is repeated within the shape in a tiling pattern.
You can create an object of the ImagePattern using one of its constructors:
- ImagePattern(Image image)
- ImagePattern(Image image, double x, double y, double width, double height, boolean proportional)
The first constructor fills the entire bounding box with the image without any pattern.
The second constructor lets you specify the x and y coordinates, width, and height of the anchor rectangle. If the proportional argument is true, the anchor rectangle is specified relative to the bounding box of the shape to be filled in terms of a unit square. If the proportional argument is false, the anchor rectangle is specified in the local coordinate system of the shape.
The following two calls to the two constructors would produce the same result:
1 2 | ImagePatterm ip1 = new ImagePattern(anImage);ImagePatterm ip2 = new ImagePattern(anImage, 0.0, 0.0, 1.0, 1.0, true); |
2.2 The GUI
The following GUI shows the result of the usage of an image pattern:
3. Using the LinearGradient Class
3.1 The Code
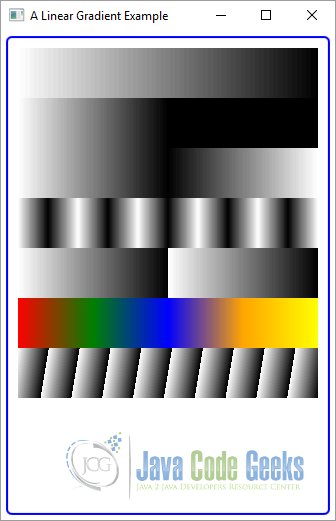
FxColorExample3.java
01 02 03 04 05 06 07 08 09 10 11 12 13 14 15 16 17 18 19 20 21 22 23 24 25 26 27 28 29 30 31 32 33 34 35 36 37 38 39 40 41 42 43 44 45 46 47 48 49 50 51 52 53 54 55 56 57 58 59 60 61 62 63 64 65 66 67 68 69 70 71 72 73 74 75 76 77 78 79 80 81 82 83 84 85 86 87 88 | import javafx.application.Application;import javafx.scene.Scene;import javafx.scene.layout.VBox;import javafx.scene.paint.Color;import javafx.scene.paint.CycleMethod;import javafx.scene.paint.LinearGradient;import javafx.scene.paint.Stop;import javafx.scene.shape.Rectangle;import javafx.stage.Stage;public class FxColorExample3 extends Application{ public static void main(String[] args) { Application.launch(args); } public void start(Stage stage) { // Create the Stop Points of the First Rectangle Stop[] stop1 = new Stop[]{new Stop(0, Color.WHITE), new Stop(1, Color.BLACK)}; // Create the Linear Gradient of the First Rectangle LinearGradient gradient1 = new LinearGradient(0, 0, 1, 0, true, CycleMethod.NO_CYCLE, stop1); // Create the first Rectangle Rectangle rectangle1 = new Rectangle(300, 50); // Fill the first Rectangle rectangle1.setFill(gradient1); // Same procedure with all other Objects Stop[] stop2 = new Stop[]{new Stop(0, Color.WHITE), new Stop(1, Color.BLACK)}; LinearGradient gradient2 = new LinearGradient(0, 0, 0.5, 0, true, CycleMethod.NO_CYCLE, stop2); Rectangle rectangle2 = new Rectangle(300, 50); rectangle2.setFill(gradient2); Stop[] stop3 = new Stop[]{new Stop(0, Color.WHITE), new Stop(1, Color.BLACK)}; LinearGradient gradient3 = new LinearGradient(0, 0, 0.5, 0, true, CycleMethod.REFLECT, stop3); Rectangle rectangle3 = new Rectangle(300, 50); rectangle3.setFill(gradient3); Stop[] stop4 = new Stop[]{new Stop(0, Color.WHITE), new Stop(1, Color.BLACK)}; LinearGradient gradient4 = new LinearGradient(0, 0, 0.1, 0, true, CycleMethod.REFLECT, stop4); Rectangle rectangle4 = new Rectangle(300, 50); rectangle4.setFill(gradient4); Stop[] stop5 = new Stop[]{new Stop(0, Color.WHITE), new Stop(1, Color.BLACK)}; LinearGradient gradient5 = new LinearGradient(0, 0, 0.5, 0, true, CycleMethod.REPEAT, stop5); Rectangle rectangle5 = new Rectangle(300, 50); rectangle5.setFill(gradient5); Stop[] stop6 = new Stop[]{new Stop(0, Color.RED), new Stop(0.25, Color.GREEN), new Stop(0.50, Color.BLUE), new Stop(0.75, Color.ORANGE), new Stop(1, Color.YELLOW)}; LinearGradient gradient6 = new LinearGradient(0, 0, 1, 0, true, CycleMethod.NO_CYCLE, stop6); Rectangle rectangle6 = new Rectangle(300, 50); rectangle6.setFill(gradient6); Stop[] stop7 = new Stop[]{new Stop(0, Color.WHITE), new Stop(1, Color.BLACK)}; LinearGradient gradient7 = new LinearGradient(0, 0, 0.1, 0.1, true, CycleMethod.REPEAT, stop7); Rectangle rectangle7 = new Rectangle(300, 50); rectangle7.setFill(gradient7); // Create the VBox VBox root = new VBox(); // Add the details to the VBox root.getChildren().addAll(rectangle1, rectangle2, rectangle3, rectangle4, rectangle5, rectangle6, rectangle7); // Set the Style-properties of the VBox root.setStyle("-fx-padding: 10;" + "-fx-border-style: solid inside;" + "-fx-border-width: 2;" + "-fx-border-insets: 5;" + "-fx-border-radius: 5;" + "-fx-border-color: blue;"); // Create the Scene Scene scene = new Scene(root); // Add the Scene to the Stage stage.setScene(scene); // Set the Title stage.setTitle("A Linear Gradient Example"); // Show the Stage stage.show(); }} |
A linear color gradient is defined using an axis known as a gradient line. Each point on the gradient line is of a different color in java. All points on a line that is perpendicular to the gradient line have the same color in java , which is the color of the point of intersection between the two lines.
The gradient line is defined by a starting point and an ending point. Colors in Java along the gradient line are defined at some points on the gradient line, which are known as stop-color points (or stop points). In java, colors between two stop points are computed using interpolation.
The gradient line has a direction, which is from the starting point to the ending point. All points on a line perpendicular to the gradient line that pass through a stop point will have the color of the stop point.
For example, suppose you have defined a stop point P1 with a color C1. If you draw a line perpendicular to the gradient line passing through the point P1, all points on that line will have the color C1.
In JavaFX, an instance of the LinearGradient class represents a linear color gradient. The class has the following two constructors. The types of their last arguments are different:
- LinearGradient(double startX, double startY, double endX, double endY, boolean proportional, CycleMethod cycleMethod, List stops)
- LinearGradient(double startX, double startY, double endX, double endY, boolean proportional, CycleMethod cycleMethod, Stop… stops)
The startX and startY arguments define the x and y coordinates of the starting point of the gradient line.
The endX and endY arguments define the x and y coordinates of the starting point of the gradient line.
The proportional argument affects the way the coordinates of the starting and ending points are treated.
If it is true, the starting and ending points are treated relative to a unit square. Otherwise, they are treated as absolute value in the local coordinate system. The use of this argument needs a little more explanation.
Typically, a color gradient in java is used to fill a region, for example, a rectangle. Sometimes, you know the size of the region and sometimes you will not. The value of this argument lets you specify the gradient line in relative or absolute form.
In relative form, the region is treated as a unit square. That is, the coordinates of the upper left and the lower right corners are (0.0, 0.0) and (1.0, 1.0), respectively.
Other points in the regions will have x and y coordinates between 0.0 and 1.0. Suppose you specify the starting point as (0.0, 0.0) and the ending point as (1.0, 0.0). It defines a horizontal gradient line from the left to right. The starting and ending points of (0.0, 0.0) and (0.0, 1.0) define a vertical gradient line from top to bottom. The starting and ending points of (0.0, 0.0) and (0.5, 0.0) define a horizontal gradient line from left to middle of the region.
When the proportional argument is false, the coordinate values for the starting and ending points are treated as absolute values with respect to the local coordinate system.
Suppose you have a rectangle of width 200 and height 100. The starting and ending points of (0.0, 0.0) and (200.0, 0.0) define a horizontal gradient line from left to right. The starting and ending points of (0.0, 0.0) and (200.0, 100.0) define a diagonal gradient line from the top left corner to the bottom right corner.
The cycleMethod argument defines how the regions outside the color gradient bounds, defined by the starting and ending points, should be filled. Suppose you define the starting and ending points with the proportional argument set to true as (0.0, 0.0) and (0.5, 0.0), respectively.
This covers only the left half of the region. How should the right half of the region be filled? You specify this behavior using the cycleMethod argument. Its value is one of the enum constants defined in the CycleMethod enum:
- CycleMethod.NO_CYCLE
- CycleMethod.REFLECT
- CycleMethod.REPEAT
The cycle method of CycleMethod.NO_CYCLE fills the remaining region with the terminal color. If you have defined color a stop point only from the left to the middle of a region, the right half will be filled with the color that is defined for the middle of the region.
Suppose you define a color gradient for only the middle half of a region, leaving the 25% at the left side and 25% at the right side undefined. The CycleMethod.NO_CYCLE method will fill the left 25% region with the color that is defined at the 25% distance from left and the right 25% region with the color defined at the 25% distance from right.
The color for the middle 50% will be determined by the color-stop points. The cycle method of CycleMethod.REFLECT fills the remaining regions by reflecting the color gradient, as start-to-end and end-to-start, from the nearest filled region. The cycle method of CycleMethod.REPEAT repeats the color gradient to fill the remaining region.
The stops argument defines the color-stop points along the gradient line. A color-stop point is represented by an instance of the Stop class, which has only one constructor:
1 | Stop(double offset, Color color) |
The offset value is between 0.0 and 1.0. It defines the relative distance of the stop point along the gradient line from the starting point.
For example, an offset of 0.0 is the starting point, an offset of 1.0 is the ending point, an offset of 0.5 is in the middle of the starting and ending points, and so forth.
You define at least two stop points with two different colors to have a color gradient in Java. There are no limits on the number of stop points you can define for a color gradient.
That covers the explanation for the arguments of the LinearGradient constructors.
The following snippet of code fills a Rectangle with a linear color gradient:
1 2 3 4 5 6 7 8 | // Create the Stop Points of the First RectangleStop[] stop1 = new Stop[]{new Stop(0, Color.WHITE), new Stop(1, Color.BLACK)};// Create the Linear Gradient of the First RectangleLinearGradient gradient1 = new LinearGradient(0, 0, 1, 0, true, CycleMethod.NO_CYCLE, stop1);// Create the first RectangleRectangle rectangle1 = new Rectangle(300, 50);// Fill the first Rectanglerectangle1.setFill(gradient1); |
You have two color-stop points. The stop point in the beginning is colored white and that of the end is colored black. The starting point (0, 0) and ending point (1, 0) define a horizontal gradient from left to right.
The proportional argument is set to true, which means the coordinate values are interpreted as relative to a unit square.
The cycle method argument, which is set to CycleMethod.NO_CYCLE, has no effect in this case as your gradient bounds cover the entire region. In the above code, if you want to set the proportional argument value to false, to have the same effect, you would create the LinearGradient object as follows.
Note the use of 200 as the x coordinate for the ending point to denote the end of the rectangle width:
1 | LinearGradient gradient = new LinearGradient(0, 0, 200, 0, false, CycleMethod.NO_CYCLE, stops); |
In the following code, you have made a slight change. You defined a horizontal gradient line, which starts at the left side of the rectangle and ends in the middle. Note the use of (0.5, 0) as the coordinates for the ending point.
This leaves the right half of the rectangle with no color gradient. The cycle method is effective in this case as its job is to fill the unfilled regions. The color at the middle of the rectangle is black, which is defined by the second stop point. The CycleMethod.NO_CYCLE value uses the terminal black color to fill the right half of the rectangle.
1 2 3 4 5 | // Same procedure with all other ObjectsStop[] stop2 = new Stop[]{new Stop(0, Color.WHITE), new Stop(1, Color.BLACK)};LinearGradient gradient2 = new LinearGradient(0, 0, 0.5, 0, true, CycleMethod.NO_CYCLE, stop2);Rectangle rectangle2 = new Rectangle(300, 50);rectangle2.setFill(gradient2); |
Let’s look at a slight variant of the previous example. You change the cycle method from CycleMethod.NO_CYCLE to CycleMethod.REFLECT. Note that the right half region (the region with undefined gradient) is the reflection of the left half:
1 2 3 4 | Stop[] stop3 = new Stop[]{new Stop(0, Color.WHITE), new Stop(1, Color.BLACK)};LinearGradient gradient3 = new LinearGradient(0, 0, 0.5, 0, true, CycleMethod.REFLECT, stop3);Rectangle rectangle3 = new Rectangle(300, 50);rectangle3.setFill(gradient3); |
Let’s make a slight change in the previous example so the ending point coordinate covers only one-tenth of the width of the rectangle. The right 90% of the rectangle is filled using the CycleMethod.REFLECT cycle method by alternating end-to-start and start-to-end
color patterns:
1 2 3 4 | Stop[] stop4 = new Stop[]{new Stop(0, Color.WHITE), new Stop(1, Color.BLACK)};LinearGradient gradient4 = new LinearGradient(0, 0, 0.1, 0, true, CycleMethod.REFLECT, stop4);Rectangle rectangle4 = new Rectangle(300, 50);rectangle4.setFill(gradient4); |
Now let’s look at the effect of using the CycleMethod.REPEAT cycle method. The following snippet of code uses an ending point at the middle of the width of the rectangle and a cycle method of CycleMethod.REPEAT.
1 2 3 4 | Stop[] stop5 = new Stop[]{new Stop(0, Color.WHITE), new Stop(1, Color.BLACK)};LinearGradient gradient5 = new LinearGradient(0, 0, 0.5, 0, true, CycleMethod.REPEAT, stop5);Rectangle rectangle5 = new Rectangle(300, 50);rectangle5.setFill(gradient5); |
You could also define more than two stop points, as shown in the following snippet of code. It divides the distance between the starting and the ending points on the gradient line into four segments, each by 25% of the width. The first segment (from left in the above java program) will have colors between red and green, the second between green and blue, the third between blue and orange, and the fourth between orange and yellow.
1 2 3 4 5 6 7 8 9 | Stop[] stop6 = new Stop[]{new Stop(0, Color.RED), new Stop(0.25, Color.GREEN), new Stop(0.50, Color.BLUE), new Stop(0.75, Color.ORANGE), new Stop(1, Color.YELLOW)};LinearGradient gradient6 = new LinearGradient(0, 0, 1, 0, true, CycleMethod.NO_CYCLE, stop6);Rectangle rectangle6 = new Rectangle(300, 50);rectangle6.setFill(gradient6); |
The following snippet of code defines a gradient line between (0, 0) and (0.1, 0.1) points. It uses the CycleMethod.REPEAT cycle method to fill the rest of the region.
1 2 3 4 | Stop[] stop7 = new Stop[]{new Stop(0, Color.WHITE), new Stop(1, Color.BLACK)};LinearGradient gradient7 = new LinearGradient(0, 0, 0.1, 0.1, true, CycleMethod.REPEAT, stop7);Rectangle rectangle7 = new Rectangle(300, 50);rectangle7.setFill(gradient7); |
3.2 The GUI
The following GUI shows the result of the above examples:
4. Defining Linear Color Gradients Using a String Format
4.1 The Code
FxColorExample4.java
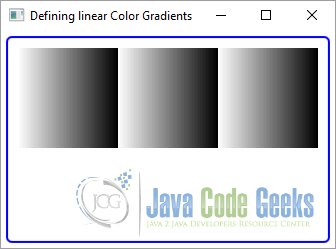
01 02 03 04 05 06 07 08 09 10 11 12 13 14 15 16 17 18 19 20 21 22 23 24 25 26 27 28 29 30 31 32 33 34 35 36 37 38 39 40 41 42 43 44 45 46 47 48 | import javafx.application.Application;import javafx.scene.Scene;import javafx.scene.layout.VBox;import javafx.scene.paint.LinearGradient;import javafx.scene.shape.Rectangle;import javafx.stage.Stage;public class FxColorExample4 extends Application{ public static void main(String[] args) { Application.launch(args); } public void start(Stage stage) { // Set the Property of the Points String value = "from 0px 0px to 100px 0px, repeat, white 0%, black 100%"; // Create the Linear Gradient LinearGradient gradient = LinearGradient.valueOf(value); // Create the Rectangle Rectangle rectangle = new Rectangle(300, 100); rectangle.setFill(gradient); // Create the VBox VBox root = new VBox(); // Add the details to the VBox root.getChildren().add(rectangle); // Set the Style-properties of the VBox root.setStyle("-fx-padding: 10;" + "-fx-border-style: solid inside;" + "-fx-border-width: 2;" + "-fx-border-insets: 5;" + "-fx-border-radius: 5;" + "-fx-border-color: blue;"); // Create the Scene Scene scene = new Scene(root); // Add the Scene to the Stage stage.setScene(scene); // Set the Title stage.setTitle("Defining linear Color Gradients"); // Show the Stage stage.show(); }} |
You can also specify a linear color gradient in string format using the static method valueOf(String colorString) of the LinearGradient class. Typically, the string format is used to specify a linear color gradient in a CSS file. It has the following syntax:
1 | linear-gradient([gradient-line], [cycle-method], color-stops-list) |
The arguments within square brackets ([ and ]) are optional. If you do not specify an optional argument, the comma that follows also needs to be excluded. The default value for the gradient-line argument is “to bottom”. The default value for the cycle-method argument is CycleMethod.NO_CYCLE. You can specify the gradient line in two ways:
- Using two points—the starting point and the ending point
- Using a side or s corner
The syntax for using two points for the gradient line is:
1 | from point-1 to point-2 |
The coordinates of the points may be specified in percentage of the area or in actual measurement in pixels. For a 200px wide by 100px tall rectangle, a horizontal gradient line may be specified in the following two ways:
1 | from 0% 0% to 100% 0% |
or
1 | from 0px 0px to 200px 0px |
The syntax for using a side or a corner is:
1 | to side-or-corner |
The side-or-corner value may be top, left, bottom, right, top left, bottom left, bottom right or top right.

When you define the gradient line using a side or a corner, you specify only the ending point. The starting point is inferred. For example, the value “to top” infers the starting point as “from bottom”. The value “to bottom right” infers the starting point as “from top left,” and so forth. If the gradient-line value is missing, it defaults to “to bottom”.
The valid values for the cycle-method are repeat and reflect. If it is missing, it defaults to CycleMethod.NO_CYCLE.
The color-stops-list argument is a list of color stops. A color stop consists of a web color name and, optionally, a position in pixels or percentage from the starting point.
Examples of lists of color stops are:
- white, black
- white 0%, black 100%
- white 0%, yellow 50%, blue 100%
- white 0px, yellow 100px, red 200px
When you do not specify positions for the first and the last color stops, the positions for the first one defaults to 0% and the second one to 100%. So, the color stop lists “white, black” and “white 0%, black 100%” are fundamentally the same.
If you do not specify positions for any of the color stops in the list, they are assigned positions in such a way that they are evenly placed between the starting point and the ending point.
The following two lists of color stops are the same:
- white, yellow, black, red, green
- white 0%, yellow 25%, black 50%, red 75%, green 100%
You can specify positions for some color stops in a list and not for others. In this case, the color stops without positions are evenly spaced between the preceding and following color stops with positions. The following two lists of color stops are the same:
- white, yellow, black 60%, red, green
- white 0%, yellow 30%, black 50%, red 80%, green 100%
If a color stop in a list has its position set less than the position specified for any previous color stops, its position is set equal to the maximum position set for the previous color stops. The following list of color stops sets 10% for the third color stop, which is less than the position of the second color stop (50%):
1 | white, yellow 50%, black 10%, green |
This will be changed at runtime to use 50% for the third color stop as follows:
1 | white 0%, yellow 50%, black 50%, green 100% |
The following snippet of code will create a rectangle. It defines a horizontal color gradient with the ending point midway through the width of the rectangle. It uses repeat as the cycle method:
1 2 3 4 5 6 7 | // Set the Property of the PointsString value = "from 0px 0px to 100px 0px, repeat, white 0%, black 100%";// Create the Linear Gradient LinearGradient gradient = LinearGradient.valueOf(value);// Create the Rectangle Rectangle rectangle = new Rectangle(300, 100);rectangle.setFill(gradient); |
4.2 The GUI
The following image shows the result of the above code:
5. Using the RadialGradient Class
5.1 The Code
FxColorExample5.java
01 02 03 04 05 06 07 08 09 10 11 12 13 14 15 16 17 18 19 20 21 22 23 24 25 26 27 28 29 30 31 32 33 34 35 36 37 38 39 40 41 42 43 44 45 46 47 48 49 50 51 52 53 54 55 56 57 58 59 60 61 62 63 64 65 66 67 68 69 70 71 72 73 74 75 76 77 78 79 80 81 82 83 84 85 86 87 88 89 90 91 92 93 | import javafx.application.Application;import javafx.scene.Scene;import javafx.scene.layout.HBox;import javafx.scene.layout.VBox;import javafx.scene.paint.Color;import javafx.scene.paint.CycleMethod;import javafx.scene.paint.RadialGradient;import javafx.scene.paint.Stop;import javafx.scene.shape.Circle;import javafx.scene.shape.Rectangle;import javafx.stage.Stage;public class FxColorExample5 extends Application{ public static void main(String[] args) { Application.launch(args); } public void start(Stage stage) { // Create the Stop Points of the First Rectangle Stop[] stop1 = new Stop[]{new Stop(0, Color.WHITE), new Stop(1, Color.BLACK)}; // Create the Linear Gradient of the First Circle RadialGradient gradient1 = new RadialGradient(0, 0, 0.5, 0.5, 0.5, true, CycleMethod.NO_CYCLE, stop1); // Create the first Circle Circle circle1 = new Circle(50, 50, 50); // Fill the first Circle circle1.setFill(gradient1); // Same procedure with all other Objects Stop[] stop2 = new Stop[]{new Stop(0, Color.WHITE), new Stop(1, Color.BLACK)}; RadialGradient gradient2 = new RadialGradient(0, 0, 0.5, 0.5, 0.2, true, CycleMethod.NO_CYCLE, stop2); Circle circle2 = new Circle(50, 50, 50); circle2.setFill(gradient2); Stop[] stop3 = new Stop[]{new Stop(0, Color.WHITE), new Stop(1, Color.BLACK)}; RadialGradient gradient3 = new RadialGradient(0, 0, 0.5, 0.5, 0.2, true, CycleMethod.REPEAT, stop3); Circle circle3 = new Circle(50, 50, 50); circle3.setFill(gradient3); Stop[] stop4 = new Stop[]{new Stop(0, Color.WHITE), new Stop(1, Color.BLACK)}; RadialGradient gradient4 = new RadialGradient(60, 0.2, 0.5, 0.5, 0.2, true, CycleMethod.REPEAT, stop4); Circle circle4 = new Circle(50, 50, 50); circle4.setFill(gradient4); Stop[] stop5 = new Stop[]{new Stop(0, Color.WHITE), new Stop(1, Color.BLACK)}; RadialGradient gradient5 = new RadialGradient(0, 0, 0.5, 0.5, 0.5, true, CycleMethod.REPEAT, stop5); Rectangle rectangle1 = new Rectangle(200, 100); rectangle1.setFill(gradient5); Stop[] stop6 = new Stop[]{new Stop(0, Color.WHITE), new Stop(1, Color.BLACK)}; RadialGradient gradient6 = new RadialGradient(0, 0, 100, 50, 50, false, CycleMethod.REPEAT, stop6); Rectangle rectangle2 = new Rectangle(200, 100); rectangle2.setFill(gradient6); Stop[] stop7 = new Stop[]{new Stop(0, Color.WHITE), new Stop(0.40, Color.GRAY), new Stop(0.60, Color.TAN), new Stop(1, Color.BLACK)}; RadialGradient gradient7 = new RadialGradient(-30, 1.0, 0.5, 0.5, 0.5, true, CycleMethod.REPEAT, stop7); Circle circle5 = new Circle(50, 50, 50); circle5.setFill(gradient7); // Create the VBoxes VBox vbox1 = new VBox(circle1, circle2, circle3, circle4); VBox vbox2 = new VBox(rectangle1, rectangle2, circle5); // Create the HBox HBox root = new HBox(); // Add the details to the HBox root.getChildren().addAll(vbox1, vbox2); // Set the Style-properties of the HBox root.setStyle("-fx-padding: 10;" + "-fx-border-style: solid inside;" + "-fx-border-width: 2;" + "-fx-border-insets: 5;" + "-fx-border-radius: 5;" + "-fx-border-color: blue;"); // Create the Scene Scene scene = new Scene(root); // Add the Scene to the Stage stage.setScene(scene); // Set the Title stage.setTitle("A Radial Gradient Example"); // Show the Stage stage.show(); }} |
In a radial color gradient, colors start at a single point, transitioning smoothly outward in a circular or elliptical shape. The shape, let’s say a circle, is defined by a center point and a radius.
The starting point of colors is known as the focus point of the gradient. The colors change along a line, starting at the focus point of the gradient, in all directions until the periphery of the shape is reached.
A radial color gradient is defined using three components:
- A gradient shape (the center and radius of the of the gradient circle)
- A focus point that has the first color of the gradient
- Color stops
The list of color stops determines the value of the color at a point inside the gradient shape. The focus point defines the 0% position of the color stops. The points on the periphery of the circle define the 100% position for the color stops. The color at the point will be interpolated using the nearest color stops on each side of the point on the line.
An instance of the RadialGradient class represents a radial color gradient. The class contains the following two constructors that differ in the types of their last argument:
- RadialGradient(double focusAngle, double focusDistance, double centerX, double centerY, double radius, boolean proportional, CycleMethod cycleMethod, List stops)
- RadialGradient(double focusAngle, double focusDistance, double centerX, double centerY, double radius, boolean proportional, CycleMethod cycleMethod, Stop… stops)
The focusAngle argument defines the focus angle for the focus point. A positive focus angle is measured clockwise from the horizontal line passing through the center point and the line connecting the center point and the focus point. A negative value is measured counterclockwise.
The focusDistance argument is specified in terms of the percentage of the radius of the circle. The value is clamped between -1 and 1. That is, the focus point is always inside the gradient circle. If the focus distance sets the focus point outside the periphery of the gradient circle, the focus point that is used is the point of intersection of the periphery of the circle and the line connecting the center point and the set focus point.
The focusangle and the focusdistance can have positive and negative values.
The centerX and centerY arguments define the x and y coordinates of the center point, respectively, and the radius argument is the radius of the gradient circle. These arguments can be specified relative to a unit square (between 0.0 and 1.0) or in pixels.
The proportional argument affects the way the values for the coordinates of the center point and radius are treated. If it is true, they are treated relative to a unit square. Otherwise, they are treated as absolute values in the local coordinate system.
The cycleMethod and stops arguments have the same meaning as described earlier in the section on using the LinearGradient class. In a radial color gradient, stops are defined along lines connecting the focus point and points on the periphery of the gradient circle. The focus point defines the 0% stop point and the points on the circle periphery define 100% stop points.
The following snippet of code produces a radial color gradient for a Circle:
1 2 3 4 5 6 7 8 | // Create the Stop Points of the First RectangleStop[] stop1 = new Stop[]{new Stop(0, Color.WHITE), new Stop(1, Color.BLACK)};// Create the Linear Gradient of the First CircleRadialGradient gradient1 = new RadialGradient(0, 0, 0.5, 0.5, 0.5, true, CycleMethod.NO_CYCLE, stop1);// Create the first CircleCircle circle1 = new Circle(50, 50, 50);// Fill the first Circlecircle1.setFill(gradient1); |
The zero value for the focus angle and focus distance locates the focus point at the center of the gradient circle. A true proportional argument interprets the center point coordinates (0.5, 0.5) as (25px, 25px) for the 50 by 50 rectangular bounds of the circle. The radius value of 0.5 is interpreted as 25px, and that places the center of the gradient circle at the same location as the center of the circle to fill. The cycle method of CycleMethod.NO_CYCLE has no effect in this case as the gradient circle fills the entire circular area. The color stop at the focus point is white and at the periphery of the gradient circle it is black.
The following snippet of code specifies the radius of the gradient circle as 0.2 of the circle to be filled. This means that it will use a gradient circle of 10px (0.2 multiplied by 50px, which is the radius of the circle to be filled). The region of the circle beyond the 0.2 of its radius has been filled with the color black, as the cycle method was specified as CycleMethod.NO_CYCLE:
1 2 3 4 5 | // Same procedure with all other ObjectsStop[] stop2 = new Stop[]{new Stop(0, Color.WHITE), new Stop(1, Color.BLACK)};RadialGradient gradient2 = new RadialGradient(0, 0, 0.5, 0.5, 0.2, true, CycleMethod.NO_CYCLE, stop2);Circle circle2 = new Circle(50, 50, 50);circle2.setFill(gradient2); |
Now let’s use the cycle method of CycleMethod.REPEAT in the above snippet of code.
1 2 3 4 | Stop[] stop3 = new Stop[]{new Stop(0, Color.WHITE), new Stop(1, Color.BLACK)};RadialGradient gradient3 = new RadialGradient(0, 0, 0.5, 0.5, 0.2, true, CycleMethod.REPEAT, stop3);Circle circle3 = new Circle(50, 50, 50);circle3.setFill(gradient3); |
So now let’s use a different center point and focus point. Use a 60-degree focus angle and 0.2 times the radius as the focus distance as in the following code. Notice the 3D effect you get by moving the focus point away from the center point.
1 2 3 4 | Stop[] stop4 = new Stop[]{new Stop(0, Color.WHITE), new Stop(1, Color.BLACK)};RadialGradient gradient4 = new RadialGradient(60, 0.2, 0.5, 0.5, 0.2, true, CycleMethod.REPEAT, stop4);Circle circle4 = new Circle(50, 50, 50);circle4.setFill(gradient4); |
Now let’s fill a rectangular region (nonsquare) with a radial color gradient. Notice the elliptical gradient shape used by JavaFX. You have specified the radius of the gradient as 0.5 and the proportional argument as true. Since your rectangle is 200px wide and 100px tall, it results in two radii. One along the x-axis and one along the y-axis, giving rise to an ellipse. The radii along the x and y axes are 100px and 50px, respectively.
1 2 3 4 | Stop[] stop5 = new Stop[]{new Stop(0, Color.WHITE), new Stop(1, Color.BLACK)};RadialGradient gradient5 = new RadialGradient(0, 0, 0.5, 0.5, 0.5, true, CycleMethod.REPEAT, stop5);Rectangle rectangle1 = new Rectangle(200, 100);rectangle1.setFill(gradient5); |
If you want a rectangle to be filled with a color gradient of a circular shape rather than elliptical shape, you should specify the proportional argument as false and the radius value will be treated in pixels. The following snippet of code produces a rectangle:
1 2 3 4 | Stop[] stop6 = new Stop[]{new Stop(0, Color.WHITE), new Stop(1, Color.BLACK)};RadialGradient gradient6 = new RadialGradient(0, 0, 100, 50, 50, false, CycleMethod.REPEAT, stop6);Rectangle rectangle2 = new Rectangle(200, 100);rectangle2.setFill(gradient6); |
Finally, let’s look at an example of using multiple color stops with the focus point on the periphery of the circle. The code to produce the effect is as follows:
1 2 3 4 5 6 7 8 | Stop[] stop7 = new Stop[]{new Stop(0, Color.WHITE), new Stop(0.40, Color.GRAY), new Stop(0.60, Color.TAN), new Stop(1, Color.BLACK)};RadialGradient gradient7 = new RadialGradient(-30, 1.0, 0.5, 0.5, 0.5, true, CycleMethod.REPEAT, stop7);Circle circle5 = new Circle(50, 50, 50);circle5.setFill(gradient7); |
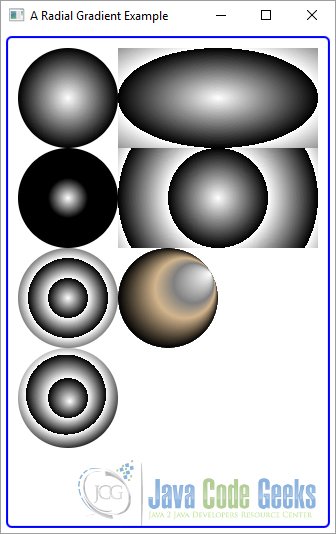
5.2 The GUI
The following GUI shows the result of the discussed colors examples in Java:
6. Defining Radial Color Gradients in String Format
6.1 The Code
FxColorExample6.java
01 02 03 04 05 06 07 08 09 10 11 12 13 14 15 16 17 18 19 20 21 22 23 24 25 26 27 28 29 30 31 32 33 34 35 36 37 38 39 40 41 42 43 44 45 46 47 48 49 | import javafx.application.Application;import javafx.scene.Scene;import javafx.scene.layout.VBox;import javafx.scene.paint.RadialGradient;import javafx.scene.shape.Circle;import javafx.stage.Stage;public class FxColorExample6 extends Application{ public static void main(String[] args) { Application.launch(args); } public void start(Stage stage) { // Set the Property of the Points String colorValue = "radial-gradient(focus-angle 45deg, focus-distance 50%, " + "center 50% 50%, radius 50%, white 0%, black 100%)"; // Create the Radial Gradient RadialGradient gradient = RadialGradient.valueOf(colorValue); // Create the Circle Circle circle = new Circle(150, 150, 150); circle.setFill(gradient); // Create the VBox VBox root = new VBox(); // Add the details to the VBox root.getChildren().add(circle); // Set the Style-properties of the VBox root.setStyle("-fx-padding: 10;" + "-fx-border-style: solid inside;" + "-fx-border-width: 2;" + "-fx-border-insets: 5;" + "-fx-border-radius: 5;" + "-fx-border-color: blue;"); // Create the Scene Scene scene = new Scene(root); // Add the Scene to the Stage stage.setScene(scene); // Set the Title stage.setTitle("Defining radial Color Gradients"); // Show the Stage stage.show(); }} |
You can also specify a radial color gradient in string format by using the static method valueOf(String colorString) of the RadialGradient class. Typically, the string format is used to specify a radial color gradient in a CSS file. It has the following syntax:
1 2 | radial-gradient([focus-angle], [focus-distance], [center], radius, [cycle-method],color-stops-list) |
The arguments within square brackets are optional. If you do not specify an optional argument, the comma that follows needs to be excluded as well.
The default value for focus-angle and focus-distance is 0. You can specify the focus angle in degrees, radians, gradians, and turns. The focus distance is specified as a percentage of the radius. Examples are as follows:
- focus-angle 45.0deg
- focus-angle 0.5rad
- focus-angle 30.0grad
- focus-angle 0.125turn
- focus-distance 50%
The center and radius arguments at colors in java are specified in a percentage relative to the region being filled or in absolute pixels. You cannot specify one argument in a percentage and the other in pixels. Both must be specified in the same unit. The default value for the center is (0, 0) in the unit. Examples are as follows:
- center 50px 50px, radius 50px
- center 50% 50%, radius 50%
The valid values for the cycle-method argument are repeat and reflect. If this is not specified, it defaults to CycleMethod.NO_CYCLE.
A list of colors in java stops is specified using colors and their positions. Positions are specified as a percentage of distance on a line from the focus point to the periphery of the shape of the gradient. Please refer to the earlier discussion on specifying the color stops in a linear color gradient for more details.
Examples are as follows:
- white, black
- white 0%, black 100%
- red, green, blue
- red 0%, green 80%, blue 100%
The following snippet of code will produce a circle:
1 2 3 4 5 6 7 8 | // Set the Property of the Points String colorValue = "radial-gradient(focus-angle 45deg, focus-distance 50%, " + "center 50% 50%, radius 50%, white 0%, black 100%)";// Create the Radial Gradient RadialGradient gradient = RadialGradient.valueOf(colorValue);// Create the Circle Circle circle = new Circle(150, 150, 150);circle.setFill(gradient); |
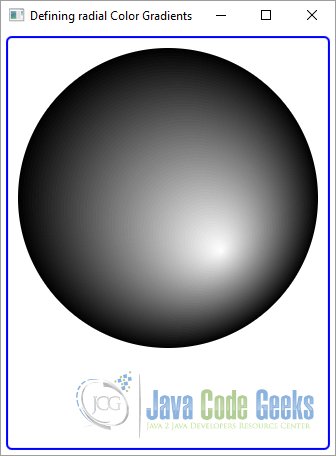
6.2 The GUI
The image shows the result of the previous code:
7. Download Java Source Code
This was an example of Colors in Java using the javafx.scene.paint
You can download the full source code of this example here: Colors in Java – JavaFX Color Example
Last updated on May 14th, 2020
