Android Settings Example
During the development of mobile applications, a common requirement is of storing app related data to the phone. In Android we perform this task with the help of Preference APIs. We may also need settings that allow users to modify preferences in app. Thankfully Android provides a powerful framework to manage user preferences.
The provided mechanism allows us to show, save and manipulate user’s preferences very easily, it also has support for automatic UI creation. Yes, you read it right, by declaring the type of a user preference, a user interface for manipulating these preferences is automatically generated, without having us to write a single line of code. All we need to do is to simply use it in our app. Doesn’t it sound cool? Lets start then.
Table Of Contents
1. Introduction
In the Preference Framework we have four components to cover, they are:
- Preference Activity or Fragment – these host the Preference Screen, displaying your settings. We may use any one (Activity or Fragment) as per our requirement.
- Preference XML – a xml file defining your settings items.
- Preference Headers – these are lists of subscreens. An xml file defines the Preference Fragments used for the Headers subscreens.
- Shared Preference Change Listener – listens for any changes in the Shared Preference values.
So, now we have a brief introduction to the Preference Framework. We would move forward by creating the project.
2. Create a New Android Application Project
We will create a simple Android Project as we are used to. There is nothing special or new for this tutorial. We have some screenshots for those who are new to android development, which will definitely help them start with.
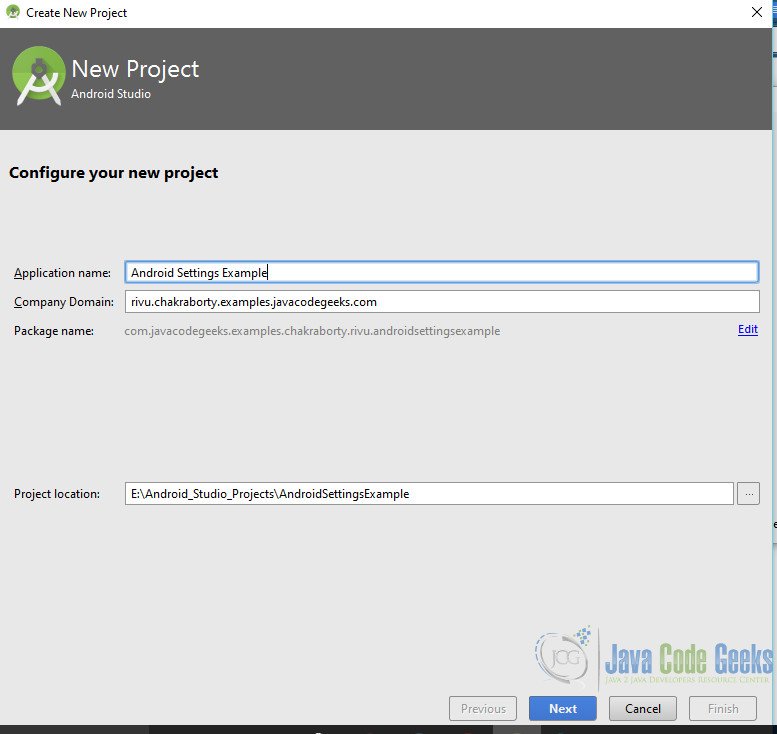
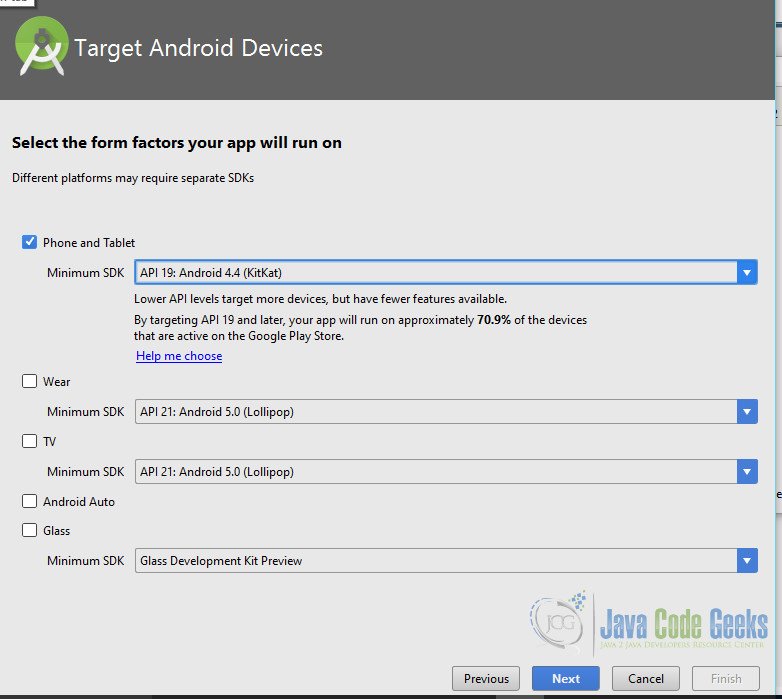
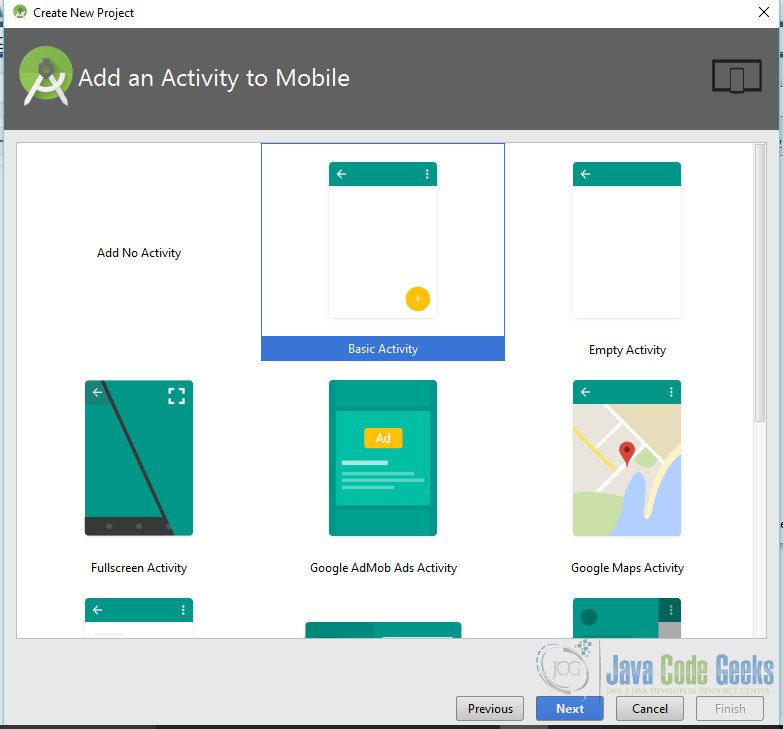
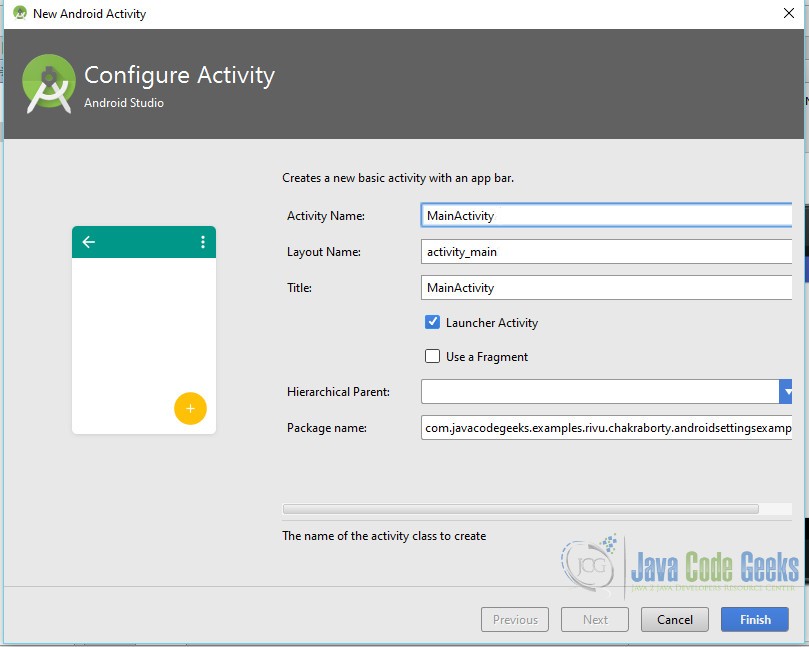
So, now we have our project. We also have the MainActivity, which we will use to show the Preference Settings and also as the start point of PreferenceActivity.
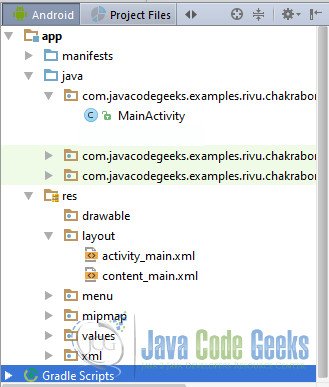
The final structure of the created project is shown in the image below.
We’ll have a look at the auto generated MainActivity class.
MainActivity.java
package com.javacodegeeks.examples.rivu.chakraborty.androidsettingsexample;

import android.os.Bundle;
import android.support.design.widget.FloatingActionButton;
import android.support.design.widget.Snackbar;
import android.support.v7.app.AppCompatActivity;
import android.support.v7.widget.Toolbar;
import android.view.View;
import android.view.Menu;
import android.view.MenuItem;

public class MainActivity extends AppCompatActivity {

    @Override
    protected void onCreate(Bundle savedInstanceState) {
        super.onCreate(savedInstanceState);
        setContentView(R.layout.activity_main);
        Toolbar toolbar = (Toolbar) findViewById(R.id.toolbar);
        setSupportActionBar(toolbar);

        FloatingActionButton fab = (FloatingActionButton) findViewById(R.id.fab);
        fab.setOnClickListener(new View.OnClickListener() {
            @Override
            public void onClick(View view) {
                Snackbar.make(view, "Replace with your own action", Snackbar.LENGTH_LONG)
                        .setAction("Action", null).show();
            }
        });
    }

}
And here is the auto generated xml layout files.
activity_main.xml
<?xml version="1.0" encoding="utf-8"?>
<android.support.design.widget.CoordinatorLayout xmlns:android="http://schemas.android.com/apk/res/android"
    xmlns:app="http://schemas.android.com/apk/res-auto"
    xmlns:tools="http://schemas.android.com/tools"
    android:layout_width="match_parent"
    android:layout_height="match_parent"
    android:fitsSystemWindows="true"
    tools:context="com.webege.rivu.myapplication.MainActivity">

    <android.support.design.widget.AppBarLayout
        android:layout_width="match_parent"
        android:layout_height="wrap_content"
        android:theme="@style/AppTheme.AppBarOverlay">

        <android.support.v7.widget.Toolbar
            android:id="@+id/toolbar"
            android:layout_width="match_parent"
            android:layout_height="?attr/actionBarSize"
            android:background="?attr/colorPrimary"
            app:popupTheme="@style/AppTheme.PopupOverlay" />

    </android.support.design.widget.AppBarLayout>

    <include layout="@layout/content_main" />

    <android.support.design.widget.FloatingActionButton
        android:id="@+id/fab"
        android:layout_width="wrap_content"
        android:layout_height="wrap_content"
        android:layout_gravity="bottom|end"
        android:layout_margin="@dimen/fab_margin"
        android:src="@android:drawable/ic_dialog_email" />

</android.support.design.widget.CoordinatorLayout>
content_main.xml
<?xml version="1.0" encoding="utf-8"?>
<RelativeLayout xmlns:android="http://schemas.android.com/apk/res/android"
    xmlns:app="http://schemas.android.com/apk/res-auto"
    xmlns:tools="http://schemas.android.com/tools"
    android:layout_width="match_parent"
    android:layout_height="match_parent"
    android:paddingBottom="@dimen/activity_vertical_margin"
    android:paddingLeft="@dimen/activity_horizontal_margin"
    android:paddingRight="@dimen/activity_horizontal_margin"
    android:paddingTop="@dimen/activity_vertical_margin"
    app:layout_behavior="@string/appbar_scrolling_view_behavior"
    tools:context="com.webege.rivu.myapplication.MainActivity"
    tools:showIn="@layout/activity_main">

    <TextView
        android:layout_width="wrap_content"
        android:layout_height="wrap_content"
        android:text="Hello World!" />
</RelativeLayout>
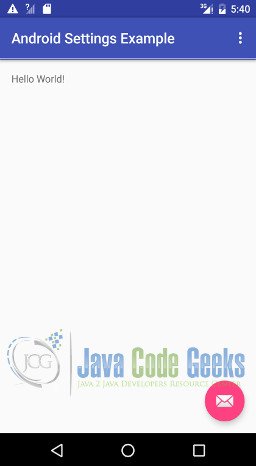
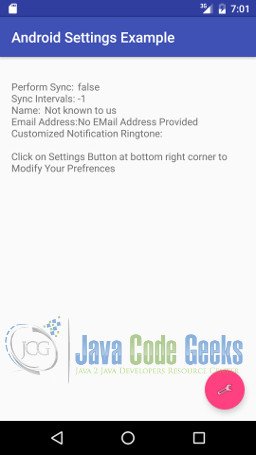
and here is the primary screen.
3. Use MainActivity as Starting Point
There is nothing new in the codes I’ve pasted above. We will make a slight alteration to this one. As I already told I’ll use MainActivity to show settings. I will also use the FloatingActionButton to start the PreferenceActivity. So let us first have a little alteration in the layout files and in the code of MainActivity. I have simply changed the icon in FloatingActionButton to a settings icon in activity_main.xml.
In the content_main.xml, I have provided id to the TextView, so that i can use it in code for showing the preferences in text. I have also removed the Hello World! text from there. Here is the final code.
activity_main.xml
<?xml version="1.0" encoding="utf-8"?>
<android.support.design.widget.CoordinatorLayout xmlns:android="http://schemas.android.com/apk/res/android"
    xmlns:app="http://schemas.android.com/apk/res-auto"
    xmlns:tools="http://schemas.android.com/tools"
    android:layout_width="match_parent"
    android:layout_height="match_parent"
    android:fitsSystemWindows="true"
    tools:context="com.javacodegeeks.examples.rivu.chakraborty.androidsettingsexample.MainActivity">

    <android.support.design.widget.AppBarLayout
        android:layout_width="match_parent"
        android:layout_height="wrap_content"
        android:theme="@style/AppTheme.AppBarOverlay">

        <android.support.v7.widget.Toolbar
            android:id="@+id/toolbar"
            android:layout_width="match_parent"
            android:layout_height="?attr/actionBarSize"
            android:background="?attr/colorPrimary"
            app:popupTheme="@style/AppTheme.PopupOverlay" />

    </android.support.design.widget.AppBarLayout>

    <include layout="@layout/content_main" />

    <android.support.design.widget.FloatingActionButton
        android:id="@+id/fab"
        android:layout_width="wrap_content"
        android:layout_height="wrap_content"
        android:layout_gravity="bottom|end"
        android:layout_margin="@dimen/fab_margin"
        android:src="@android:drawable/ic_menu_preferences" />

</android.support.design.widget.CoordinatorLayout>
content_main.xml
<?xml version="1.0" encoding="utf-8"?>
<RelativeLayout xmlns:android="http://schemas.android.com/apk/res/android"
    xmlns:app="http://schemas.android.com/apk/res-auto"
    xmlns:tools="http://schemas.android.com/tools"
    android:layout_width="match_parent"
    android:layout_height="match_parent"
    android:paddingBottom="@dimen/activity_vertical_margin"
    android:paddingLeft="@dimen/activity_horizontal_margin"
    android:paddingRight="@dimen/activity_horizontal_margin"
    android:paddingTop="@dimen/activity_vertical_margin"
    app:layout_behavior="@string/appbar_scrolling_view_behavior"
    tools:context="com.javacodegeeks.examples.rivu.chakraborty.androidsettingsexample.MainActivity"
    tools:showIn="@layout/activity_main">

    <TextView
        android:id="@+id/settingsContent"
        android:layout_width="wrap_content"
        android:layout_height="wrap_content" />
</RelativeLayout>
In the MainActivity, I’ve used SharedPreferences to show the settings primarily. Here it is.
MainActivity.java
package com.javacodegeeks.examples.rivu.chakraborty.androidsettingsexample;

import android.content.Intent;
import android.content.SharedPreferences;
import android.os.Bundle;
import android.preference.PreferenceManager;
import android.support.design.widget.FloatingActionButton;
import android.support.design.widget.Snackbar;
import android.support.v7.app.AppCompatActivity;
import android.support.v7.widget.Toolbar;
import android.view.View;
import android.view.Menu;
import android.view.MenuItem;
import android.widget.TextView;

public class MainActivity extends AppCompatActivity {

    @Override
    protected void onCreate(Bundle savedInstanceState) {
        super.onCreate(savedInstanceState);
        setContentView(R.layout.activity_main);
        Toolbar toolbar = (Toolbar) findViewById(R.id.toolbar);
        setSupportActionBar(toolbar);

        FloatingActionButton fab = (FloatingActionButton) findViewById(R.id.fab);
        fab.setOnClickListener(new View.OnClickListener() {
            @Override
            public void onClick(View view) {
                Intent modifySettings=new Intent(MainActivity.this,SettingsActivity.class);
                startActivity(modifySettings);
            }
        });

        SharedPreferences sharedPrefs = PreferenceManager.getDefaultSharedPreferences(this);

        StringBuilder builder = new StringBuilder();

        builder.append("\n" + "Perform Sync:\t" + sharedPrefs.getBoolean("perform_sync", false));
        builder.append("\n" + "Sync Intervals:\t" + sharedPrefs.getString("sync_interval", "-1"));
        builder.append("\n" + "Name:\t" + sharedPrefs.getString("full_name", "Not known to us"));
        builder.append("\n" + "Email Address:\t" + sharedPrefs.getString("email_address", "No EMail Address Provided"));
        builder.append("\n" + "Customized Notification Ringtone:\t" + sharedPrefs.getString("notification_ringtone", ""));
        builder.append("\n\nClick on Settings Button at bottom right corner to Modify Your Prefrences");

        TextView settingsTextView = (TextView) findViewById(R.id.settingsContent);
        settingsTextView.setText(builder.toString());

    }


}
So as I told, I’m using settingsTextView to show the SharedPreferences data. For simplicity I’m assuming of an application which has background sync. I’m assuming that the application would allow user to enable or disable the background sync, and also users can specify the sync interval. This application also stores user’s name and email, and also allows to modify them. It also has an option to customise push notification ringtone.
In the above code I’ve initialised SharedPreferences with PreferenceManager.getDefaultSharedPreferences(context). I have used getBoolean and getString methods to read them if they are present and assigned a default value if they are not. There is one more thing, you can easily get from the above code that I’ve already created another activity SettingsActivity, which I’ve called on the FloatingActionButton click event. That FloatingActionButton is actually a subclass of PreferenceActivity.
4. The Preference Framework – PreferenceActivity
So now we have stepped in to the core part of this tutorial. We will go through the steps of creating the SettingsActivity, but let us first look at the framework. We will look at the four most common types of Preferences present in this framework.
- CheckBoxPreference: Provides checkbox widget functionality. Will store a Boolean value into the SharedPreferences.
- EditTextPreference: Provides UI for string input dialog. Will store the entered string into the SharedPreferences.
- ListPreference: Displays a list of entries as a dialog. The selected preference will store a string into the SharedPreferences.
- RingtonePreference: Provides UI to choose a ringtone from the device. The selected ringtone’s URI will be persisted as a string into the SharedPreferences.
- PreferenceScreen: It is the root of a Preference hierarchy. When a PreferenceActivity points to this, it is not shown but the contained preferences are shown. When it appears inside another preference hierarchy, it is shown and serves as the gateway to another screen of preferences (may be via Dialog or via Intent).
- PreferenceCategory: It is used to group
Preferenceobjects and provide a disabled (non-selectable) title above the group..
So now lets create the preferences.xml file in the values–xml folder, it will be used in the SettingsActivity.
preferences.xml
<?xml version="1.0" encoding="utf-8"?>
<PreferenceScreen xmlns:android="http://schemas.android.com/apk/res/android">
    <PreferenceCategory
        android:title="Sync Information"
        android:key="sync_category">

        <CheckBoxPreference
            android:key="perform_sync"
            android:summary="Enable or disable data sync"
            android:title="Enable Auto Sync"
            android:defaultValue="true"/>

        <ListPreference
            android:key="sync_interval"
            android:title="Sync interval"
            android:summary="Define how often sync will be performed"
            android:defaultValue="1000"
            android:entries="@array/updateInterval"
            android:entryValues="@array/updateIntervalValues"
            android:dependency="perform_sync"/>

    </PreferenceCategory>

    <PreferenceCategory
        android:title="Personal Informations"
        android:key="personal_category">


        <EditTextPreference
            android:key="full_name"
            android:title="Name"
            android:summary="Enter Your Complete Name"
            android:dialogTitle="Your Name"
            android:dialogMessage="Enter Your Complete Name"
            android:defaultValue=""
            android:inputType="textCapWords"/>

        <EditTextPreference
            android:key="email_address"
            android:title="Email Address"
            android:summary="Enter Your Email Address"
            android:dialogTitle="Enter Your Email Address"
            android:dialogMessage="Enter Your Email Address"
            android:defaultValue=""
            android:inputType="textEmailAddress"/>

    </PreferenceCategory>


    <PreferenceCategory
        android:title="Customisations"
        android:key="custom_category">


        <RingtonePreference
            android:key="notification_ringtone"
            android:title="Notification Ringtone"
            android:summary="Customise Notification Ringtone for you"
            android:dialogTitle="Notification Ringtone"
            android:dialogMessage="Customise Notification Ringtone for you"/>


    </PreferenceCategory>

</PreferenceScreen>
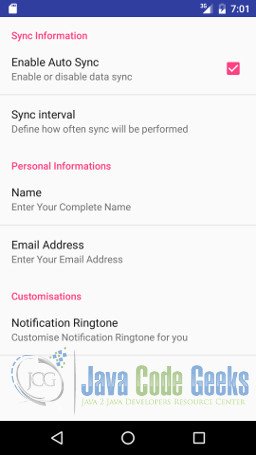
I would like to describe a bit. As I already mentioned PreferenceScreen is the root. Under that I have three PreferenceCategory groups, that are sync_category (Sync Information), personal_category (Personal Informations) and custom_category (Customisations).
The provided user settings are already discussed. So we would move forward and create the PreferenceActivity. Please follow the screenshots.
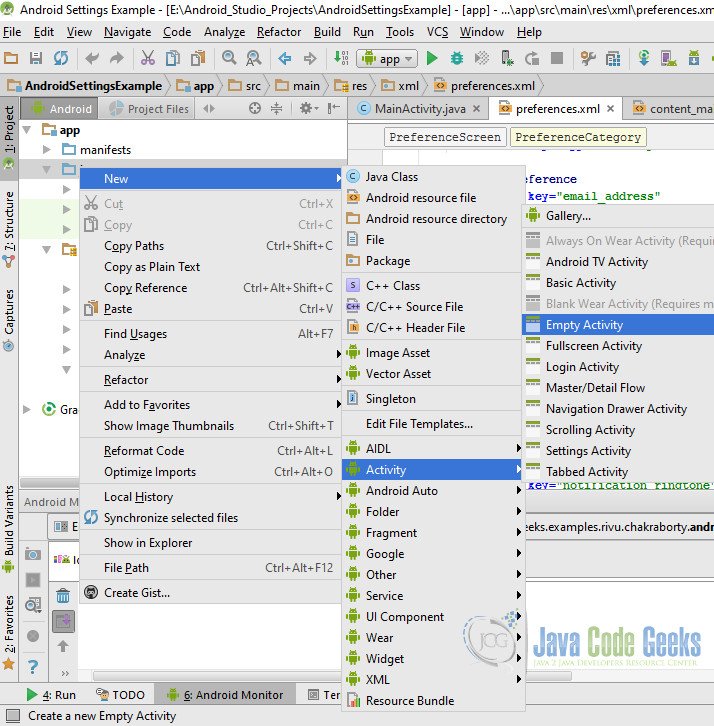

So the SettingsActivity is created. We will now add a code to this newly created Activity.
SettingsActivity.java
package com.javacodegeeks.examples.rivu.chakraborty.androidsettingsexample;

import android.preference.PreferenceActivity;
import android.os.Bundle;

public class SettingsActivity extends PreferenceActivity {

    @Override
    protected void onCreate(Bundle savedInstanceState) {
        super.onCreate(savedInstanceState);
        addPreferencesFromResource(R.xml.preferences);
    }
}
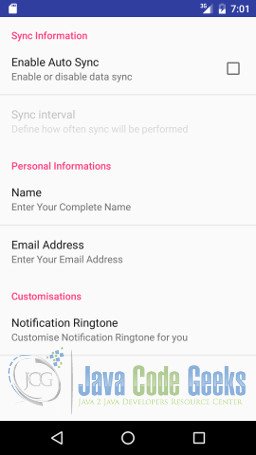
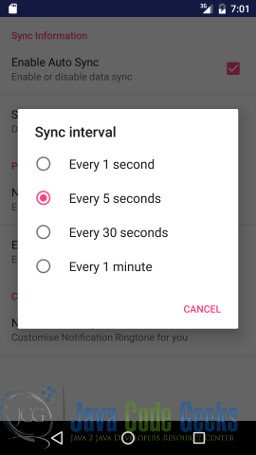
That set. We are done. We will now look at the output screenshots.
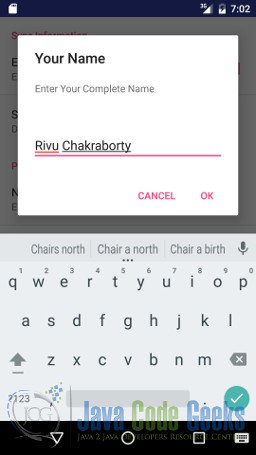
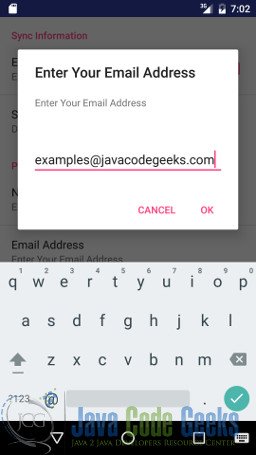
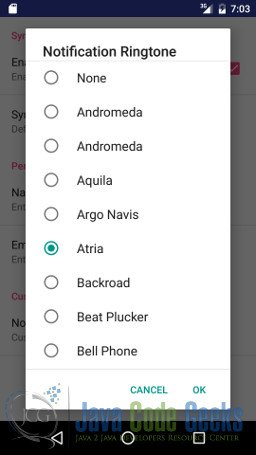
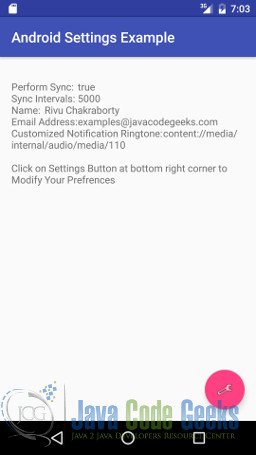
5. PreferenceFragment and Preference Headers
Till now we have dealt with the simplest example of using Preference Framework. Its time to dive deeper. Sometime you may wish to have separate subscreens for each type of preferences. You may also want a multipane layout Tablets. These requirements can be fulfilled by the use of Preference Headers and PreferenceFragment .
As I stated in the start of the tutorial that PreferenceFragment is also used to host the PreferenceScreen as the PreferenceActivity. Preference Headers sre used to organise the Preference Screens in subscreens. So we are creating another activity SettingsActivity2. We will implement preference_header and PreferenceFragment in this activity. First we need to create 4 xml files. 3 for three Preference Screens and 1 for Preference Header. So lets get a glimpse on code.
pref_headers.xml
<preference-headers xmlns:android="http://schemas.android.com/apk/res/android">

    <!-- These settings headers are only used on tablets. -->

    <header
        android:fragment="com.javacodegeeks.examples.rivu.chakraborty.androidsettingsexample.SettingsActivity2$GeneralPreferenceFragment"
        android:icon="@drawable/ic_info_black_24dp"
        android:title="@string/pref_header_general">
        <extra android:name="settings" android:value="prefs_general" ></extra>
    </header>

    <header
        android:fragment="com.javacodegeeks.examples.rivu.chakraborty.androidsettingsexample.SettingsActivity2$GeneralPreferenceFragment"
        android:icon="@drawable/ic_notifications_black_24dp"
        android:title="@string/pref_header_notifications" >
        <extra android:name="settings" android:value="prefs_notification" ></extra>
    </header>

    <header
        android:fragment="com.javacodegeeks.examples.rivu.chakraborty.androidsettingsexample.SettingsActivity2$GeneralPreferenceFragment"
        android:icon="@drawable/ic_sync_black_24dp"
        android:title="@string/pref_header_data_sync" >
        <extra android:name="settings" android:value="prefs_sync" ></extra>
    </header>

</preference-headers>
pref_general.xml
<PreferenceScreen xmlns:android="http://schemas.android.com/apk/res/android">

    <EditTextPreference
        android:key="full_name"
        android:title="Name"
        android:summary="Enter Your Complete Name"
        android:dialogTitle="Your Name"
        android:dialogMessage="Enter Your Complete Name"
        android:defaultValue=""
        android:inputType="textCapWords"/>

    <EditTextPreference
        android:key="email_address"
        android:title="Email Address"
        android:summary="Enter Your Email Address"
        android:dialogTitle="Enter Your Email Address"
        android:dialogMessage="Enter Your Email Address"
        android:defaultValue=""
        android:inputType="textEmailAddress"/>

</PreferenceScreen>
pref_notification.xml
<PreferenceScreen xmlns:android="http://schemas.android.com/apk/res/android">

    <!-- A 'parent' preference, which enables/disables child preferences (below)
         when checked/unchecked. -->
    <SwitchPreference
        android:defaultValue="true"
        android:key="notifications_new_message"
        android:title="@string/pref_title_new_message_notifications" />

    <RingtonePreference
        android:key="notification_ringtone"
        android:title="Notification Ringtone"
        android:summary="Customise Notification Ringtone for you"
        android:dialogTitle="Notification Ringtone"
        android:dialogMessage="Customise Notification Ringtone for you"
        android:dependency="notifications_new_message"/>


</PreferenceScreen>
pref_data_sync.xml
<PreferenceScreen xmlns:android="http://schemas.android.com/apk/res/android">

    <!-- NOTE: Hide buttons to simplify the UI. Users can touch outside the dialog to
         dismiss it. -->
    <!-- NOTE: ListPreference's summary should be set to its value by the activity code. -->
    <CheckBoxPreference
        android:key="perform_sync"
        android:summary="Enable or disable data sync"
        android:title="Enable Auto Sync"
        android:defaultValue="true"/>

    <ListPreference
        android:key="sync_interval"
        android:title="Sync interval"
        android:summary="Define how often sync will be performed"
        android:defaultValue="1000"
        android:entries="@array/updateInterval"
        android:entryValues="@array/updateIntervalValues"
        android:dependency="perform_sync"/>

</PreferenceScreen>
So before moving to newly created SettingsActivity2 let me explain the xml files first. The pref_headers.xml file contains the Headers with Titles, Icons and target fragments. When SettingsActivity2 is created the Headers will be displayed and upon click of a header item the respective PreferenceScreen will be displayed. The <extra> is used to pass some arguments to the fragment, which we can get by calling getArguments() inside the Fragment.
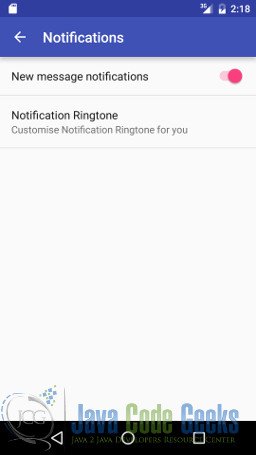
I’ve divided the previous preferences.xml into 3 separate files, namely pref_general.xml, pref_notification.xml and pref_data_sync.xml. Everything in those files are almost same with previous, except a SwitchPreference used in pref_notification.xml. the functionality of SwitchPreference is almost same with CheckBoxPreference except that the SwitchPreference provides a Switch UI instead of CheckBox UI. Each of the PreferenceScreens are displayed with PreferenceFragment. So here is the new activity code.
SettingsActivity2.java
package com.javacodegeeks.examples.rivu.chakraborty.androidsettingsexample;


import android.annotation.TargetApi;
import android.content.Context;
import android.content.Intent;
import android.content.res.Configuration;
import android.media.Ringtone;
import android.media.RingtoneManager;
import android.net.Uri;
import android.os.Build;
import android.os.Bundle;
import android.preference.ListPreference;
import android.preference.Preference;
import android.preference.PreferenceActivity;
import android.support.v7.app.ActionBar;
import android.preference.PreferenceFragment;
import android.preference.PreferenceManager;
import android.preference.RingtonePreference;
import android.text.TextUtils;
import android.view.MenuItem;
import android.widget.Toast;

import java.util.List;

public class SettingsActivity2 extends AppCompatPreferenceActivity {

    /**
     * Helper method to determine if the device has an extra-large screen. For
     * example, 10" tablets are extra-large.
     */
    private static boolean isLargeTablet(Context context) {
        return (context.getResources().getConfiguration().screenLayout
                & Configuration.SCREENLAYOUT_SIZE_MASK) >= Configuration.SCREENLAYOUT_SIZE_LARGE;
    }


    @Override
    protected void onCreate(Bundle savedInstanceState) {
        super.onCreate(savedInstanceState);
        setupActionBar();
    }

    @Override
    public boolean onOptionsItemSelected(MenuItem item) {
        int id = item.getItemId();
        if (id == android.R.id.home) {
            onBackPressed();
            return true;
        }
        return super.onOptionsItemSelected(item);
    }

    /**
     * Set up the {@link android.app.ActionBar}, if the API is available.
     */
    private void setupActionBar() {
        ActionBar actionBar = getSupportActionBar();
        if (actionBar != null) {
            // Show the Up button in the action bar.
            actionBar.setDisplayHomeAsUpEnabled(true);
        }
    }

    /**
     * {@inheritDoc}
     */
    @Override
    public boolean onIsMultiPane() {
        return isLargeTablet(this);
    }

    /**
     * {@inheritDoc}
     */
    @Override
    @TargetApi(Build.VERSION_CODES.HONEYCOMB)
    public void onBuildHeaders(List<Header> target) {
        loadHeadersFromResource(R.xml.pref_headers, target);
    }

    /**
     * This method stops fragment injection in malicious applications.
     * Make sure to deny any unknown fragments here.
     */
    protected boolean isValidFragment(String fragmentName) {
        return PreferenceFragment.class.getName().equals(fragmentName)
                || GeneralPreferenceFragment.class.getName().equals(fragmentName);
    }


    @TargetApi(Build.VERSION_CODES.HONEYCOMB)
    public static class GeneralPreferenceFragment extends PreferenceFragment {
        @Override
        public void onCreate(Bundle savedInstanceState) {
            super.onCreate(savedInstanceState);
            int preferenceFile_toLoad=-1;
            String settings = getArguments().getString("settings");
            if ("prefs_general".equalsIgnoreCase(settings)) {
                // Load the preferences from an XML resource
                preferenceFile_toLoad= R.xml.pref_general;
            }else if ("prefs_notification".equalsIgnoreCase(settings)) {
                // Load the preferences from an XML resource
                preferenceFile_toLoad=R.xml.pref_notification;
            }else if ("prefs_sync".equals(settings)) {
                // Load the preferences from an XML resource
                preferenceFile_toLoad=R.xml.pref_data_sync;
            }

            addPreferencesFromResource(preferenceFile_toLoad);


        }


    }


}
The headers are loaded using loadHeadersFromResource(R.xml.pref_headers, target) inside onBuildHeaders method. And as per our previous discussions, I have loaded the PreferenceScreen for each header in GeneralPreferenceFragment. In GeneralPreferenceFragment
I’ve first determined the required PreferenceScreen using getArguments().getString("settings") (which were passed in pref_headers.xml using <extra> tag), then initialised with addPreferencesFromResource(preferenceFile_toLoad).
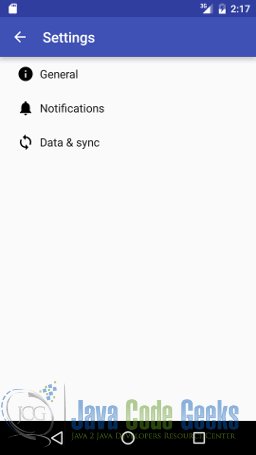
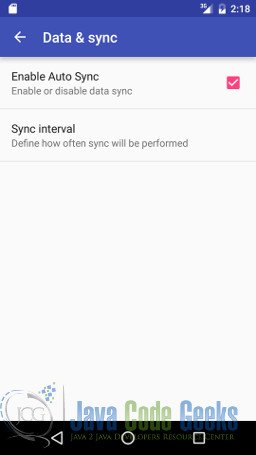
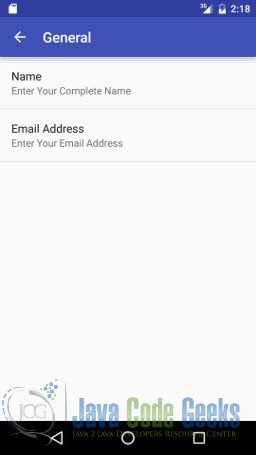
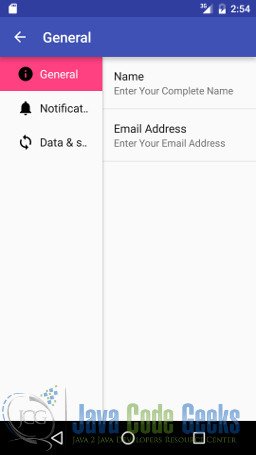
There is another new method in SettingsActivity2, onIsMultiPane which is called internally to determine multipane is required or not. I’ve returned true if the device is Large Tablet. So lets have a look at the final output screenshots.
6. Download the Source Code
This was an example on Android Settings.
You can download the full source code of this example here: AndroidSettingsExample


Great work!
Thanks
Great work. Thanks for the tutorial