JUnit Temporary Folder Example
In this tutorial, we shall show users the usage of JUnit Temporary Folder. JUnit Temporary Folder Example is a simple example showing how we can use and why we should use this feature of the JUnit.
Basic tutorials about JUnit can be found here.
1. Introduction
There are some scenarios where we want to create a temporary folder and then delete after test complete. This can be achieved manually by creating a folder through the code and then delete after the test is complete.
But this can also be achieved with the help of the JUnit TemporaryFolder Rule. JUnit provides a very beautiful way of handling such scenarios. It provides us with the Rule, where we simply define it and then creation and deletion of the folder is handled by JUnit automatically.
2. Technologies Used
We will be using the following technologies while building an example. Here we are taking the latest version of each technology.
- Java 1.8 – We will be using the latest version of Java. There is no specific feature of Java 1.8 that has been used.
- JUnit 4.12 – This is the main testing framework that we will be using.
- Maven – This is the build and dependency tool for this example.
- Eclipse – IDE for writing the code.
For links to the latest versions and there websites visit the reference section of the tutorial. Now, we have defined the technologies to be used. Let’s start the setup of our example.
3. Project Setup
You may skip project creation and jump directly to the beginning of the example below.
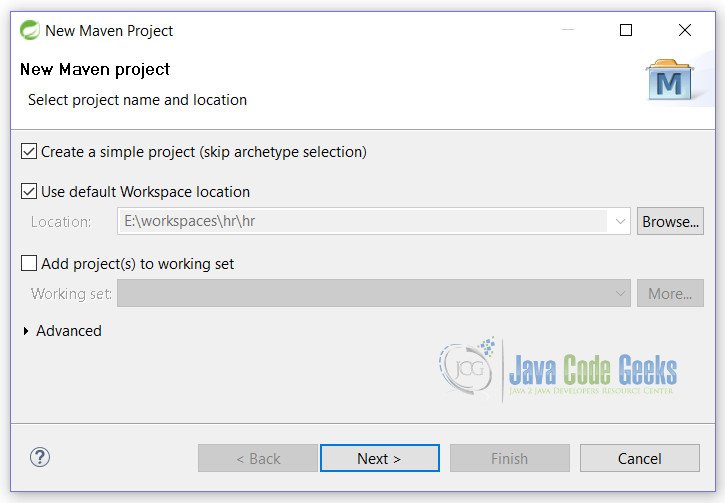
As you already know, we are using the Eclipse. So start by opening the Eclipse. Click on the File -> New -> Maven Project. You will see the first screen as shown here. Simply check the first checkbox and click on the Next button.

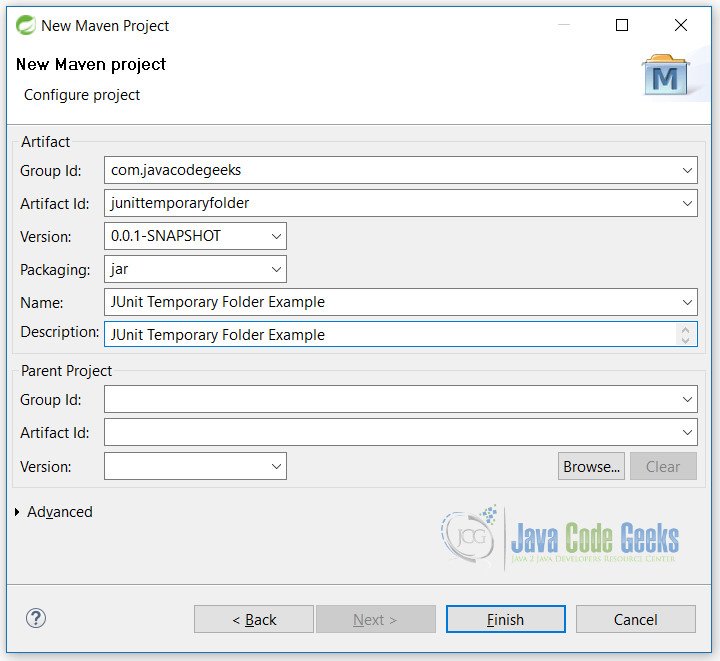
On this screen, you need to fill in the details regarding the project we are building. You can simply fill in the following details as shown and click on the Finish button.

After clicking on the Finish button, we are ready with the blank Maven project. But before we start with the code, we need to do some changes in the pom.xml file.
pom.xml
...
<dependencies>
    <dependency>
        <groupId>junit</groupId>
        <artifactId>junit</artifactId>
        <version>4.12</version>
    </dependency>
</dependencies>
<build>
    <finalName>junittemporaryfolder</finalName>
    <plugins>
        <plugin>
            <groupId>org.apache.maven.plugins</groupId>
            <artifactId>maven-compiler-plugin</artifactId>
            <version>2.5.1</version>
            <inherited>true</inherited>
            <configuration>
                <source>1.8</source>
                <target>1.8</target>
            </configuration>
        </plugin>
    </plugins>
</build>
...
Line 4: actually pulls out the JUnit for this project.
Line 18,19: tells maven to compile and build with Java 8.
4. JUnit Temporary Folder Example
In this example, we will create four test cases and show how to create and delete, files and folders using the TemporaryFolder Rule of JUnit.
TemporaryFolderTest.java
package junittemporaryfolder;

import static org.junit.Assert.assertFalse;
import static org.junit.Assert.assertTrue;

import java.io.File;
import java.io.IOException;

import org.junit.Rule;
import org.junit.Test;
import org.junit.rules.TemporaryFolder;

public class TemporaryFolderTest {

    @Rule
    public TemporaryFolder tempFolder = new TemporaryFolder();

    @Test
    public void testCreateFile() throws IOException{
        File file = tempFolder.newFile("test.txt");
        assertTrue(file.exists());
    }

    @Test
    public void testDeleteFile() throws IOException{
        File file = tempFolder.newFile("test.txt");
        file.delete();
        assertFalse(file.exists());
    }

    @Test
    public void testCreateFolder() throws IOException{
        File file = tempFolder.newFolder("testfolder");
        assertTrue(file.exists());
    }

    @Test
    public void testDeleteFolder() throws IOException{
        File file = tempFolder.newFile("testfolder");
        file.delete();
        assertFalse(file.exists());
    }

}
Let’s analyze the code:
Line 15,16: These are the main lines of this example. We have used the @Rule annotation of JUnit to define the rule. On next line, we have defined the TemporaryFolder class, which is used for creation and deletion of temporary files and folders.
Line 19: In this test case we simply create a new file using the newFile() method of the TemporaryFolder class. This will create a temporary file with the name “test.txt“. On next line, we test with the assertTrue(), that the file is created. If file is created it will pass else it will fail.
Line 25: Similar to test case in line 19, we will first create a file and on next line we will delete it. Further we will test for the file existence.
Line 32: In above test case we have created a file and then test its existence. Similarly, in this test case we will create a temporary folder using the newFolder() method of TemporaryFolder class. First we will create a folder and then on next line we test for its existence using the assertTrue() method of the JUnit. Id folder is created, test case will pass else it will fail.
Line 38: Similar to the test case at line 32, in this test case first we will create a folder, then we will delete it and then we will test for its existence.
5. Conclusion
In JUnit Temporary Folder example, we have seen the use of the powerful feature of the JUnit framework. TemporaryFolder class provides a feature to create a temporary file or folder as the test runtime and delete as soon as the test case is finished.
This can be a power to developers who want to create temporary file and folders during test run time. They do not have to manually create or delete the temporary folders.
6. Download the Eclipse Project
This is a JUnit Temporary Folder Example
You can download the full source code of this example here: JUnitTemporaryFolder.zip


