1. Introduction
In this post, I’ll be giving an example of using JTextArea Swing component. This component is usually used to create an input text that can get large strings of data. Large strings of data can be, xml, html, source code or even an entire metadata string.
2. The example
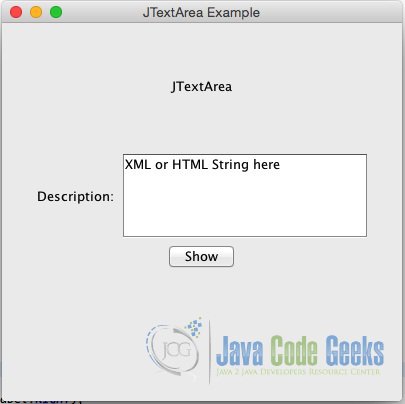
For this example, we’ll be making a basic JTextArea component wrapped in a UI with labels and buttons. The app will basically just display the description on a label underneath it.
The following code below is the entire source code that generates the sample above.
JTextAreaExample.java
package com.jcg.areyes1.jtextareasample;

import java.awt.FlowLayout;
import java.awt.GridLayout;
import java.awt.event.ActionEvent;
import java.awt.event.ActionListener;
import java.awt.event.WindowAdapter;
import java.awt.event.WindowEvent;

import javax.swing.JButton;
import javax.swing.JFrame;
import javax.swing.JLabel;
import javax.swing.JPanel;
import javax.swing.JScrollPane;
import javax.swing.JTextArea;

public class JTextAreaExample {

	private JFrame mainFrame;
	private JLabel headerLabel;
	private JLabel statusLabel;
	private JPanel controlPanel;

	public JTextAreaExample() {
		prepareGUI();
	}

	public static void main(String[] args) {
		JTextAreaExample swingControlDemo = new JTextAreaExample();
		swingControlDemo.showTextAreaDemo();
	}

	private void prepareGUI() {
		mainFrame = new JFrame("JTextArea Example");
		mainFrame.setSize(400, 400);
		mainFrame.setLayout(new GridLayout(3, 1));
		mainFrame.addWindowListener(new WindowAdapter() {
			public void windowClosing(WindowEvent windowEvent) {
				System.exit(0);
			}
		});
		headerLabel = new JLabel("", JLabel.CENTER);
		statusLabel = new JLabel("", JLabel.CENTER);

		statusLabel.setSize(350, 100);

		controlPanel = new JPanel();
		controlPanel.setLayout(new FlowLayout());

		mainFrame.add(headerLabel);
		mainFrame.add(controlPanel);
		mainFrame.add(statusLabel);
		mainFrame.setVisible(true);
	}

	private void showTextAreaDemo() {
		headerLabel.setText("JTextArea");

		JLabel descriptionLabel = new JLabel("Description: ", JLabel.RIGHT);

		final JTextArea descriptionTextArea = new JTextArea("XML or HTML String here", 5, 20);

		JScrollPane scrollPane = new JScrollPane(descriptionTextArea);

		JButton showButton = new JButton("Show");

		showButton.addActionListener(new ActionListener() {
			public void actionPerformed(ActionEvent e) {
				statusLabel.setText(descriptionTextArea.getText());
			}
		});

		controlPanel.add(descriptionLabel);
		controlPanel.add(scrollPane);
		controlPanel.add(showButton);
		mainFrame.setVisible(true);
	}

}
Let’s go bits by bit in this example.
First of, We created a method that will basically initiate the creation of UI. The prepareGUI() method is called upon constructing of the JTextAreaExample object. This will then create the following:
- Main Frame (
mainFrame) object where all components will be placed. - Header and status label. This will be used to set the header and status text whenever the
showButtonis clicked. - The control panel where all the components will be placed, including our JTextArea
- The label, and control panels will be placed on the main frame.
3. Download the Eclipse project of this tutorial:
You can download the full source code of this example here: jtextarea-sample
