In one of the previous example, we have studied about exposing a simple REST web-service using Spring REST and also how to consume a REST web-service.
In this example, we will go a step further and attempt to access a REST Web-Service which is secured by Spring Security. We shall use Spring-REST to host the REST Web-Service. So let’s start with the project set-up:
1. Project Set-Up
We shall use Maven to setup our project. Open Eclipse and create a simple Maven project and check the skip archetype selection checkbox on the dialogue box that appears. Replace the content of the existing pom.xml with the one provided below:
pom.xml
<project xmlns="http://maven.apache.org/POM/4.0.0" xmlns:xsi="http://www.w3.org/2001/XMLSchema-instance"
	xsi:schemaLocation="http://maven.apache.org/POM/4.0.0 http://maven.apache.org/maven-v4_0_0.xsd">
	<modelVersion>4.0.0</modelVersion>
	<groupId>com.jcg.examples.springSecuritywithRest</groupId>
	<artifactId>SpringSecurityWithRest</artifactId>
	<packaging>war</packaging>
	<version>0.0.1-SNAPSHOT</version>
	<name>SpringSecurityWithRest Maven Webapp</name>
	<url>http://maven.apache.org</url>
	<dependencies>
		<dependency>
			<groupId>junit</groupId>
			<artifactId>junit</artifactId>
			<version>3.8.1</version>
			<scope>test</scope>
		</dependency>
		<dependency>
			<groupId>org.springframework</groupId>
			<artifactId>spring-core</artifactId>
			<version>4.2.3.RELEASE</version>
		</dependency>
		<dependency>
			<groupId>org.springframework.security</groupId>
			<artifactId>spring-security-core</artifactId>
			<version>4.0.3.RELEASE</version>
		</dependency>

		<dependency>
			<groupId>org.springframework.security</groupId>
			<artifactId>spring-security-web</artifactId>
			<version>4.0.3.RELEASE</version>
		</dependency>

		<dependency>
			<groupId>org.springframework.security</groupId>
			<artifactId>spring-security-config</artifactId>
			<version>4.0.3.RELEASE</version>
		</dependency>

		<dependency>
			<groupId>org.springframework</groupId>
			<artifactId>spring-webmvc</artifactId>
			<version>4.2.3.RELEASE</version>
		</dependency>

		<dependency>
			<groupId>org.springframework</groupId>
			<artifactId>spring-web</artifactId>
			<version>4.2.3.RELEASE</version>
		</dependency>
	</dependencies>
	<build>
		<finalName>SpringSecurityWithRest</finalName>
		<pluginManagement>
			<plugins>
				<plugin>
				<groupId>org.apache.maven.plugins</groupId>
				<artifactId>maven-compiler-plugin</artifactId>
				<version>3.1</version>
				<configuration>
					<source>1.8</source>
					<target>1.8</target>
				</configuration>
			</plugin>
			</plugins>

		</pluginManagement>
	</build>
</project>
This will import the required JAR dependencies in the project. We can now start with the actual Spring-Security implementation for the REST Web-Service.
2. Implementation
We have already demonstrated how we can configure Spring Security for a Web-application. For Spring Security to work with REST Wev-Service we will make some changes to the security-config.xml as under :
security-config.xml
<?xml version="1.0" encoding="UTF-8"?>
<beans:beans xmlns="http://www.springframework.org/schema/security"
	xmlns:xsi="http://www.w3.org/2001/XMLSchema-instance" xmlns:beans="http://www.springframework.org/schema/beans"
	xmlns:sec="http://www.springframework.org/schema/security"
	xmlns:context="http://www.springframework.org/schema/context"
	xsi:schemaLocation="
      http://www.springframework.org/schema/security
      http://www.springframework.org/schema/security/spring-security-4.0.xsd
      http://www.springframework.org/schema/beans
      http://www.springframework.org/schema/beans/spring-beans-4.0.xsd
      http://www.springframework.org/schema/context
	  http://www.springframework.org/schema/context/spring-context-4.0.xsd">

	<sec:http entry-point-ref="customEntryPoint" use-expressions="true">

		<sec:custom-filter ref="authenticationFilter"
			before="PRE_AUTH_FILTER" />

		<sec:intercept-url pattern="/**"
			access="hasAuthority('AUTH_USER')" />

		<sec:logout delete-cookies="JSESSIONID" />

		<sec:csrf disabled="true" />
	</sec:http>

	<context:component-scan base-package="com.jcg.examples" />

	<sec:authentication-manager alias="authenticationManager">
		<authentication-provider ref="customAuthenticationProvider" />
	</sec:authentication-manager>

	<context:component-scan base-package="com.jcg.examples" />

	<beans:bean id="authenticationFilter"
		class="org.springframework.security.web.authentication.UsernamePasswordAuthenticationFilter">
		<beans:property name="authenticationManager" ref="authenticationManager" />
		<beans:property name="postOnly" value="false" />
		<beans:property name="authenticationSuccessHandler" ref="customSuccessHandler" />
	</beans:bean>

	<beans:bean id="customSuccessHandler"
		class="com.jcg.examples.authentication.CustomSuccessHandler" />

</beans:beans>
The configuration starts by establishing an entry point for the all incoming request. All the requests for the application go through this entry-point and hence this is the point where user-authentication occurs. In a traditional web-application this is point is created by default when we use the sec:http auto-config="true" in the security-config.xml configuration(refer the above link). To create a custom entry-point, we need to provide a entry-point-ref bean in the http tag. We will look at its implementation later in the example.
Next, important piece of configuration here is the configuration of Authentication Filter. Since we cannot have form based authentication filter here, we need to provide our own authentication strategy. This authentication filter will use the authentication manager to authenticate the user. If the user is successfully authenticated the user is allowed to access the resource he/she is requesting. In case of a authentication-failure, the user receives a response header with 401 error-code.
We need to implement a successful-authentication handler. The reason is, in default spring security case the user is redirected to the resource he has requested and when we try to this in a web-service we get a 301 code, which means the resource has been moved permanently instead of a 200 OK response from the server. So, we implement success-handler which simply over-rides this default behavior.
The rest of the configuration remains similar as in the case of a Spring-Security with normal Web-Application.
Now, let us have a look at the implementation of different components we have discussed above :
CustomEntryPoint.java
package com.jcg.examples.authentication;

import java.io.IOException;

import javax.servlet.ServletException;
import javax.servlet.http.HttpServletRequest;
import javax.servlet.http.HttpServletResponse;

import org.springframework.security.core.AuthenticationException;
import org.springframework.security.web.AuthenticationEntryPoint;
import org.springframework.stereotype.Component;

@Component
public class CustomEntryPoint implements AuthenticationEntryPoint
{

		@Override
		public void commence(HttpServletRequest request, HttpServletResponse response, AuthenticationException authException) throws IOException, ServletException
		{
					System.out.println("Entering commence due to failed Authentication");
				 response.sendError( HttpServletResponse.SC_UNAUTHORIZED, "Unauthorized Access!" );
		}

}
To create a custom Entry-point into our application we just need to implement the org.springframework.security.web.AuthenticationEntryPoint interface and over-ride its commence method. This method is invoked in the event of a failed authentication. We have marked this as a component so that we need not explicitly define the bean in the xml file.
CustomSuccessHandler.java
package com.jcg.examples.authentication;


import java.io.IOException;

import javax.servlet.ServletException;
import javax.servlet.http.HttpServletRequest;
import javax.servlet.http.HttpServletResponse;

import org.springframework.security.core.Authentication;
import org.springframework.security.web.authentication.SavedRequestAwareAuthenticationSuccessHandler;


public class CustomSuccessHandler extends SavedRequestAwareAuthenticationSuccessHandler
{

		@Override
		public void onAuthenticationSuccess(HttpServletRequest request, HttpServletResponse response, Authentication authentication) throws ServletException, IOException
		{
				System.out.println("authentication successful!");
		}
}
CustomSuccessHandler simply overrides the default action of the onAuthenticationSuccess method of SavedRequestAwareAuthenticationSuccessHandler class so that the request does not get redirected.
Spring Security uses J2EE Filter to implement security. So we need to configure the same in the web.xml
web.xml
<web-app xmlns="http://java.sun.com/xml/ns/javaee" xmlns:xsi="http://www.w3.org/2001/XMLSchema-instance"
	xsi:schemaLocation="http://java.sun.com/xml/ns/javaee
          http://java.sun.com/xml/ns/javaee/web-app_3_0.xsd"
	version="3.0">

	<display-name>Spring REST Security Example</display-name>

	<context-param>
		<param-name>contextConfigLocation</param-name>
		<param-value>
			classpath:/security-config.xml
		</param-value>
	</context-param>

	<filter>
		<filter-name>springSecurityFilterChain</filter-name>
		<filter-class>org.springframework.web.filter.DelegatingFilterProxy</filter-class>
	</filter>

	<filter-mapping>
		<filter-name>springSecurityFilterChain</filter-name>
		<url-pattern>/*</url-pattern>
	</filter-mapping>

	<listener>
		<listener-class>org.springframework.web.context.ContextLoaderListener</listener-class>
	</listener>

	<servlet>
		<servlet-name>Spring-Controller</servlet-name>
		<servlet-class>org.springframework.web.servlet.DispatcherServlet</servlet-class>
		<init-param>
			<param-name>contextConfigLocation</param-name>
			<param-value>classpath:/spring-beans.xml</param-value>
		</init-param>
		<load-on-startup>1</load-on-startup>
	</servlet>
	<servlet-mapping>
		<servlet-name>Spring-Controller</servlet-name>
		<url-pattern>/</url-pattern>
	</servlet-mapping>

	<session-config>
		<session-timeout>15</session-timeout>
	</session-config>

</web-app>
That is all about configuring the Spring Security. Let’s have a look at a basic REST Controller and the spring-beans.xml
CustomController.java
package com.jcg.examples.controller;

import org.springframework.http.HttpStatus;
import org.springframework.http.ResponseEntity;
import org.springframework.web.bind.annotation.PathVariable;
import org.springframework.web.bind.annotation.RequestMapping;
import org.springframework.web.bind.annotation.RequestMethod;
import org.springframework.web.bind.annotation.RestController;

@RestController
public class CustomController
{

		@RequestMapping(value="/welcome/{customer}",method=RequestMethod.POST)
		public ResponseEntity<String> welcomeUser(@PathVariable("customer") String customer)
		{
				System.out.println("Inside welcomeUser in controller");
				return new ResponseEntity<String>("Welcome "+customer,HttpStatus.OK);
		}

		@RequestMapping(value = "/login", method = RequestMethod.POST)
    public String login() {

				System.out.println("Welcome called Login");
        return "welcome";
    }

}
spring-beans.xml
<beans xmlns="http://www.springframework.org/schema/beans"
	xmlns:context="http://www.springframework.org/schema/context"
	xmlns:xsi="http://www.w3.org/2001/XMLSchema-instance"
	xsi:schemaLocation="
   http://www.springframework.org/schema/beans
   http://www.springframework.org/schema/beans/spring-beans-3.0.xsd
   http://www.springframework.org/schema/context
   http://www.springframework.org/schema/context/spring-context-3.0.xsd">

	<context:component-scan base-package="com.jcg.examples" />

</beans>
That is all from the implementation point of view for the Spring Security with REST. Now, let’s test out the configuration!
curl -i -X POST -d username=Chandan -d password=Chandan -c C:\Users\cshambhunathsingh\Desktop\temp\cookies.txt http://localhost:8080/SpringSecurityWithRest/login
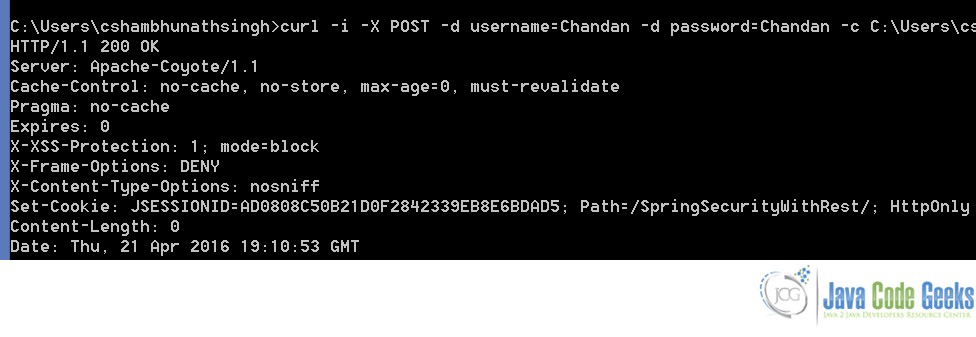
This creates a new cookie file at the path passed in the argument. This cookie contains the JSessionId. This JSessionId gets invalidated after 15 minutes of inactivity as mentioned in the session-timeout tag of the web.xml
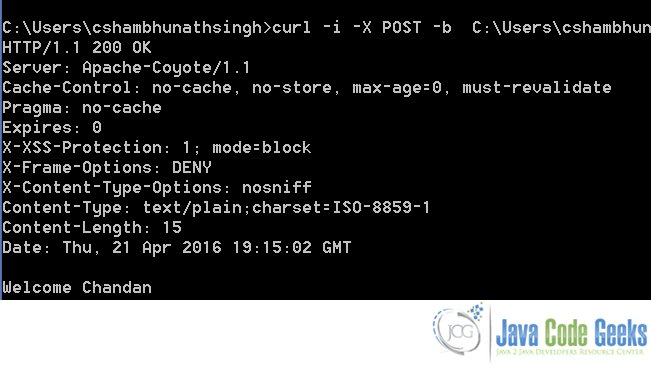
Accessing a resource after successful authentication :
curl -i -X POST -b C:\Users\cshambhunathsingh\Desktop\temp\cookies.txt http://localhost:8080/SpringSecurityWithRest/welcome/Chandan
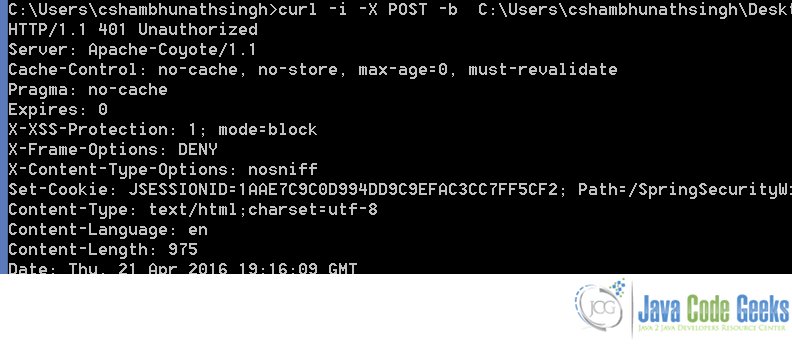
Now, I delete the cookie file and try to access the protected the resource again. We should see the 401 error message
curl -i -X POST -b C:\Users\cshambhunathsingh\Desktop\temp\cookies.txt http://localhost:8080/SpringSecurityWithRest/welcome/Chandan
3. Download The Source Code
This was an example of how we can secure our REST Web-Service using Spring Security Module.
You can download the source code of this example here: SpringSecurityWithRest.zip

Hello,
Please I want to get the user connected in the restController, how I can I do it ?
if i comment the code <sec:intercept-url pattern=”/**”
access=”hasAuthority(‘AUTH_USER’)” then my webservice are working..
But please give the suggestion for spring security initialize , because postman in basic auth for not working this api