When you need an Application to work with different screen sizes, or you don’t know the screen size of your application, UI frameworks provide layout managers facilities to help position components on the screen.
The layout manager has the ability to automatic determine the position and size of the widgets on the screen. In most cases the layout manager is an invisible and important component that is in charge of other widgets.
1. The tools
- Java JDK 8
- Latest Eclipse Mars
- Vaadin 7.6.5
- Tomcat Server 8
2. Introduction
Vaadin provides useful layout managers for all your needs. In this example we are going to show how to use these layout managers. In modern web applications you ofter need to use responsive design and its easy to make your application responsive with the Vaadin layout managers, to fit multiple screen sizes without too much worry on your side.
- Each Item has the same number of Properties.
- Each Item has an ID property.
- All Properties in different items must have the same data type.
- The Item ID of a container id unique and non-null.
In this example I am going to show how to use a Vaadin Container.
3. Prerequisites
- JDK installed
- Eclipse Mars installed and working
- Vaadin plug-in installed
- Tomcat 8 installed and running
4. Set up the project
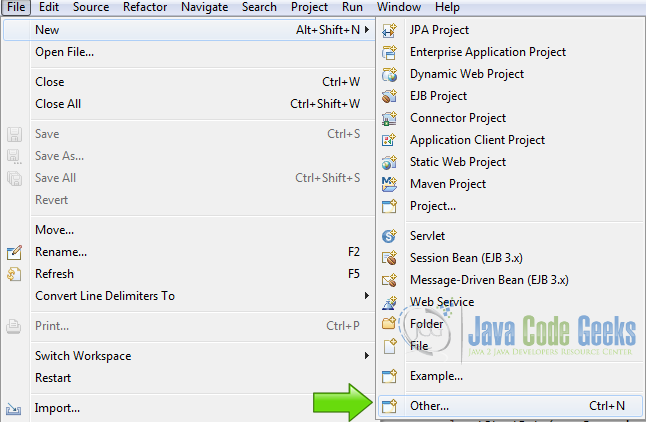
In the file menu choose File -> New -> Other
Now from the list choose Vaadin 7 project
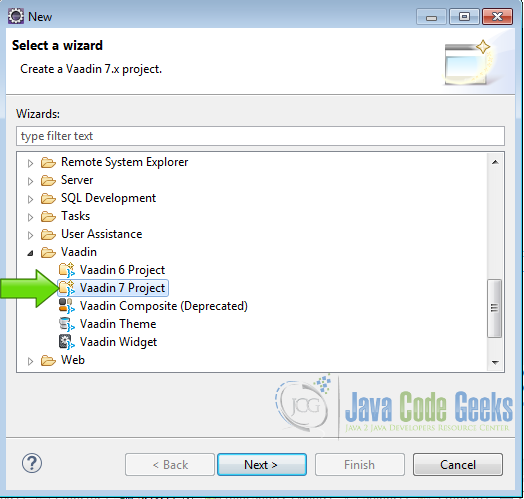
Press next and name your project then press finish.
5. Coding the example
5.1 The main layout
Main layout
		final GridLayout mainLayout = new GridLayout(3,2);
		mainLayout.setSpacing(true);
		mainLayout.setStyleName("black");
		mainLayout.setWidth("90%");
		mainLayout.setHeight("90%");
		setContent(mainLayout);
We need a layout to show different layouts types. We are going to use a grid layout to show the example, this is a GridLayout and we will get into it later.
5.2 Vertical Layout
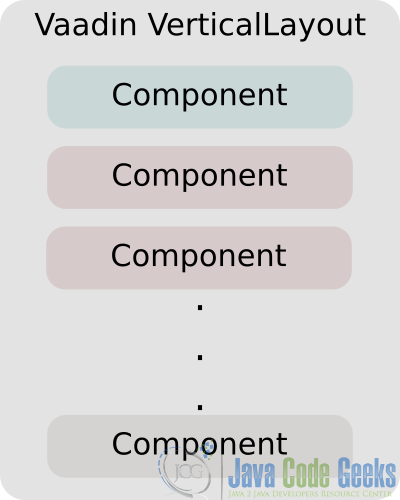
The VerticalLayout, lays out components vertically, each component in a different row.
Label grey
		Label lVerticalBlue = new Label("VerticalLayout");
		lVerticalBlue.setSizeFull();
		lVerticalBlue.addStyleName("grey");
Here we create a label and style it with a gray color.
Green Label
		Label lVerticalGreen = new Label("VerticalLayout");
		lVerticalGreen.setSizeFull();
		lVerticalGreen.addStyleName("green");
Here we create a label and style it with a green color.
Red Label
		Label lVerticalRed = new Label("VerticalLayout");
		lVerticalRed.setSizeFull();
		lVerticalRed.addStyleName("red");
Here we create a label and style it with a red color.
VerticalLayout
		VerticalLayout verticalLayout = new VerticalLayout();
		verticalLayout.setSpacing(true);
		verticalLayout.addComponent(lVerticalBlue);
		verticalLayout.addComponent(lVerticalGreen);
		verticalLayout.addComponent(lVerticalRed);
We create the VerticalLayout, then we set the space between widgets inside the layout to true, just for the example purpose and then we add the three labels created before to this layout. This layout has 100% default width and undefined height and it means that the layout it’s going to fill the parent container width and begin to lay out children controls vertically.
5.3 Horizontal Layout
Labels
		Label lHorizontalBlue = new Label("HorizontalLayout");
		lHorizontalBlue.setSizeFull();
		lHorizontalBlue.addStyleName("grey");

		Label lHorizontalGreen = new Label("HorizontalLayout");
		lHorizontalGreen.setSizeFull();
		lHorizontalGreen.addStyleName("green");

		Label lHorizontalRed = new Label("HorizontalLayout");
		lHorizontalRed.setSizeFull();
		lHorizontalRed.addStyleName("red");
Here we create some labels to show the layout.
HorizontalLayout
		HorizontalLayout horizontalLayout = new HorizontalLayout();
		horizontalLayout.setSpacing(true);
		horizontalLayout.addComponent(lHorizontalBlue);
		horizontalLayout.addComponent(lHorizontalGreen);
		horizontalLayout.addComponent(lHorizontalRed);
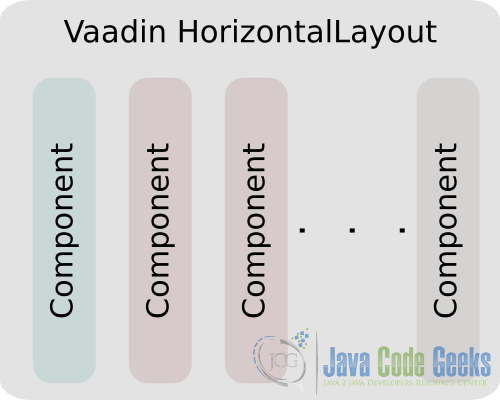
First we create the layout, then we set the spacing to true and then we add the three labels into the layout. This is simple, you create the layout and then you add the components into it and the layout get in charge of all the details. HorizontalLayout has undefined width and height.
5.4 Grid Layout

GridLayout
		Button bt00 = new Button("0,0");
		Button bt01 = new Button("0,1");
		Button bt10 = new Button("1,0");
		Button bt11 = new Button("1,1");

		GridLayout gridLayout = new GridLayout(2, 2);
		gridLayout.setSpacing(true);
		gridLayout.addComponent(bt00,0,0);
		gridLayout.addComponent(bt01,0,1);
		gridLayout.addComponent(bt10,1,0);
		gridLayout.addComponent(bt11,1,1);
Here we use buttons to show the layout. First we create the buttons and then we create the GridLayout with two columns and two rows, then we add the buttons to the layout beginning with the position 0,0 that is the upper left position of the layout.
5.5 Absolute Layout

Absolute Layout
		AbsoluteLayout absoluteLayout = new AbsoluteLayout();
		absoluteLayout.setWidth("200px");
		absoluteLayout.setHeight("200px");
		absoluteLayout.setStyleName("grey");
		Label l50 = new Label("Absolute x=10/y=10");
		l50.setStyleName("green");
		absoluteLayout.addComponent(l50, "left: 10px; top: 10px;");
In the absolute layout we put all children components with absolute coordinates which are specified by a CSS absolute position string, using the left, right, top, bottom, and z-index. Z-index is used when you want overlapping components and this index tells the layout manager what component is showed over each other. The left, right, top and bottom indicates the relative border where you want to position the component and the coordinates in units or proportional coordinates if you want. In this case we create an absolute layout of 200 pixels width and 200 pixels height, fill the background of the layout with a gray color and then put a label l50 ten pixels from the top and ten pixels from the left side of the layout.
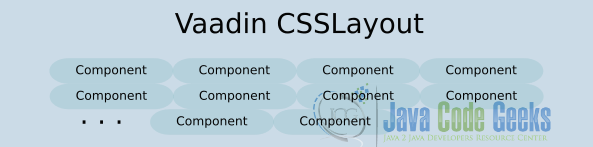
5.6 CSS Layout
CSS Layout
		CssLayout cssLayout = new CssLayout();
		Label lCssGrey = new Label("Css Layout");
		lCssGrey.addStyleName("grey");
		Label lCssGreen = new Label("Css Layout");
		lCssGreen.addStyleName("green");
		Label lCssRed = new Label("Css Layout");
		lCssRed.addStyleName("red");
		cssLayout.addComponent(lCssRed);
		cssLayout.addComponent(lCssGrey);
		cssLayout.addComponent(lCssGreen);
This is the fastest and customizable layout because Vaadin put all components contained in this layout inside an HTML. div is fully customizable through CSS and by default it puts the components laid out horizontally and wrap at the end of the container. We create some labels and the add it to the layout.
5.7 Custom Layout
Custom Layout
		Label lCustomGrey = new Label("Custom Layout");
		lCustomGrey.addStyleName("grey");
		Label lCustomGreen = new Label("Custom Layout");
		lCustomGreen.addStyleName("green");
		Label lCustomRed = new Label("Custom Layout");
		lCustomRed.addStyleName("red");
		CustomLayout customLayout = new CustomLayout("customlayout");
		customLayout.addComponent(lCustomRed, "redloc");
		customLayout.addComponent(lCustomGreen, "greenloc");
		customLayout.addComponent(lCustomGrey, "greyloc");
customLayout.html
<table width="100%" height="100%">
	<tr>
		<td><div location="redloc"></div></td>
	</tr>
	<tr>
		<td><div location="greenloc"></div></td>
	</tr>
	<tr>
		<td><div location="greyloc"></div></td>
	</tr>
</table>
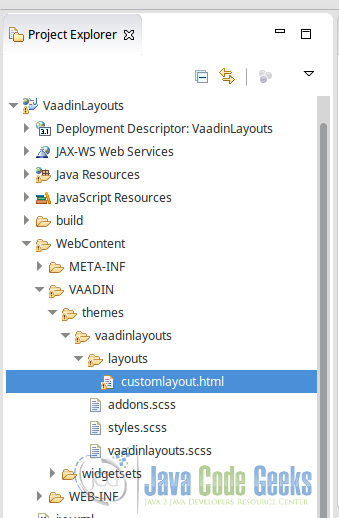
With the CustomLayout you use an HTML template to layout the components. You need to create the template into a fixed location in the project, in the folder VAADIN/themes/vaadinlayouts/layout as shown in the image:

In the HTML template you define the placeholders with the attribute location in the HTML tag that you want to put the component, and then when you add the component to the container customLayout.addComponent(lCustomRed, "redloc"); you need to specify the location tag where you want to put the component.
5.8 Add the layouts to the main layout
Add layouts
		mainLayout.addComponent(verticalLayout, 0, 0);
		mainLayout.addComponent(horizontalLayout, 1, 0);
		mainLayout.addComponent(gridLayout, 2, 0);
		mainLayout.addComponent(absoluteLayout, 0, 1);
		mainLayout.addComponent(cssLayout, 1, 1);
		mainLayout.addComponent(customLayout, 2, 1);
We add all the layouts created to the main layout that is a GridLayout and as you can see is possible to stack the layouts in a hierarchical fashion to build your dream UI but be careful of the overhead because it is always better to keep things simple.
5.9 The styles
The style used in the labels are defined in the file VAADIN/themes/vaadinlayouts/vaadinlayouts.scss and we will only change the color of the text and the background color of the labels for our tutorial purpose.
6. The complete source code
vaadinlayouts.scss
@import "../valo/valo.scss";

@mixin vaadinlayouts {
  @include valo;

.black {
	color: white;
	background: #3A3A38;
}

.grey {
	color: white;
	background: #808069;
}

.green {
	color: white;
    background: #79973F;
}
.red {
	color: white;
    background: #C67171;
}
}
customLayout.html
<table width="100%" height="100%">
	<tr>
		<td><div location="redloc"></div></td>
	</tr>
	<tr>
		<td><div location="greenloc"></div></td>
	</tr>
	<tr>
		<td><div location="greyloc"></div></td>
	</tr>
</table>
VaadinLayoutsUI.java
package com.example.vaadinlayouts;

import javax.servlet.annotation.WebServlet;

import com.vaadin.annotations.Theme;
import com.vaadin.annotations.VaadinServletConfiguration;
import com.vaadin.server.VaadinRequest;
import com.vaadin.server.VaadinServlet;
import com.vaadin.ui.AbsoluteLayout;
import com.vaadin.ui.Button;
import com.vaadin.ui.CssLayout;
import com.vaadin.ui.CustomLayout;
import com.vaadin.ui.GridLayout;
import com.vaadin.ui.HorizontalLayout;
import com.vaadin.ui.Label;
import com.vaadin.ui.UI;
import com.vaadin.ui.VerticalLayout;

@SuppressWarnings("serial")
@Theme("vaadinlayouts")
public class VaadinlayoutsUI extends UI {

	@WebServlet(value = "/*", asyncSupported = true)
	@VaadinServletConfiguration(productionMode = false, ui = VaadinlayoutsUI.class, widgetset = "com.example.vaadinlayouts.widgetset.VaadinlayoutsWidgetset")
	public static class Servlet extends VaadinServlet {
	}

	@Override
	protected void init(VaadinRequest request) {
		final GridLayout mainLayout = new GridLayout(3,2);
		mainLayout.setSpacing(true);
		mainLayout.setStyleName("black");
		mainLayout.setWidth("90%");
		mainLayout.setHeight("90%");
		setContent(mainLayout);

		Label lVerticalBlue = new Label("VerticalLayout");
		lVerticalBlue.setSizeFull();
		lVerticalBlue.addStyleName("grey");

		Label lVerticalGreen = new Label("VerticalLayout");
		lVerticalGreen.setSizeFull();
		lVerticalGreen.addStyleName("green");

		Label lVerticalRed = new Label("VerticalLayout");
		lVerticalRed.setSizeFull();
		lVerticalRed.addStyleName("red");

		VerticalLayout verticalLayout = new VerticalLayout();
		verticalLayout.setSpacing(true);
		verticalLayout.addComponent(lVerticalBlue);
		verticalLayout.addComponent(lVerticalGreen);
		verticalLayout.addComponent(lVerticalRed);


		Label lHorizontalBlue = new Label("HorizontalLayout");
		lHorizontalBlue.setSizeFull();
		lHorizontalBlue.addStyleName("grey");

		Label lHorizontalGreen = new Label("HorizontalLayout");
		lHorizontalGreen.setSizeFull();
		lHorizontalGreen.addStyleName("green");

		Label lHorizontalRed = new Label("HorizontalLayout");
		lHorizontalRed.setSizeFull();
		lHorizontalRed.addStyleName("red");

		HorizontalLayout horizontalLayout = new HorizontalLayout();
		horizontalLayout.setSpacing(true);
		horizontalLayout.addComponent(lHorizontalBlue);
		horizontalLayout.addComponent(lHorizontalGreen);
		horizontalLayout.addComponent(lHorizontalRed);

		Button bt00 = new Button("0,0");
		Button bt01 = new Button("0,1");
		Button bt10 = new Button("1,0");
		Button bt11 = new Button("1,1");

		GridLayout gridLayout = new GridLayout(2, 2);
		gridLayout.setSpacing(true);
		gridLayout.addComponent(bt00,0,0);
		gridLayout.addComponent(bt01,0,1);
		gridLayout.addComponent(bt10,1,0);
		gridLayout.addComponent(bt11,1,1);


		AbsoluteLayout absoluteLayout = new AbsoluteLayout();
		absoluteLayout.setWidth("200px");
		absoluteLayout.setHeight("200px");
		absoluteLayout.setStyleName("grey");
		Label l50 = new Label("Absolute x=10/y=10");
		l50.setStyleName("green");
		absoluteLayout.addComponent(l50, "left: 10px; top: 10px;");

		CssLayout cssLayout = new CssLayout();
		Label lCssGrey = new Label("Css Layout");
		lCssGrey.addStyleName("grey");
		Label lCssGreen = new Label("Css Layout");
		lCssGreen.addStyleName("green");
		Label lCssRed = new Label("Css Layout");
		lCssRed.addStyleName("red");
		cssLayout.addComponent(lCssRed);
		cssLayout.addComponent(lCssGrey);
		cssLayout.addComponent(lCssGreen);

		Label lCustomGrey = new Label("Custom Layout");
		lCustomGrey.addStyleName("grey");
		Label lCustomGreen = new Label("Custom Layout");
		lCustomGreen.addStyleName("green");
		Label lCustomRed = new Label("Custom Layout");
		lCustomRed.addStyleName("red");
		CustomLayout customLayout = new CustomLayout("customlayout");
		customLayout.addComponent(lCustomRed, "redloc");
		customLayout.addComponent(lCustomGreen, "greenloc");
		customLayout.addComponent(lCustomGrey, "greyloc");


		mainLayout.addComponent(verticalLayout, 0, 0);
		mainLayout.addComponent(horizontalLayout, 1, 0);
		mainLayout.addComponent(gridLayout, 2, 0);
		mainLayout.addComponent(absoluteLayout, 0, 1);
		mainLayout.addComponent(cssLayout, 1, 1);
		mainLayout.addComponent(customLayout, 2, 1);

	}

}
7. Running the example
Right click on the project folder and choose Run as -> Run on server choose Tomcat 8 server and hit finish.
8. Results
As you can see in the image below we have all the layouts we created in action in a single application:
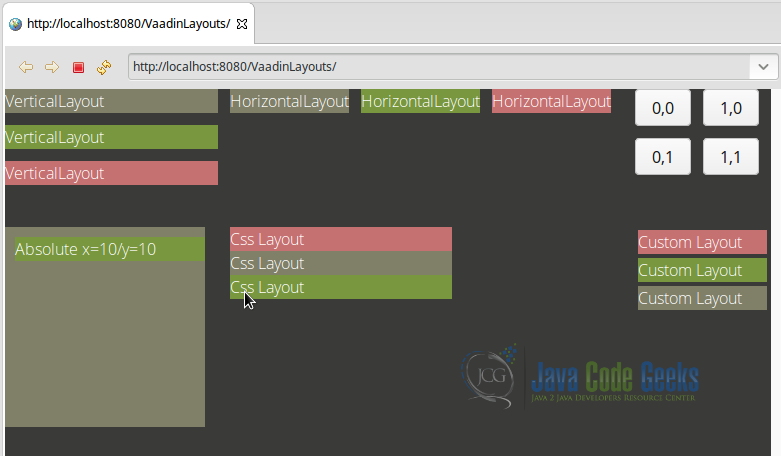
VerticalLayout is on the top left of the image.
HorizontalLayout is on the top center of the image.
GridLayout is on the top right of the image.
AbsoluteLayout is on the bottom left of the image.
CssLayout is on the bottom center of the image.
CustomLayout is on the bottom right of the image.
9. Download the Source Code
This was an example of Vaadin Layouts.
