In this article we present a simple example of using Spring Batch Scheduler. We will demonstrate how to configure a job and then trigger it periodically using the Spring Batch Scheduler. This example will be based on XML configuration. Following are the tools and libraries used in this example.
- Eclipse Helios
- Spring 4.0.5.RELEASE
- Spring Batch 3.0.4.RELEASE
- JDBC 4.0.5.RELEASE
- HSQL 1.8.0.7
- Apache Commons 1.4
The example has been organized as shown below. The full example code is available for download at the end of the article.
Table Of Contents
1. Introduction
Spring Batch is an open-source batch processing framework. Starting at version 3.x it has rolled out a Spring Batch Scheduler to trigger batch jobs.In this example, we will configure a simple Job with a Tasklet that performs a select query on an HSQL database table and prints out the result-set. This Tasklet will be scheduled to run periodically using the Spring Batch Scheduler. Note that this article assumes that the reader is familiar with the basic concepts involved in Spring Batch Scheduling like Job, Step, Tasklet etc. If not, one could follow the hyperlinks or browse through the following article posted earlier.
2. Spring Batch Scheduler Example
The example code has been arranged into the following sections.
2.1. Project Set-Up
- Fire up Eclipse from a suitable location
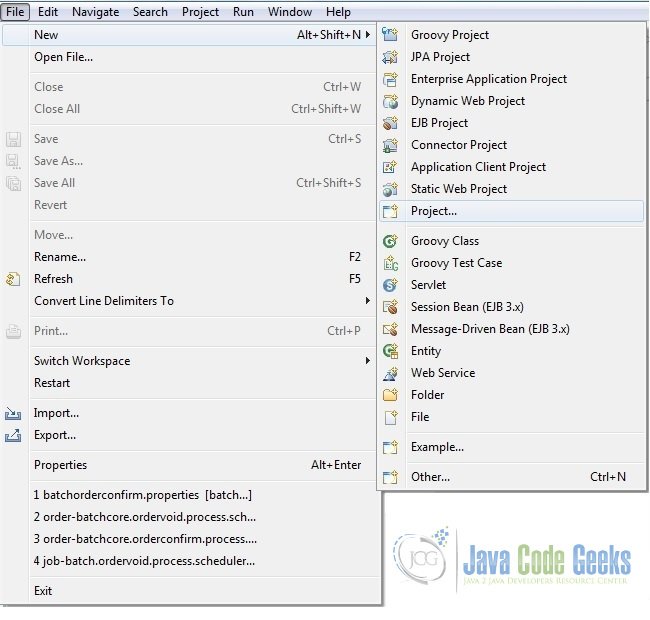
- Click on File->New->Project…

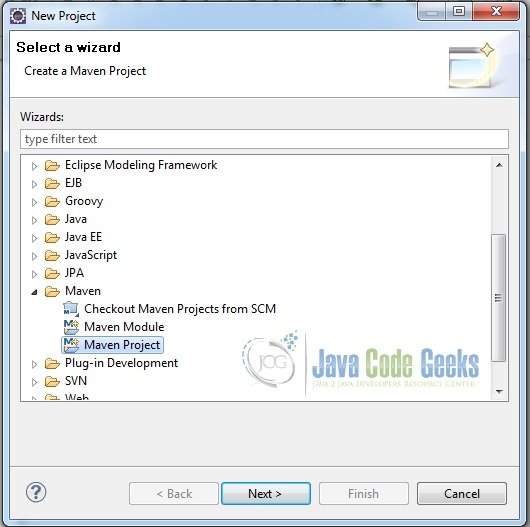
Fig.1 Create Project - Choose the creation of a Maven project and skip ‘archetype’ selection as shown in the screenshots below.

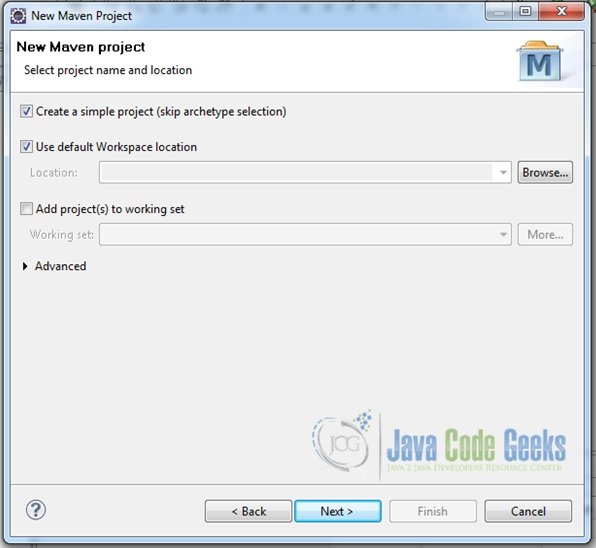
Fig.2 Choose the Creation of a Maven Project 
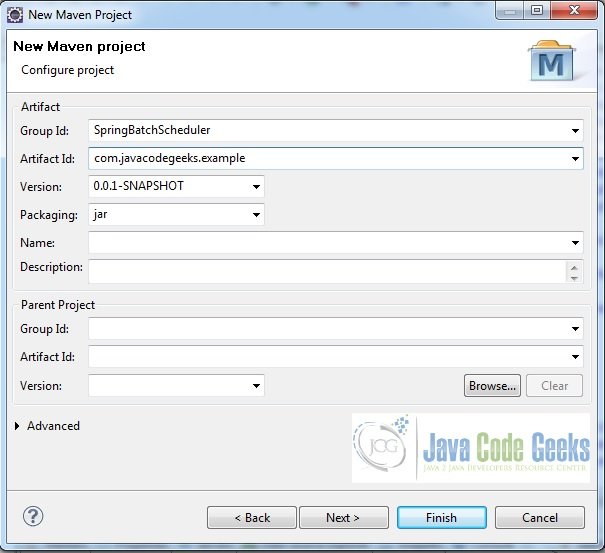
Fig.3 Skip ArcheType Selection - Provide the project name & details

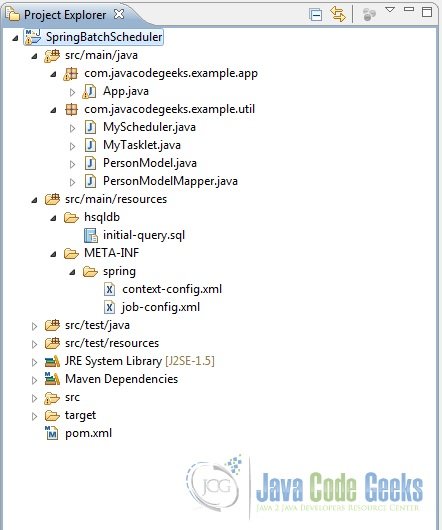
Fig.4 Provide Project Name - Next, we will add some folders and files to it so that the final project structure is as shown below:

Fig.5 Final Project Structure
2.2. Add Maven Dependencies
Open the pom.xml file and add the following dependencies into it.
pom.xml
<project xmlns="http://maven.apache.org/POM/4.0.0" xmlns:xsi="http://www.w3.org/2001/XMLSchema-instance" xsi:schemaLocation="http://maven.apache.org/POM/4.0.0 http://maven.apache.org/xsd/maven-4.0.0.xsd">
  <modelVersion>4.0.0</modelVersion>
  <groupId>com.javacodegeeks.example</groupId>
  <artifactId>SpringBatchScheduler</artifactId>
  <version>0.0.1-SNAPSHOT</version>
  <properties>
  	<spring.version>4.0.5.RELEASE</spring.version>
  	<spring.batch.version>3.0.4.RELEASE</spring.batch.version>
  	<spring.jdbc.version>4.0.5.RELEASE</spring.jdbc.version>
  	<hsql.version>1.8.0.7</hsql.version>
  	<commons.version>1.4</commons.version>
  </properties>
  <dependencies>
  	 <dependency>
		<groupId>org.springframework</groupId>
		<artifactId>spring-context-support</artifactId>
		<version>${spring.version}</version>
    </dependency>
  	<dependency>
		<groupId>org.springframework.batch</groupId>
		<artifactId>spring-batch-core</artifactId>
		<version>${spring.batch.version}</version>
    </dependency>
    <dependency>
		<groupId>hsqldb</groupId>
		<artifactId>hsqldb</artifactId>
		<version>${hsql.version}</version>
	</dependency>
	<dependency>
		<groupId>org.springframework</groupId>
		<artifactId>spring-jdbc</artifactId>
		<version>${spring.jdbc.version}</version>
   </dependency>
     <dependency>
			<groupId>commons-dbcp</groupId>
			<artifactId>commons-dbcp</artifactId>
			<version>${commons.version}</version>
	</dependency>
  </dependencies>
</project>
2.3. Create HSQL Table
In this section we are going to create an HSQL database table namely, ‘person’ and insert some records into it. These are the values which would be read in our tasklet. Note that the database queries in this file would be invoked in our job-config.xml file that is described in a following section.
initial-query.sql
DROP TABLE person IF EXISTS;

CREATE TABLE person (
firstName VARCHAR(20),
lastName VARCHAR(20),
school VARCHAR(20),
rollNumber int);

INSERT INTO person VALUES ('Henry','Donald','Little Garden',1234901);
INSERT INTO person VALUES ('Eric','Osborne','Little Garden',1234991);
2.4. Set-up POJOs
Now we are good to set-up a an object model to which the database table values would be mapped. It is a simple POJO with just a few attributes. The POJO and its corresponding mapper class are as shown below.
PersonModel.java
package com.javacodegeeks.example.util;

public class PersonModel {
	String firstName, lastName, school;
	int rollNumber;
	public String getFirstName() {
		return firstName;
	}
	public void setFirstName(String firstName) {
		this.firstName = firstName;
	}
	public String getLastName() {
		return lastName;
	}
	public void setLastName(String lastName) {
		this.lastName = lastName;
	}
	public String getSchool() {
		return school;
	}
	public void setSchool(String school) {
		this.school = school;
	}
	public int getRollNumber() {
		return rollNumber;
	}
	public void setRollNumber(int rollNumber) {
		this.rollNumber = rollNumber;
	}

	@Override
	public String toString(){
		return "Hello, "+firstName+" "+lastName+"! Welcome to "+school+ "!";
	}
}
PersonModelMapper.java
package com.javacodegeeks.example.util;

import java.sql.ResultSet;
import java.sql.SQLException;

import org.springframework.jdbc.core.RowMapper;

public class PersonModelMapper implements RowMapper{

	public PersonModel mapRow(ResultSet rs, int rowNum) throws SQLException {
		PersonModel person = new PersonModel();
		person.setFirstName(rs.getString("firstName"));
		person.setLastName(rs.getString("lastName"));
		person.setSchool(rs.getString("school"));
		person.setRollNumber(rs.getInt("rollNumber"));
		return person;
	}

}
2.5. Create the Tasklet
In the below code we will create a Tasklet which does a very simple task of simply reading data from the HSQL database table and printing out the result-set onto the console. Note how the Tasklet interface is being implemented here.
MyTasklet.java
package com.javacodegeeks.example.util;

import java.util.ArrayList;
import java.util.List;

import javax.sql.DataSource;

import org.springframework.batch.core.StepContribution;
import org.springframework.batch.core.scope.context.ChunkContext;
import org.springframework.batch.core.step.tasklet.Tasklet;
import org.springframework.batch.repeat.RepeatStatus;
import org.springframework.jdbc.core.JdbcTemplate;

public class MyTasklet implements Tasklet{

	private DataSource dataSource;
	private String sql="select firstName,lastName,school,rollNumber from PERSON";


	public RepeatStatus execute(StepContribution contribution,
			ChunkContext chunkContext) throws Exception {
		List personList = new ArrayList();
		JdbcTemplate myTemplate = new JdbcTemplate(getDataSource());
		personList = myTemplate.query(sql, new PersonModelMapper());
		for(PersonModel p: personList){
			System.out.println(p.toString());
		}
		return RepeatStatus.FINISHED;
	}


	public DataSource getDataSource() {
		return dataSource;
	}
	public void setDataSource(DataSource dataSource) {
		this.dataSource = dataSource;
	}
}
2.6. Cook-up the Scheduler
Here is the code for our scheduler. It is a simple class that defines a run() which we will schedule to run periodically, say every 5 secs or so. The job gets launched in this method as can be seen from the code below.
MyScheduler.java
package com.javacodegeeks.example.util;

import org.springframework.batch.core.Job;
import org.springframework.batch.core.JobExecution;
import org.springframework.batch.core.JobParameters;
import org.springframework.batch.core.JobParametersInvalidException;
import org.springframework.batch.core.launch.JobLauncher;
import org.springframework.batch.core.repository.JobExecutionAlreadyRunningException;
import org.springframework.batch.core.repository.JobInstanceAlreadyCompleteException;
import org.springframework.batch.core.repository.JobRestartException;
import org.springframework.beans.factory.annotation.Autowired;

public class MyScheduler {

	@Autowired
	private JobLauncher launcher;

	@Autowired
	private Job job;

	private JobExecution execution;

	public void run(){
		try {
			execution = launcher.run(job, new JobParameters());
			System.out.println("Execution status: "+ execution.getStatus());
		} catch (JobExecutionAlreadyRunningException e) {
			e.printStackTrace();
		} catch (JobRestartException e) {
			e.printStackTrace();
		} catch (JobInstanceAlreadyCompleteException e) {
			e.printStackTrace();
		} catch (JobParametersInvalidException e) {
			e.printStackTrace();
		}
	}
}
2.7. Context Configuration
Next, we will configure the context file in which we define beans like jobRepository, jobLauncher etc.

context-config.xml
<?xml version="1.0" encoding="UTF-8"?>
<beans xmlns="http://www.springframework.org/schema/beans"
	xmlns:xsi="http://www.w3.org/2001/XMLSchema-instance"
	xmlns:jdbc="http://www.springframework.org/schema/jdbc"
	xsi:schemaLocation="http://www.springframework.org/schema/beans
	http://www.springframework.org/schema/beans/spring-beans.xsd
    http://www.springframework.org/schema/beans
    http://www.springframework.org/schema/beans/spring-beans.xsd
    http://www.springframework.org/schema/jdbc
	http://www.springframework.org/schema/jdbc/spring-jdbc.xsd">

    <bean id="jobRepository"
	class="org.springframework.batch.core.repository.support.JobRepositoryFactoryBean">
		<property name="dataSource" ref="dataSource" />
		<property name="transactionManager" ref="transactionManager" />
		<property name="databaseType" value="hsql" />
  	</bean>

  	<bean id="jobLauncher"
	class="org.springframework.batch.core.launch.support.SimpleJobLauncher">
		<property name="jobRepository" ref="jobRepository" />
  	</bean>

    <bean id="transactionManager"
	class="org.springframework.batch.support.transaction.ResourcelessTransactionManager" />

	<bean id="dataSource" class="org.apache.commons.dbcp.BasicDataSource"
		lazy-init="true" destroy-method="close">
		<property name="driverClassName" value="org.hsqldb.jdbcDriver" />
		<property name="url"
			value="jdbc:hsqldb:file:src/main/resources/hsqldb/batchcore.db;shutdown=true;" />
		<property name="username" value="sa" />
		<property name="password" value="" />

	</bean>

	<!-- Create meta-tables -->
	<jdbc:initialize-database data-source="dataSource">
	    <jdbc:script location="classpath:hsqldb/initial-query.sql" />
		<jdbc:script location="org/springframework/batch/core/schema-drop-hsqldb.sql" />
		<jdbc:script location="org/springframework/batch/core/schema-hsqldb.sql" />
    </jdbc:initialize-database>

</beans>
2.8. Job Configuration
In this section we are going to configure the job. Notice the use of component-scan. This is done so that Autowiring used in the MyScheduler.java works as expected.
job-config.xml
<?xml version="1.0" encoding="UTF-8"?>
<beans xmlns="http://www.springframework.org/schema/beans"
	xmlns:batch="http://www.springframework.org/schema/batch"
	xmlns:task="http://www.springframework.org/schema/task"
	xmlns:xsi="http://www.w3.org/2001/XMLSchema-instance"
	xmlns:context="http://www.springframework.org/schema/context"
	xmlns:jdbc="http://www.springframework.org/schema/jdbc"
	xsi:schemaLocation="http://www.springframework.org/schema/beans
	http://www.springframework.org/schema/beans/spring-beans.xsd
    http://www.springframework.org/schema/beans
    http://www.springframework.org/schema/beans/spring-beans.xsd
    http://www.springframework.org/schema/batch
    http://www.springframework.org/schema/batch/spring-batch.xsd
    http://www.springframework.org/schema/context
    http://www.springframework.org/schema/context/spring-context.xsd
    http://www.springframework.org/schema/jdbc
	http://www.springframework.org/schema/jdbc/spring-jdbc.xsd
	http://www.springframework.org/schema/task
	http://www.springframework.org/schema/task/spring-task.xsd">

	<context:component-scan base-package="com.javacodegeeks.example.util"></context:component-scan>

	<job id="myJob" xmlns="http://www.springframework.org/schema/batch" restartable="true">
		<step id="step1" allow-start-if-complete="true">
			<tasklet ref="myTasklet">
			</tasklet>
		</step>
	</job>

	<bean id="myTasklet" class="com.javacodegeeks.example.util.MyTasklet">
	   <property name="dataSource" ref="dataSource"></property>
	</bean>

	<bean id="myScheduler" class="com.javacodegeeks.example.util.MyScheduler"/>
	<!-- this is where we are scheduling the job to run using our scheduler every 5 secs, note how the method of the
	     scheduler and the cron expression to be used are being specified -->
	<task:scheduled-tasks>
		<task:scheduled ref="myScheduler" method="run" cron="*/5 * * * * *"/>
	</task:scheduled-tasks>

</beans>
2.9. Run the Application
Finally, we will write the following App.java which simply loads the application context and does nothing more. Once it is written, simply Right Click and Run it as a Java Application.
App.java
package com.javacodegeeks.example.app;

import org.springframework.context.ApplicationContext;
import org.springframework.context.support.ClassPathXmlApplicationContext;

public class App {
	public static void main(String[] args) {
		String[] str = {"classpath:META-INF/spring/job-config.xml","classpath:META-INF/spring/context-config.xml"};
		ApplicationContext ctx = new ClassPathXmlApplicationContext(str);
	}
}
2.10. Output
When the application is run, it should print out the following output from the Tasklet every 5 secs.
Output
INFO: Job: [FlowJob: [name=myJob]] launched with the following parameters: [{}]
Jul 13, 2015 5:36:10 PM org.springframework.batch.core.job.SimpleStepHandler handleStep
INFO: Executing step: [step1]
Hello, Henry Donald! Welcome to Little Garden!
Hello, Eric Osborne! Welcome to Little Garden!
Jul 13, 2015 5:36:10 PM org.springframework.batch.core.launch.support.SimpleJobLauncher run
INFO: Job: [FlowJob: [name=myJob]] completed with the following parameters: [{}] and the following status: [COMPLETED]
Execution status: COMPLETED
Jul 13, 2015 5:36:15 PM org.springframework.batch.core.launch.support.SimpleJobLauncher run
INFO: Job: [FlowJob: [name=myJob]] launched with the following parameters: [{}]
Jul 13, 2015 5:36:15 PM org.springframework.batch.core.job.SimpleStepHandler handleStep
INFO: Executing step: [step1]
Hello, Henry Donald! Welcome to Little Garden!
Hello, Eric Osborne! Welcome to Little Garden!
Jul 13, 2015 5:36:15 PM org.springframework.batch.core.launch.support.SimpleJobLauncher run
INFO: Job: [FlowJob: [name=myJob]] completed with the following parameters: [{}] and the following status: [COMPLETED]
Execution status: COMPLETED
3. Conclusion
This brings us to the end of the example. Hope it was a useful read. The Tasklet we configured did not really do anything much interesting but it does show the concept of how to go about scheduling Spring Batch jobs using the scheduler and cron expressions. The full example code is available for download below.
You can download the full source code of this example here: SpringBatchScheduler

Good tutorial with example