1. Introduction
In this post, we feature a comprehensive Example on Spring Security, Spring Boot and Angular to demonstrate how you can secure your Angular application using Basic Authentication via Spring Security. You will learn to use Spring Boot for quickly building a Java backend layer and then adding a maven dependency for making it secure. We will use Angular as a modern TypeScript based platform for building web based applications.
Before diving deep, we would like to showcase the application that we are going to build in the next sections.
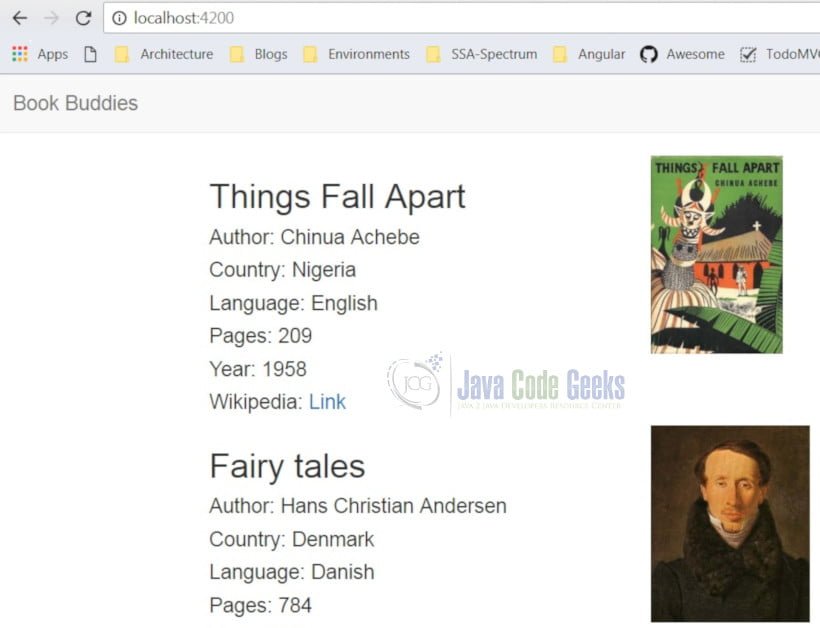
Above is an online book store that displays the listing of books. All the information displayed comes from a REST endpoint exposed using the Spring Boot Application. Initially, we will keep the endpoint non-secure so that the Angular app is able to display the books. Then, as a next step, we will secure this REST endpoint and make the necessary changes to our Angular app for accessing the data using basic authentication.
We will build this application using a step by step approach that will help you to follow along but if you are a seasoned developer, you may jump directly to the end to see the working code below.
2. Technologies used
The example code in this article was built and run using:
- Angular 6
- Spring Boot 2.0.5.RELEASE
- Java 1.8.0_102
- Maven 3.2.5
- Visual Studio Code 1.27.1
- IntelliJ IDEA 14.0.3
3. Build Java back-end using Spring Boot
There are many ways for creating a Spring Boot project. You may create using:
- Spring Initializr website
- Spring Boot CLI
- Spring Tool Suite
- curl command
We will not delve deeper into each of the above ways and will use the first mechanism i.e. Spring Initializr
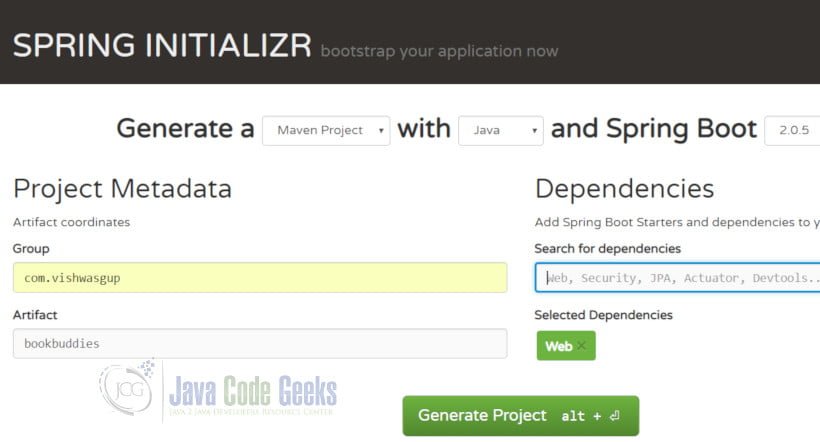
3.1 Create the starter project
Go to https://start.spring.io, enter the group and artifact and choose Web as the dependency. Press Generate Project.
You will get a .zip file that you need to unzip in a directory which will house your application code.
3.2 Run the application
Execute the following command to run the Spring Boot application
mvn spring-boot:run
Once the application has started, open the browser and go to http://localhost:8080
3.3 Add a REST endpoint
In the application class BookbuddiesApplication, add the @RestController annotation and define a new @RequestMapping
BookbuddiesApplication.java
package com.vishwasgup.bookbuddies;

import com.vishwasgup.bookbuddies.model.Book;
import org.springframework.boot.SpringApplication;
import org.springframework.boot.autoconfigure.SpringBootApplication;
import org.springframework.web.bind.annotation.CrossOrigin;
import org.springframework.web.bind.annotation.RequestMapping;
import org.springframework.web.bind.annotation.RestController;

import java.util.HashMap;
import java.util.Map;

@SpringBootApplication
@RestController
public class BookbuddiesApplication {
    @CrossOrigin(origins = "http://localhost:4200")
    @RequestMapping("/books")
    public Map home() {
        Map model = new HashMap();
        model.put("content", getListOfBooks());
        return model;
    }

    private Book[] getListOfBooks() {
        // Create few books
        Book book1 = new Book("Chinua Achebe", "Nigeria",
                "https://upload.wikimedia.org/wikipedia/en/6/65/ThingsFallApart.jpg", "English",
                "https://en.wikipedia.org/wiki/Things_Fall_Apart", 209, "Things Fall Apart", 1958);

        Book book2 = new Book("Hans Christian Andersen", "Denmark",
                "https://upload.wikimedia.org/wikipedia/commons/5/5b/Hans_Christian_Andersen_%281834_painting%29.jpg", "Danish",
                "https://en.wikipedia.org/wiki/Fairy_Tales_Told_for_Children._First_Collection", 784, "Fairy tales", 1836);

        Book book3 = new Book("Dante Alighieri", "Italy",
                "https://upload.wikimedia.org/wikipedia/commons/thumb/e/e2/Michelino_DanteAndHisPoem.jpg/450px-Michelino_DanteAndHisPoem.jpg",
                "Italian", "https://en.wikipedia.org/wiki/Divine_Comedy", 1928, "The Divine Comedy", 1315);

        return new Book[]{book1, book2, book3};
    }

    public static void main(String[] args) {
		SpringApplication.run(BookbuddiesApplication.class, args);
	}
}
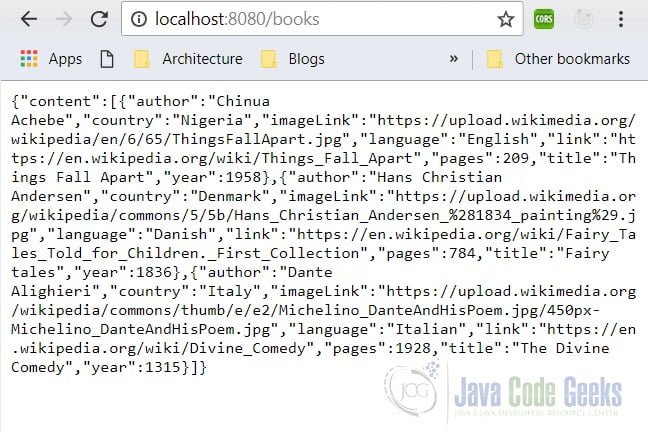
Now, restart the application, open the browser and go to http://localhost:8080/books. You should see the information of all the books in JSON format as seen below
4. Build front-end application using Angular
Similar to creating the Spring Boot application, there are several ways to build the starter Angular application. We will use Angular CLI.
Execute the following command to spin off a skeleton Angular application with the name bookbuddies-ui
ng new bookbuddies-ui
The command might take few minutes for creating configuration files and bringing in all the dependencies. It will also create a very simple application for you. Once the command completes, execute
ng serve
This command will start the application, open the browser and go to http://localhost:4200 and you will see the default Angular page.
We now need to create some components to provide visualization to our web page. Angular CLI again comes very handy in creating Angular artifacts e.g. components, services etc. For this example, we will create header component for displaying the application name, book component for displaying all the books received from back-end. We will also create a service which will be responsible for invoking our REST endpoint.
For giving our application good look and feel, we will use Bootstrap CSS Framework.
4.1 Installing Bootstrap
Go to the root of the application and install Bootstrap via node package manager npm
npm install --save bootstrap@3
Additionally, when using a project created with Angular CLI 6+ (you may check this using ng -v ), you’ll have an angular.json file and you need to add Bootstrap to the styles[] array as shown
angular.json
"styles": [
  "node_modules/bootstrap/dist/css/bootstrap.min.css",
  "src/styles.css"
]
4.2 Create header and book components
For creating component classes, use the following Angular CLI command
ng generate component header
or, in short
ng g c header
In the header component, add the following code
header.component.html
<nav class="navbar navbar-default">
  <div class="conatiner-fluid">
    <div class="navbar-header">
      <a href="#" class="navbar-brand">Book Buddies</a>
    </div>
  </div>
</nav>
Before building the book component, let’s first create an interface for book class. This is similar to creating domain objects or POJOs in Java. Create a new folder called interfaces and define Book class as below
book.ts
export class Book {
  author: string;
  country: string;
  imageLink: string;
  language: string;
  link: string;
  pages: number;
  title: string;
  year: number;
}
Now create the book component using ng g c book command and inject the service class book.service.ts that we will create shortly
book.component.ts
import { Component, OnInit } from '@angular/core';
import { BookService } from '../book.service';
import { Book } from '../interfaces/book';

@Component({
  selector: 'app-book',
  templateUrl: './book.component.html',
  styleUrls: ['./book.component.css']
})
export class BookComponent implements OnInit {

  books: Book[];

  constructor(private bookService: BookService) { }

  ngOnInit() {
    this.bookService.getBooks()
      .subscribe(
        (books: any[]) => {
          this.books = books['content'];
        },
        (error) => console.log(error)
      );
  }
}
In the book template, add the following code
book.component.html
<div *ngFor="let book of books">
  <div class="row margin-top='1px;'">
    <div class="col-xs-4">
      <h2>{{ book.title }}</h2>
      <h4>Author: {{ book.author }} </h4>
      <h4>Country: {{ book.country }}</h4>
      <h4>Language: {{ book.language }}</h4>
      <h4>Pages: {{ book.pages }}</h4>
      <h4>Year: {{ book.year }}</h4>
      <h4>Wikipedia: <a [href]="book.link">Link</a></h4>
    </div>
    <div class="col-xs-8">
      <img [src]="book.imageLink" alt="" class="img-responsive" style="max-height: 175px;">
    </div>
  </div>
</div>
4.3 Create book service
It’s time to create a service class that we will use for fetching the data from our back-end. We can create a service class using
ng generate service book
or, in short
ng g s book
Add the following code to Book service
book.service.ts
import { Injectable } from '@angular/core';
import { HttpClient } from '@angular/common/http';

@Injectable({
  providedIn: 'root'
})
export class BookService {

  constructor(private http: HttpClient) { }

  getBooks() {
    const url = 'http://localhost:8080/books';
    return this.http.get(url);
  }
}
4.4 A glance at the App module
For using the http service in our service class, we need to import HttpClientModule
app.module.ts

import { BrowserModule } from '@angular/platform-browser';
import { NgModule } from '@angular/core';
import { HttpClientModule } from '@angular/common/http';

import { AppComponent } from './app.component';
import { HeaderComponent } from './header/header.component';
import { BookComponent } from './book/book.component';

@NgModule({
  declarations: [
    AppComponent,
    HeaderComponent,
    BookComponent
  ],
  imports: [
    BrowserModule, HttpClientModule
  ],
  providers: [],
  bootstrap: [AppComponent]
})
export class AppModule { }
4.5 Access the application
After going through the above steps, you should be able to see the list of books by accessing http://localhost:4200 in the browser.
5. Secure the REST endpoint
To enable security, simply add the following dependency to the pom.xml
pom.xml
<dependency>
	<groupId>org.springframework.boot</groupId>
	<artifactId>spring-boot-starter-security</artifactId>
</dependency>
Restart your Java application by using the command
mvn spring-boot:run
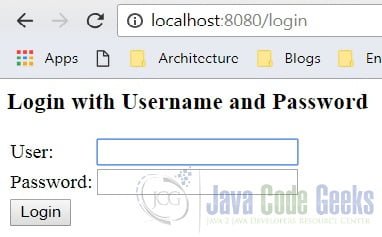
Now, try accessing http://localhost:8080/books. You should see a browser dialog asking for the credentials as shown below
The default user name is user and you can get the password from the console in which you started the Spring Boot application as shown below

If you want to use your own password instead of using the generated one, you need to specify the following in application.properties. As an example, we are using secret123.
application.properties
spring.security.user.name=user
spring.security.user.password=secret123
Try accessing http://localhost:8080/books again, fill in the credentials in the browser dialog and you should see the books JSON again but now secured using basic authentication.
6. Update Angular application for accessing the secure REST endpoint
Try accessing http://localhost:4200 in the browser and you will notice that nothing comes back from the back-end. We need to send the basic authorization headers in our Http request. So, let’s update the code in our book service, specifically the method getBooks()
book.service.ts
...
  getBooks() {
    const url = 'http://localhost:8080/books';
    const headers = new HttpHeaders({ Authorization: 'Basic ' + btoa('user:secret123') });
    return this.http.get(url, { headers });
  }
}
Again, verify http://localhost:4200 in the browser. Does it work?
No, and the reason for its not working is explained in the next section.
7. Cross-origin resource sharing (CORS)
We need to support the CORS protocol for our Angular service to be able to invoke an endpoint on different domain. By different domain, we mean that our front-end application running on http://localhost:4200 is requesting a resource on another domain i.e. http://localhost:8080. Hence, on server, we need to configure the CORS. This is done by providing the support for CORS protocol which involves a “pre-flight” OPTIONS request and some other headers to specify the behavior of the caller that is allowed.
Let’s create a CorsFilter class which specify the above configuration
CorsFilter.java
package com.vishwasgup.bookbuddies;

import org.springframework.web.filter.OncePerRequestFilter;

import javax.servlet.FilterChain;
import javax.servlet.ServletException;
import javax.servlet.http.HttpServletRequest;
import javax.servlet.http.HttpServletResponse;
import java.io.IOException;

public class CorsFilter extends OncePerRequestFilter {

    @Override
    protected void doFilterInternal(HttpServletRequest request,
                                    HttpServletResponse response, FilterChain filterChain)
            throws ServletException, IOException {
        response.setHeader("Access-Control-Allow-Origin", "*");
        response.setHeader("Access-Control-Allow-Methods", "GET, POST, PUT, DELETE, OPTIONS");
        response.setHeader("Access-Control-Allow-Headers", "authorization, content-type, xsrf-token, Cache-Control");
        response.addHeader("Access-Control-Expose-Headers", "xsrf-token");
        if ("OPTIONS".equals(request.getMethod())) {
            response.setStatus(HttpServletResponse.SC_OK);
        } else {
            filterChain.doFilter(request, response);
        }
    }
}
There is one additional step here and that is to signal the Spring Security to allow the pre-flight check from the browser. This is done by overriding the configure method of WebSecurityConfigurerAdapter.
WebSecurityConfig.java
package com.vishwasgup.bookbuddies;

import org.springframework.context.annotation.Configuration;
import org.springframework.security.config.annotation.web.builders.HttpSecurity;
import org.springframework.security.config.annotation.web.configuration.EnableWebSecurity;
import org.springframework.security.config.annotation.web.configuration.WebSecurityConfigurerAdapter;
import org.springframework.security.web.access.channel.ChannelProcessingFilter;

@EnableWebSecurity
@Configuration
public class WebSecurityConfig extends WebSecurityConfigurerAdapter {

    @Override
    protected void configure(HttpSecurity http) throws Exception {
        http.addFilterBefore(new CorsFilter(), ChannelProcessingFilter.class);
        http
                .authorizeRequests()
                .antMatchers("/")
                .permitAll()
                .anyRequest()
                .fullyAuthenticated()
                .and()
                .httpBasic()
                .and().csrf().disable();
    }
}
Verify http://localhost:4200 in the browser and you should be able to see the listing of books again.
Congratulations!
8. Spring Security Angular 6 Basic Authentication – Summary
In this example we developed a simple REST API using Spring Boot. We secured this endpoint using Spring Security. And then we used the popular front-end framework Angular for accessing this secure API.
9. Download the Source Code
This was the Spring Security Angular 6 Basic Authentication Example.
You can download the full source code of this example here: SpringSecurityAngular6BasicAuthenticationExample

With the above code Get method is working fine. But Post and Put methods are not working
error: {error: SyntaxError: Unexpected token a in JSON at position 0 at JSON.parse () at XMLHttp…, text: “added”}
headers: HttpHeaders {normalizedNames: Map(0), lazyUpdate: null, lazyInit: ƒ}
message: “Http failure during parsing for http://localhost:8080/addBook”
name: “HttpErrorResponse”
ok: false
status: 200
statusText: “OK”
url: “http://localhost:8080/addBook”
Hi javacodegeeks,
Thanks for the sharing wonderful info-value:)
We have also written publish an article on the same, check out the below URL and please leave a valuable Comment if you found its good.
https://tecmentor.in/spring-boot/convert-jar-to-war-in-spring-boot/
Regards
tecmentor.in