In this example of Solr Synonyms we will show you how to use the Solr synonym feature to substitute words with the relevant words of the data we index. This feature helps in providing better user experience by identifying different usage for a word in the given data context.
Solr ships with a filter factory called SynonymFilterFactory to achieve this functionality. Also, it provides a configuration file called synonyms.txt to add our synonyms. In this example, we will discuss how to configure the synonyms for our books data.
Our preferred environment for this example is solr-5.0.0. Before you begin the Solr installation make sure you have JDK installed andJava_Home is set appropriately.
1. Install Apache Solr
To begin with lets download the latest version of Apache Solr from the following location.
http://lucene.apache.org/solr/downloads.html
Apache Solr has gone through various changes from 4.x.x to 5.0.0, so if you have different version of Solr you need to download the 5.x.x. version to follow this example.
Once the Solr zip file is downloaded unzip it into a folder. The extracted folder will look like the below.
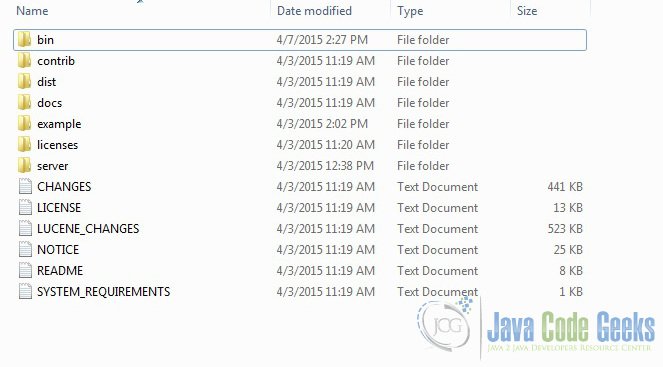
The bin folder contains the scripts to start and stop the server. The example folder contains few example files. We will be using one of them to demonstrate how Solr indexes the data. The server folder contains the logs folder where all the Solr logs are written. It will be helpful to check the logs for any error during indexing. The solr folder under server holds different collection or core. The configuration and data for each of the core/ collection are stored in the respective core/ collection folder.
Apache Solr comes with an inbuilt Jetty server. But before we start the solr instance we must validate the JAVA_HOME is set on the machine.
We can start the server using the command line script. Lets go to the bin directory from the command prompt and issue the following command:
solr start
This will start the Solr server under the default port 8983.
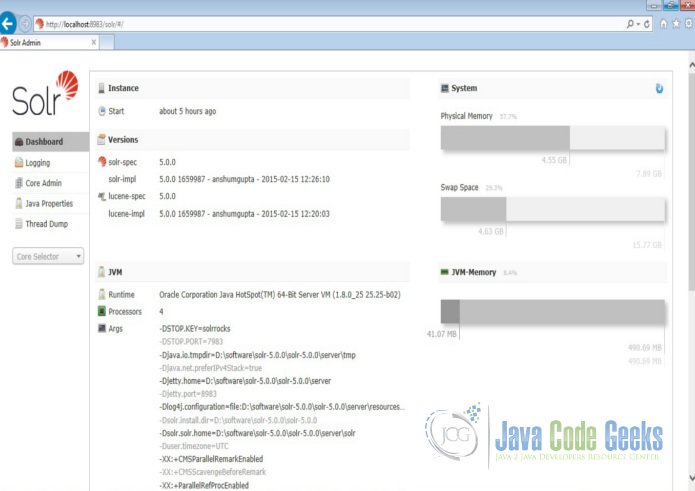
We can now open the following URL in the browser and validate that our Solr instance is running. The specifics of solr admin tool is beyond the scope of the example.
http://localhost:8983/solr/
2. Configuring Apache Solr
In this section, we will show you how to configure the core/collection for a solr instance and how to define the fields. Apache Solr ships with an option called Schemaless mode. This option allow users to construct effective schema without manually editing the schema file. For this example we will use the reference configset sample_techproducts_configs.
First, we need to create a Core for indexing the data. The Solr create command has the following options:
- -c <name> – Name of the core or collection to create (required).
- -d <confdir> – The configuration directory, useful in the SolrCloud mode.
- -n <configName> – The configuration name. This defaults to the same name as the core or collection.
- -p <port> – Port of a local Solr instance to send the create command to; by default the script tries to detect the port by looking for running Solr instances.
- -s <shards> – Number of shards to split a collection into, default is 1.
- -rf <replicas> – Number of copies of each document in the collection. The default is 1.
In this example we will use the -c parameter for core name and -d parameter for the configuration directory. For all other parameters we make use of default settings.
Now navigate the solr-5.0.0\bin folder in the command window and issue the following command.
solr create -c jcg -d sample_techproducts_configs
We can see the following output in the command window.
Creating new core 'jcg' using command:
 http://localhost:8983/solr/admin/cores?action=CREATE&name=jcg&instanceDir=jcg{
 "responseHeader":{
 "status":0,
 "QTime":1377},
 "core":"jcg"}
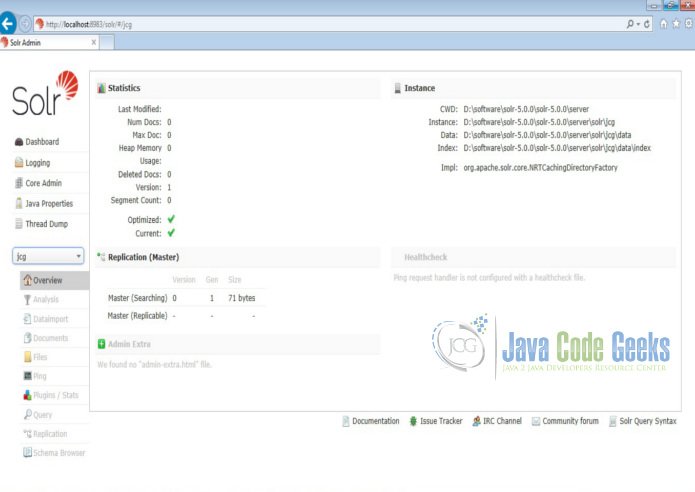
Now we navigate to the following URL and we can see jcg core being populated in the core selector. You can also see the statistics of the core.
http://localhost:8983/solr
3. Indexing the Data
Apache Solr comes with a Standalone Java program called the SimplePostTool. This program is packaged into JAR and available with the installation under the folder example\exampledocs.
Now we navigate to the example\exampledocs folder in the command prompt and type the following command. You will see a bunch of options to use the tool.
java -jar post.jar -h
The usage format in general is as follows:
Usage: java [SystemProperties] -jar post.jar [-h|-] [<file|folder|url|arg>

[<file|folder|url|arg>...]]
As we said earlier, we will index the data present in the “books.csv” file shipped with Solr installation. We will navigate to the solr-5.0.0\example\exampledocs in the command prompt and issue the following command.
java -Dtype=text/csv -Durl=http://localhost:8983/solr/jcg/update -jar post.jar books.csv
The SystemProperties used here are:
- -Dtype – the type of the data file.
- -Durl – URL for the jcg core.
The file “books.csv” will now be indexed and the command prompt will display the following output.
SimplePostTool version 5.0.0
 Posting files to [base] url http://localhost:8983/solr/jcg/update using content-type text/csv...
 POSTing file books.csv to [base]
 1 files indexed.
 COMMITting Solr index changes to http://localhost:8983/solr/jcg/update...
 Time spent: 0:00:00.604
4. Configure synonym
Now we modify the synonyms.txt file located under the folder \server\solr\jcg\conf to add the synonym for our data. There are two ways to specify synonym mappings as listed below. We will discuss both the options with example.
- Two comma-separated lists of words with the symbol “=>” between them. If the token matches any word on
the left, then the list on the right is substituted. The original token will not be included unless it is also in the list on the right. - A comma-separated list of words. If the token matches any of the words, then all the words in the list are
substituted, which will include the original token.
4.1 With symbol “=>”
We will first set up the synonym for correcting the spelling. Open the synonyms.txt file and add common spelling mistakes happens to the context of the data. In this example we will take the word ‘the’.

synonyms.txt
# Synonym mappings can be used for spelling correction too
pixima => pixma
teh => the
Since we have modified the configuration we have to restart the Solr server. To do so, issue the following commands:
solr stop -all
solr start
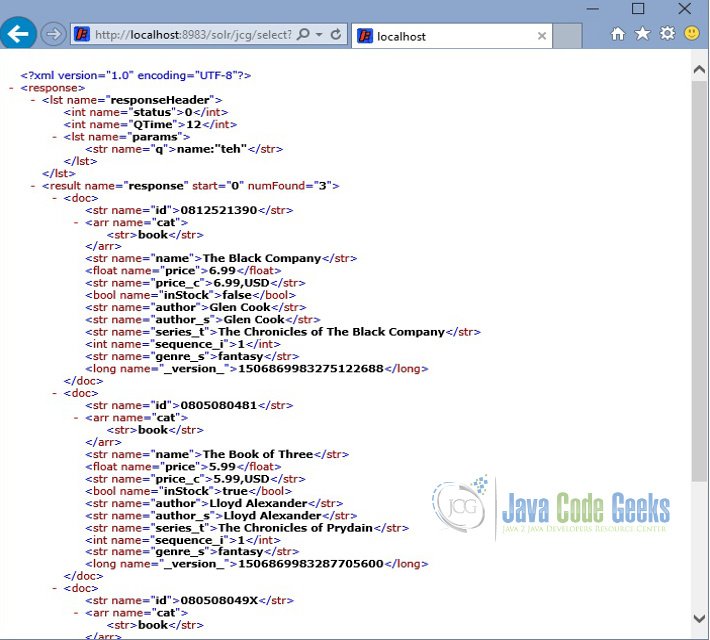
Now we query the books with wrong spelling as ‘teh’. Open the following URL:
http://localhost:8983/solr/jcg/select?q=name:"teh"
4.2 Comma-separated list
Now let’s implement another feature of Solr synonym. We will provide list of synonym for a word (clash in our case). When the user types any of the relevant word, the book with title clash will be returned. Similarly, we can add MB for MegaByte, GB for GigaByte etc depending on the context of the data we need to index.
When we perform the Solr query, each token is looked up in the list of synonyms and if a match is found then the synonym is emitted in place of the token. The position value of the new tokens are set such that they all occur at the same position as the original token.
synonyms.txt
# Some synonym groups specific to this example
GB,gib,gigabyte,gigabytes
MB,mib,megabyte,megabytes
Television, Televisions, TV, TVs

clash, battle, fight
Since we have modified the configuration we have to do a restart. Issue the following commands:
solr stop -all
solr start
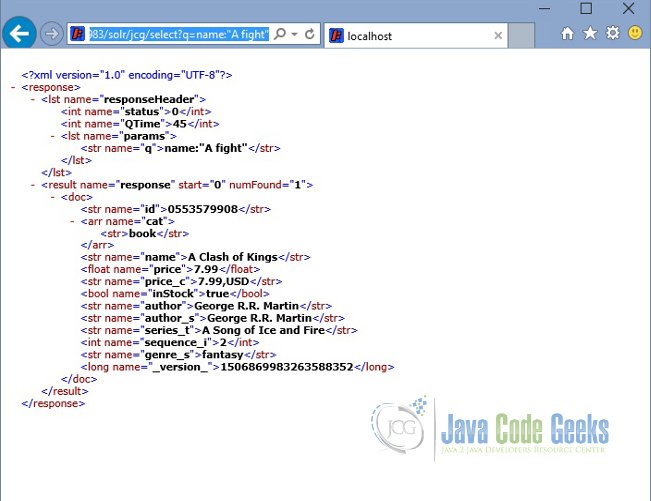
Now query the books for title fight or battle, it would fetch the book “A Clash of Kings“.
http://localhost:8983/solr/jcg/select?q=name:"A fight"
5. Schema configuration
The configuration to use synonym is located in the file called schema.xml in the Solr server. To view the configuration let’s open the file from the location \server\solr\jcg\conf\ and take a look at the following section. You can notice we have used SynonymFilterFactory filter for the fieldType text_general. Also we can notice it is only used during the query time.
schema.xml
 <!-- A general text field that has reasonable, generic
 cross-language defaults: it tokenizes with StandardTokenizer,
 removes stop words from case-insensitive "stopwords.txt"
 (empty by default), and down cases. At query time only, it
 also applies synonyms. -->
 <fieldType name="text_general" class="solr.TextField" positionIncrementGap="100">
 <analyzer type="index">
 <tokenizer class="solr.StandardTokenizerFactory"/>
 <filter class="solr.StopFilterFactory" ignoreCase="true" words="stopwords.txt" />
 <!-- in this example, we will only use synonyms at query time
 <filter class="solr.SynonymFilterFactory" synonyms="index_synonyms.txt" ignoreCase="true" expand="false"/>
 -->
 <filter class="solr.LowerCaseFilterFactory"/>
 </analyzer>
 <analyzer type="query">
 <tokenizer class="solr.StandardTokenizerFactory"/>
 <filter class="solr.StopFilterFactory" ignoreCase="true" words="stopwords.txt" />
 <filter class="solr.SynonymFilterFactory" synonyms="synonyms.txt" ignoreCase="true" expand="true"/>
 <filter class="solr.LowerCaseFilterFactory"/>
 </analyzer>
 </fieldType>
6. Download the Configuration
This was an example of Apache Solr Synonym.
You can download the synonym configuration here: synonyms.txt

So many thanks Veeramani Kalyanasundaram! You made my day.