Introduction
JPanel is basically a virtual container that can be used to group certain components to create a user interface for Java Desktop Application. It is usually being attached to a layout (for example: GridLayout) and have it act as a consolidator of components that sticks together to form a union of programmable user interface objects. For this post, I’ll be showcasing how to initialise and use this component on your standard Java Desktop application.
1. Create a Maven Java project
First we create a new maven project. I love using Maven as our silos project builder. It’s simple, easy and straight forward. Just put up al your dependencies in and you’re good to go.

The first thing we do after creating a project is we create the Main.java class that extends JFrame. This will be the the main container of our demo sample.
2. Create the main container and the new JPanel object
Initialise the JFrame component. This will act as the parent container of our JPanel component.
Main.java
...

public class Main extends JFrame {


	public static void main(String[] args) {
		// set look and feel to the system look and feel
        try {
            UIManager.setLookAndFeel(UIManager.getSystemLookAndFeelClassName());
        } catch (Exception ex) {
            ex.printStackTrace();
        }

        SwingUtilities.invokeLater(new Runnable() {

			public void run() {
				new Main().setVisible(true);

			}
		});
	}
}
...
We then create the constructor of the Main JFrame and initialize the JPanel object.
...
public Main() {
        // create a new panel with GridBagLayout manager
        JPanel newPanel = new JPanel();
}
...
3. Set the Layout of the JPanel
In order for our JPanel to have a layout structure, we need to add a layout object to it.
...
public Main() {
        // create a new panel with GridBagLayout manager
        JPanel newPanel = new JPanel();
        newPanel.setLayout(new GridBagLayout());
}
...
4. Add components in
Let’s add our component. We insert a button and a textbox component. You can put any number of components inside the JPanel. For our example, we’ll be creating 2 textbox fields, 2 label and a button. We then add these components to our JPanel component.
...
        JLabel labelName = new JLabel("Enter Name: ");
        JLabel labelDescription = new JLabel("Enter Description: ");
        JTextField textName = new JTextField(20);
        JTextField textDescription = new JTextField(20);
        JButton buttonLogin = new JButton("Button Me");

        // create a new panel with GridBagLayout manager
        JPanel newPanel = new JPanel();
        newPanel.setLayout(new GridBagLayout());

        GridBagConstraints constraints = new GridBagConstraints();
        constraints.anchor = GridBagConstraints.WEST;
        constraints.insets = new Insets(10, 10, 10, 10);

        // add components to the panel
        constraints.gridx = 0;
        constraints.gridy = 0;
        newPanel.add(labelName, constraints);

        constraints.gridx = 1;
        newPanel.add(textName, constraints);

        constraints.gridx = 0;
        constraints.gridy = 1;
        newPanel.add(labelDescription, constraints);

        constraints.gridx = 1;
        newPanel.add(textDescription, constraints);

        constraints.gridx = 0;
        constraints.gridy = 2;
        constraints.gridwidth = 2;
        constraints.anchor = GridBagConstraints.CENTER;
...
5. Add the JPanel component to the main container
After adding our components, we put some finishing details such as creating a title border to it and add the JPanel to our JFrame. We call the pack() to set the size of the window to the preferred one (relative to the components inside) and the location on where the window will show.
...
        newPanel.add(buttonLogin, constraints);

        // set border for the panel
        newPanel.setBorder(BorderFactory.createTitledBorder(BorderFactory.createEtchedBorder(), "Enter Description"));

        // add the panel to this frame
        add(newPanel);

        pack();
        setLocationRelativeTo(null);

...
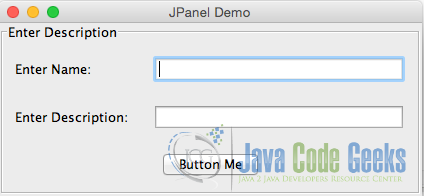
and Run the application!
6. Download the Eclipse project of this tutorial:
You can download the full source code of this example here :sample-jpanel
