This post is about integrating Gradle, a programmable build system into Hudson, a Continuous Integration server. We will also take a look at the configuration required to run a simple application.
1. Introduction
1.1. Hudson
The term ‘Continuous Integration’ originated with the Extreme Programming development process, as one of its original twelve practices. Each developer works individually in their Version Control System. This work could soon turn into a pocket of silos if not frequently integrated. The cost of integration has to be less almost non-effort. This lead to Continuous Integration technique and several products were developed to fill this need. These were referred to as CI Server and Hudson is one among them. Hudson monitors the execution of repeated jobs, such as building a software project or jobs run by cron. The automated, continuous build increases productivity. Hudson is very easy to configure and has no frills installation. Hudson supports distributed builds and detailed reports for testing. On top of it, it is pretty extensible.
1.2. Gradle
Gradle is an open-source build automation system that builds upon the concepts of Apache Ant and Apache Maven. It utilizes a Groovy-based domain-specific language (DSL) for declaring the project configuration. It is designed with programmers in mind who are comfortable with scripting than XML configuration. The created tasks are modeled as Directed Acyclic Graph(DAG) which determines the order and conditional execution of tasks. Gradle was designed at the outset for large multi-project builds. It supports incremental builds by identifying which parts of the build tree need to be built and which ones can be reused. The initial plugins were primarily focused on Java, Groovy and Scala development and deployment, but more languages and project workflows have been added since its start.
2. Hudson Gradle Integration
In this section, We will see the installation of Hudson and configuring Hudson for a simple Gradle project. Hudson can be downloaded from its website. After download, navigate to the downloaded folder and run the below command.
java -jar hudson-3.3.3.war
Hudson starts up indicating that Initial Setup is required in the console. Navigate to the index page of Hudson CI. The page looks similar to the screenshot below.
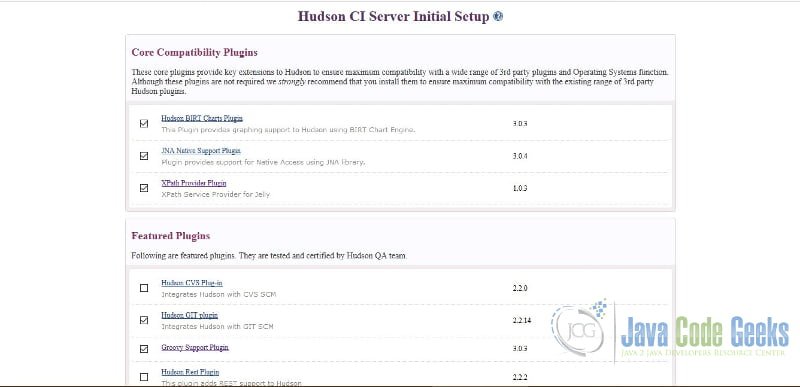
All the core plugins are recommended to be installed for efficient usage. Along with the Core plugins, the following three plugins need to be installed for our project.
- Hudson Git Plugin
- Groovy Support Plugin
- Gradle Plugin
After selecting the plugins, click on the Finish to configure the Hudson installation.
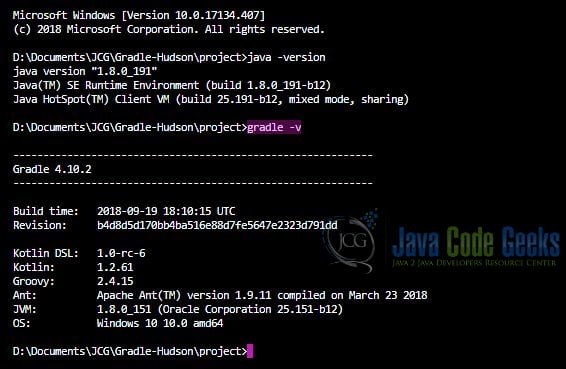
Before proceeding further, Gradle, Git and Java need to be installed in our system. Gradle can be installed from the gradle website and I personally recommend using the package manager method. I recommend using the scoop for windows and brew for mac. Please verify Gradle and Java installation with the below commands before proceeding with the rest of sections.
java -version
gradle -v
The results must be similar to the below screenshot.
After verifying the installation, Hudson must be configured to use Gradle, Git and Java. To configure, follow the below steps
- Click on Manage Hudson in the Dashboard page(
http://localhost:8080/) - Click on Configure System to navigate to System Configurations.
- Scroll towards the JDK installation section and input the paths similar to the below screenshot.
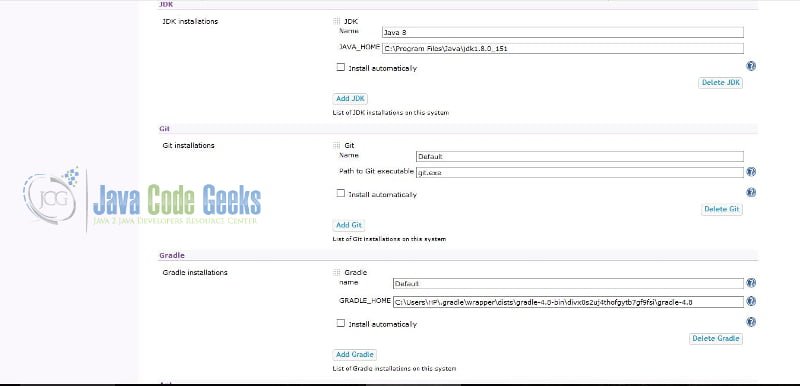
This configures Java, Gradle and Git from our local system. Alternatively, Gradle can be made to be downloaded from the gradle website by selecting the Install automatically checkbox and specifying the Gradle version.
2.1. Java Project
Once git has been installed in our environment, a new folder project has to be created. Navigate to the newly created folder and initialize a new repository with git init command.
In the git folder, create a project structure similar to the screenshot below with the appropriate files.
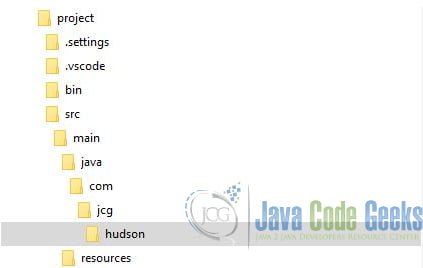
Our project involves only three files
- build.gradle under the root folder.
- log4j.xml under the resources folder.
- Main.java under the Hudson folder in the screenshot.
We will cover the files in the project below.
build.gradle
apply plugin: 'java'

sourceCompatibility = 1.8

repositories {
    mavenCentral()
}

dependencies {
    compile group: 'log4j', name: 'log4j', version: '1.2.17'
}

group 'com.jcg'
version '1.0'

task hudsonJar(type: Jar) {
    manifest {
        attributes 'Main-Class': 'com.jcg.hudson.Main'
    }
    baseName = 'hudson'
    from { configurations.compile.collect { it.isDirectory() ? it : zipTree(it) } }
    with jar
}
- Plugin Java is applied to indicate the java project.
- JDK version is specified as 1.8 using
sourceCompatibility. - Project dependencies are downloaded from maven repository specified in
repositoriessection. Alternatives are jcenter and spring.io. - Dependencies for the project are listed in the
dependenciessection. The application utilizes log4j for logging and is listed as the only dependency. - group and version are used to specify meta information about the project.
- Since the project utilizes dependencies, it must be bundled as a fat jar with all the dependencies to ensure it can be executed. For this purpose, a custom jar task is created
- The
manifestattribute specifies the entry or main class for the application. basenameindicates the jar name to be used.- All the compile dependencies are collected and zipped using
zipTree. - This is then fed to the jar pipeline which builds the jar as hudson-1.0.jar.
- The
log4j.xml
<?xml version="1.0" encoding="UTF-8" ?>
<!DOCTYPE log4j:configuration SYSTEM "log4j.dtd">
<log4j:configuration debug="true"
xmlns:log4j='http://jakarta.apache.org/log4j/'>

<appender name="console" class="org.apache.log4j.ConsoleAppender">
<layout class="org.apache.log4j.PatternLayout">
<param name="ConversionPattern"
value="%d{yyyy-MM-dd HH:mm:ss} %-5p %c{1}:%L - %m%n" />
</layout>
</appender>

<root>
<level value="DEBUG" />
<appender-ref ref="console" />
</root>

</log4j:configuration>
- This is a simple log4j configuration XML file with root logger specified at
DEBUGlevel. - A simple console
appenderis configured for the root logger with pattern specifying time and thread which logs the message.
Main.java
package com.jcg.hudson;

import org.apache.log4j.Logger;

import java.util.stream.IntStream;

public class Main {

static Logger logger = Logger.getLogger(Main.class);

public static void main(String[] args) {
IntStream.rangeClosed(1, 10).forEach(token -> {
logger.info("Counter value is " + token);
});

}
}
- Application initializes a
loggerbased on the class name. - A simple counter runs from 1 to 10 and is printed by the
logger.
After creating these files in appropriate locations as specified above, we can verify the successful build of our application with the following command gradle hudsonJar. This generates the fat jar in the location build/libs/.
Once the jar has been built, verify the results by running the application in the command line. java -jar build/libs/hudson-1.0.jar. In the next section, we will cover the automation of the following process with Hudson CI.
2.2. Job Configuration
In Hudson Dashboard, click on New Job to create a new Hudson Job. The Job name is mandatory and an optional description can be provided for better clarity. There are three important sections with respect to our project which we will cover below.
The first section is Source Code Management. Click on Git Repositories to input the reference to your local git repository. An example is provided in the screenshot below. The next configuration is Build Triggers. This is used to specify the automatic trigger for our job.
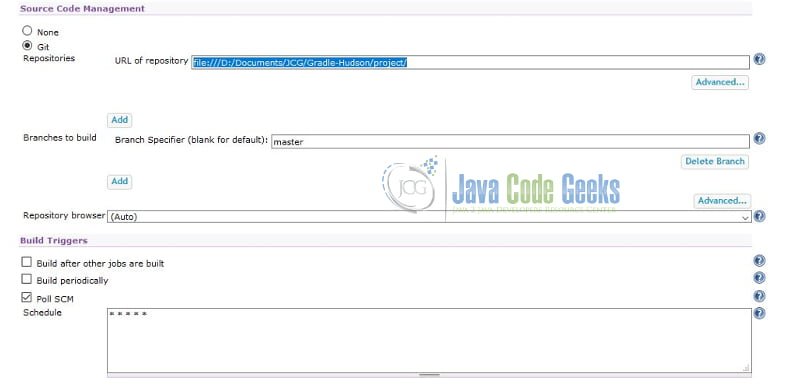
Our job is configured to use SCM polling. The schedule * * * * * indicates the job to poll the git repository for every minute. If changes are found, the job gets triggered automatically. The pattern is minute, hour, Day of Month, Month and Day of Week.
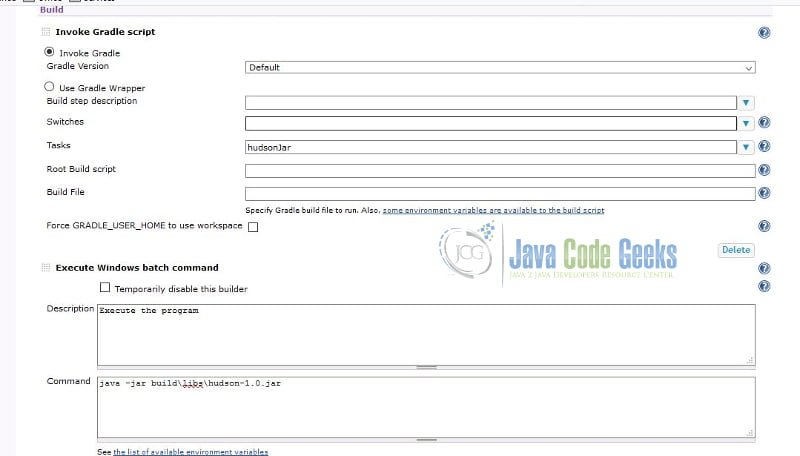
Next section is the Build section. Click on Add Build Step and Select Invoke Gradle Script to create Gradle Subsection. Default installation created previously needs to be selected for the dropdown in Invoke Gradle Version. This ensures the local gradle installation configured earlier is used for running the build.
We will add another build step(Windows Batch Command) to execute our application. This is much similar to a deployment or post-build step. In this step, We will run the created jar using the java command. The command and the build configuration is captured in the screenshot below.
Click on save to save the newly created job. Now, navigate to the git folder and commit the files detailed in the above sections. Once they are committed within a minute, Hudson job gets started automatically. The job results can be seen by clicking the Latest Console Output.
In this post, we saw automation of Gradle builds using Hudson CI server with the help of the Gradle plugin.
3. Download the Source Code
You can download the full source code of this example here: GradleHudsonExample
