In this example we are going to examine what is the servlet lifecycle and how it all works out in the servlet container. Basically, by “lifecycle”, we actually mean the whole process of creating and initializing the servlet, using it and destroying it when it is no longer needed. In the GenericServlet abstract class (which is extended by all the other servlet implementations, like the popular HttpServlet), there are three basic methods that achieve the above. Let’s take a look at them.
1. Servlet Lifecycle methods
The mehods that represent the lifecycle of a servlet are these three:
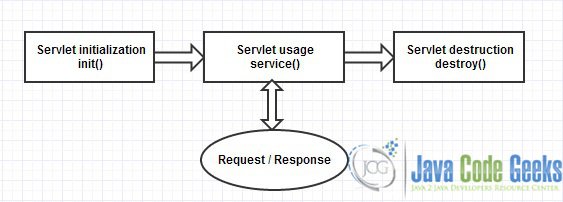
init(): This method is automatically called whenever a servlet is initialized. The developer does not explicitly call the init() method, instead, it is automatically called the first time the servlet is called through a URL request. Only one instance of each servlet is created and used, and each folowing request creates a new thread that handles it.service(): This is the main method of handling the requests to the server. This method determines the type of the request (POST, GET, etc) and acts accordingly, by calling the specified methods likedoPost()anddoGet().destroy(): The destroy method is working similarly to init(), but trying to achieve the opposite result. It is not a method that is explicitly called by the developer. Instead, when the server (servlet container) decides that the servlet is no longer in use, and its resources should be collected and used somewhere else, the destroy() method is automatically called. In that case we use destroy() to close connections, free resources and generally finalize whatever needs to be finalized for a smooth shutdown of the servlet and no memory leaks. After the servlet is destroyed, the garbage collector collects all the previously held resources.
A quick diagram describing the whole process could be this:
2. Servlet Lifecycle Example
Let’s create a simple Dynamic Web Project in Eclipse, where we will see in action how the servlet lifecycle works.
index.jsp
<%@ page language="java"
    contentType="text/html; charset=ISO-8859-1"
    pageEncoding="ISO-8859-1"%>
<!DOCTYPE html PUBLIC "-//W3C//DTD HTML 4.01 Transitional//EN" "http://www.w3.org/TR/html4/loose.dtd">
<html>
<head>
    <title>Servlet Lifecycle Example</title>
</head>
<body>
  <form action="ServletLifecycle" method="post">
      <input type="submit" value="Make request" />
  </form>
</body>
</html>
web.xml
<?xml version="1.0" encoding="UTF-8"?>
<web-app xmlns:xsi="http://www.w3.org/2001/XMLSchema-instance"
    xmlns="http://java.sun.com/xml/ns/javaee"
    xsi:schemaLocation="http://java.sun.com/xml/ns/javaee http://java.sun.com/xml/ns/javaee/web-app_3_0.xsd"
    id="WebApp_ID" version="3.0">

    <servlet>
      <servlet-name>ServletLifecycle</servlet-name>
      <servlet-class>ServletLifecycleExample</servlet-class>
    </servlet>

    <servlet-mapping>
      <servlet-name>ServletLifecycle</servlet-name>
      <url-pattern>/</url-pattern>
    </servlet-mapping>
</web-app>
ServletLifecycleExample.java

import java.io.IOException;
import java.io.PrintWriter;

import javax.servlet.GenericServlet;
import javax.servlet.ServletException;
import javax.servlet.ServletRequest;
import javax.servlet.ServletResponse;

public class ServletLifecycleExample extends GenericServlet {

    @Override
    public void init() {
        // initialize the servlet, and print something in the console.
        System.out.println("Servlet Initialized!");
    }

    @Override
    public void service(ServletRequest request, ServletResponse response)
            throws ServletException, IOException {

        // the service method will
        response.setContentType("text/html");

        PrintWriter out = response.getWriter();
        out.println("Servlet called from jsp page!");
    }

    @Override
    public void destroy() {
        // close connections etc.
    }
}
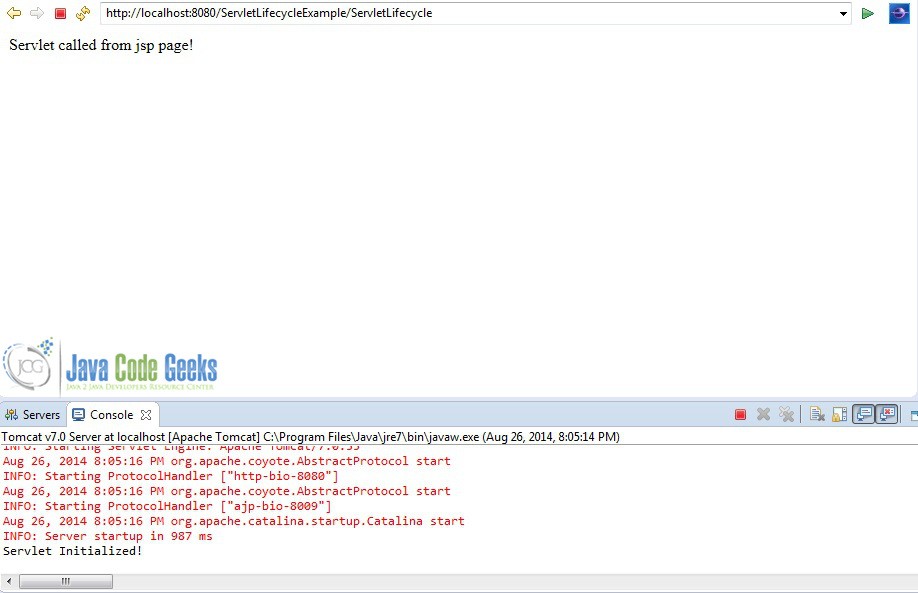
Output
Lets take a look at the output of the above application. What we should see is a simple web page, and as soon as we push the button to make the request, only then the servlet will be initialized.
Before the request…

And after the request.
3. Download the example
This was an example of the servlet lifecycle.
You can download the full source code of this example here : ServletLifecycleExample
