This article explores the integration of selenium with cucumber and how we can leverage them to achieve automated acceptance testing.
1. Selenium Cucumber Tutorial – Introduction
Selenium is used to automate browsers. Selenium WebDriver has found its place in test automation for web applications. It is used to create robust, browser-based regression automation suites and tests. It can be used for end to end testing of an application. This ensures that application works as designed. But Acceptance test ensures that the right things are built. Automated acceptance testing is one of the principles of Extreme programming.
Cucumber tries to address the area of acceptance testing. Cucumber allows collaboration between business stakeholder and development team to express the business outcomes. Cucumber has its own ubiquitous language and adheres to syntax rules known as Gherkin. We will take a look at how cucumber fits in with Selenium ecosystem.
2. Tools/Technologies
- IntelliJ Idea (Any Java IDE would work)
- Java 1.8.101 (1.8.x will do fine)
- GeckoDriver (firefox)
- ChromeDriver (Chrome)
- Maven
- Selenium
- junit
- cucumber-junit
- cucumber-java
- assert4j
3. Project Resources And Dependencies
To illustrate the Selenium’s capability, we will create two web pages login.html and index.html. login.html will contain a username and password textbox along with Login button to submit the page.
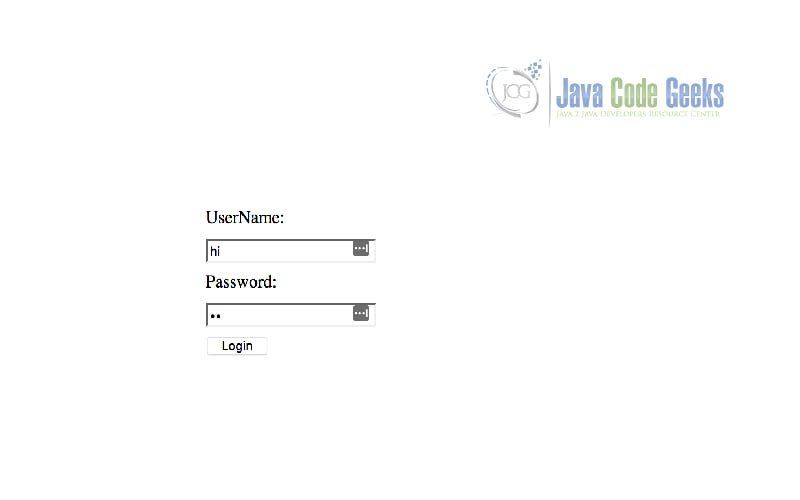
Index.html will just display the logged in user via the sessionstorage. sessionstorage resides until the user closes the browser window.

Our objective is to automate the testing of these two pages via Selenium and Cucumber. To automate this, we create a Maven project with the following pom.xml.
pom.xml
<?xml version="1.0" encoding="UTF-8"?>
<project xmlns="http://maven.apache.org/POM/4.0.0"
         xmlns:xsi="http://www.w3.org/2001/XMLSchema-instance"
         xsi:schemaLocation="http://maven.apache.org/POM/4.0.0 http://maven.apache.org/xsd/maven-4.0.0.xsd">
    <modelVersion>4.0.0</modelVersion>

    <groupId>com.jcg</groupId>
    <artifactId>cucumberSelenium</artifactId>
    <version>1.0-SNAPSHOT</version>

    <dependencies>
        <dependency>
            <groupId>org.assertj</groupId>
            <artifactId>assertj-core</artifactId>
            <version>3.10.0</version>
            <scope>test</scope>
        </dependency>
        <dependency>
            <groupId>org.seleniumhq.selenium</groupId>
            <artifactId>selenium-java</artifactId>
            <version>3.13.0</version>
        </dependency>
        <dependency>
            <groupId>junit</groupId>
            <artifactId>junit</artifactId>
            <version>4.12</version>
            <scope>test</scope>
        </dependency>
        <dependency>
            <groupId>info.cukes</groupId>
            <artifactId>cucumber-junit</artifactId>
            <version>1.2.5</version>
            <scope>test</scope>
        </dependency>
        <dependency>
            <groupId>info.cukes</groupId>
            <artifactId>cucumber-java</artifactId>
            <version>1.2.5</version>
        </dependency>
    </dependencies>

    <build>
        <plugins>
            <plugin>
                <groupId>org.apache.maven.plugins</groupId>
                <artifactId>maven-compiler-plugin</artifactId>
                <version>3.6.1</version>
                <configuration>
                    <source>1.8</source>
                    <target>1.8</target>
                </configuration>
            </plugin>
        </plugins>
    </build>

</project>- We declare
assert4j,Selenium,junit,cucumber-javaandcucumber-junitas dependencies. - We define
Mavencompiler to assemble the jar output and configure it with Java version of 1.8.
Assert4J provides a fluent assertion library for our testing purposes. Selenium is used to control the webdriver and is the scope of our discussion. Junit is used to fire our test cases. Cucumber is included to execute the behaviour driven testing and based on the declared dependencies cucumber-core is included by default.
Next, We will cover application.properties. This is used to control the properties of the application which are loaded on Startup of DriverInitializer class. This controls the behavior of our application.
application.properties
chrome.path=/usr/local/bin/chromedriver
gecko.path=/Users/rajagopalps/geckodriver
browser=firefox
login.url=file:///JCG/pageObjectModel/src/main/resources/login.html
- We need to download the
geckodriverandchromedriverfor firefox and chrome respectively. - Driver download Path is mentioned in lines 1-2 of
application.properties. - We provide browser as
chromefor testing our application. - Path to the webpage is provided in
login.url.
DriverInitializer class is used to load the default properties for our application. It is used to get the necessary driver used for testing of our application.
DriverInitializer.java
package com.jcg.PageObjectModel;

import org.openqa.selenium.WebDriver;
import org.openqa.selenium.chrome.ChromeDriver;
import org.openqa.selenium.firefox.FirefoxDriver;

import java.util.Properties;

public class DriverInitializer {

    private static Properties properties = null;

    static {
        try {
            properties = new Properties();
            properties.load(DriverInitializer.class.getClassLoader()
                    .getResourceAsStream("application.properties"));
            System.setProperty("webdriver.chrome.driver", properties.getProperty("chrome.path"));
            System.setProperty("webdriver.gecko.driver", properties.getProperty("gecko.path"));
        } catch (Exception e) {
            e.printStackTrace();
        }
    }

    public static WebDriver getDriver(String browser) {
        WebDriver driver = null;
        switch (getProperty("browser")) {
            case "chrome":
                driver = new ChromeDriver();
                break;
            case "firefox":
                driver = new FirefoxDriver();
                break;
            default:
                driver = new ChromeDriver();
        }
        return driver;
    }


    public static String getProperty(String key) {
        return properties == null ? null : properties.getProperty(key, "");
    }
}
The properties are read from the application.properties available in the classpath. Based on the properties, firefoxdriver and chromedriver paths are set. Based on the browser configured in property, either firefox or chrome is used. This class exposes two methods:
getDriver– Provides the appropriate driver based on the browser configured in the property file.getProperty– Provides a convenient method to access the property value based on the provided key.
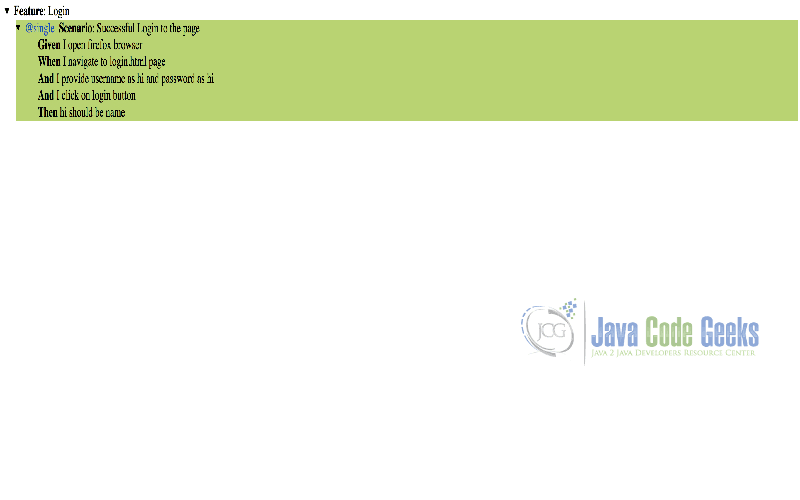
4. Scenario
Now we will dive into cucumber with the login feature. Let us consider a simple scenario. We will define our features in a feature file under src/test/resources.
login.feature
Feature: Login

  @single
  Scenario: Successful Login to the page
    Given I open firefox browser
    When I navigate to login.html page
    And I provide username as hi and password as hi
    And I click on login button
Then hi should be name- Cucumber tests are organized as
feature. We define a Login feature above in line 1. - We have tagged our
scenarioas single in line 3. - We define our
Scenarioname in line 4 and detail out the scenario in subsequent lines. - Line 5 States the
GivenCondition i.e. condition for start of testing. Whendefines the action to be taken under the given condition. Here, We are navigating to the login.html page.Andrelates to the subsequent actions to be taken under the given condition. Here, We specify username and password as hi and click on the login button.Thenprovides for the assertion i.e. checks for matching the expected output. In this example, We check if the name is hi in the index page.
We are left to implement the scenario described above. To execute cucumber tests, Launcher class is defined in src/test/java.
Launcher.java
import cucumber.api.CucumberOptions;
import cucumber.api.SnippetType;
import cucumber.api.junit.Cucumber;
import org.junit.runner.RunWith;

@RunWith(Cucumber.class)
@CucumberOptions(plugin = {"html:target/cucumber-html-report"}, snippets = SnippetType.CAMELCASE,tags = {"@single"})
public class Launcher {

}- We specify the runner as
Cucumberusing theRunWithAnnotation - We provide three options for our cucumber runner
plugin– specify the output as html with location as target/cucumber-html-reportsnippets– used to specify the test case style. We specify camel case to match Java’s syntax style but by default it is UnderScore or Snake case.tags–@singleis used to execute scenario tagged as @single. We have currently defined only one scenario.
On running the file Launcher.java, We get the snippets to be defined.
1 Scenarios (1 undefined)
5 Steps (5 undefined)
0m0.000s

You can implement missing steps with the snippets below:

@Given("^I open firefox browser$")
public void iOpenFirefoxBrowser() throws Throwable {
// Write code here that turns the phrase above into concrete actions
throw new PendingException();
}

@When("^I navigate to login\\.html page$")
public void iNavigateToLoginHtmlPage() throws Throwable {
// Write code here that turns the phrase above into concrete actions
throw new PendingException();
}

@When("^I provide username as hi and password as hi$")
public void iProvideUsernameAsHiAndPasswordAsHi() throws Throwable {
// Write code here that turns the phrase above into concrete actions
throw new PendingException();
}

@When("^I click on login button$")
public void iClickOnLoginButton() throws Throwable {
// Write code here that turns the phrase above into concrete actions
throw new PendingException();
}

@Then("^hi should be name$")
public void hiShouldBeName() throws Throwable {
// Write code here that turns the phrase above into concrete actions
throw new PendingException();
}
We provide implementation for the snippets in the file LoginSteps.java under the folder src/test/java inside the package com.jcg.StepDefinitions.

LoginSteps.java
package com.jcg.StepDefinitions;

import com.jcg.PageObjectModel.DriverInitializer;
import cucumber.api.java.en.Given;
import cucumber.api.java.en.Then;
import cucumber.api.java.en.When;
import org.openqa.selenium.By;
import org.openqa.selenium.WebDriver;
import org.openqa.selenium.WebElement;

import static org.assertj.core.api.Assertions.assertThat;

public class LoginSteps {

    WebDriver webDriver = null;

    @Given("^I open firefox browser$")
    public void iOpenFirefoxBrowser() throws Throwable {
        webDriver = DriverInitializer.getDriver("firefox");
    }

    @When("^I navigate to login\\.html page$")
    public void iNavigateToLoginHtmlPage() throws Throwable {
        webDriver.get(DriverInitializer.getProperty("login.url"));
    }

    @When("^I provide username as hi and password as hi$")
    public void iProvideUsernameAsHiAndPasswordAsHi() throws Throwable {
        WebElement webElement = webDriver.findElement(By.id("username"));
        webElement.sendKeys("hi");
        webElement = webDriver.findElement(By.id("password"));
        webElement.sendKeys("hi");
    }

    @When("^I click on login button$")
    public void iClickOnLoginButton() throws Throwable {
        WebElement webElement = webDriver.findElement(By.id("login-btn"));
        webElement.click();
    }

    @Then("^hi should be name$")
    public void hiShouldBeName() throws Throwable {
        WebElement webElement = webDriver.findElement(By.id("name"));
        try {
            assertThat(webElement.getText()).isEqualTo("hi");
        } finally {
            webDriver.quit();
        }
    }
}
For each step definition, We provide the test implementation. Here we supply the Selenium code to automate the testing.
- We initialize the driver for firefox.
- In Line 24, we instruct webdriver to navigate to login url read from the property file.
- In Lines 29-32, We locate the username and password element by id-locator. In the located elements, we supply the value as hi.
- We locate Login Button and perform click action on the login button.
- Page navigation happens and gets redirected to index.html.
- In the loaded page, We locate element with id name. The final step is the assertion of the element value to the expected value of hi.
- We handle the assertions with
Assert4J. - In case of Assertion failure,
AssertionErroris thrown. It is recommended practice to close the browser to avoid keeping multiple browsers open. Hence infinallyblock, we close the browser by callingwebdriver.quit()
Now on rerunning the launcher, Selenium runs and the results are captured in a html report along with the output in command line. Below is a screenshot of the report of our test execution.
5. Scenario Outline
In the previous example, we saw a simple test case to validate the login functionality. But a single test case cannot cover multiple scenarios and it would be cumbersome to rewrite tests with different inputs. Cucumber has Scenario Outline to cover this feature.
login.feature(Scenario Outline)
@multiple
Scenario Outline: Successful Login to the page
  Given I open firefox browser
  When I navigate to login.html page
  And I provide username as "<username>" and password as "<password>"
  And I click on login button
  Then name should be "<name>"

  Examples:
    | username | password | name |
    | username1 | password1 | username1 |
    | username2 | password2 | username2 |
Let us cover the differences with the previous Scenario
- This scenario is tagged as @multiple to differentiate it from previous test case
- Keyword Scenario Outline is used to indicate that this scenario can be run with multiple inputs / examples(cucumber domain).
- In Line 5, instead of the direct value, placeholders username and password are used.
- In Similar Vein, Line 7 has the placeholder name.
- Lines 9-12 contain the examples to be run.
- Line 10 contains the heading/placeholders used separated by |.
- These can be followed by n number of lines equal to number of testcases.
Before running the launcher, We have to perform a single change to run this particular scenario rather than the previous one.
Launcher.java
@CucumberOptions(plugin = {"html:target/cucumber-html-report"}, snippets = SnippetType.CAMELCASE,tags = {"@multiple"})
We have provided the tag as multiple for the Scenario outline to run. Generally, tags are used to differentiate test cases based on the environment to run i.e. dev,performance etc.
As in the previous scenario, it provides the missing steps to be executed. We can implement them in LoginSteps.java as before.
@When("^I provide username as \"([^\"]*)\" and password as \"([^\"]*)\"$")
public void iProvideUsernameAsAndPasswordAs(String username, String password) throws Throwable {
    WebElement webElement = webDriver.findElement(By.id("username"));
    webElement.sendKeys(username);
    webElement = webDriver.findElement(By.id("password"));
    webElement.sendKeys(password);
}

@Then("^name should be \"([^\"]*)\"$")
public void nameShouldBe(String name) throws Throwable {
    WebElement webElement = webDriver.findElement(By.id("name"));
    try {
        assertThat(webElement.getText()).isEqualTo(name);
    } finally {
        webDriver.quit();
    }
}
Selenium Implementation is more or less similar to the same. The only difference is that here arguments are passed instead of the value hi. The values are being supplied via the argument and matched with a regular expression pattern.
On rerunning the Launcher, We get the report as in the previous scenario.
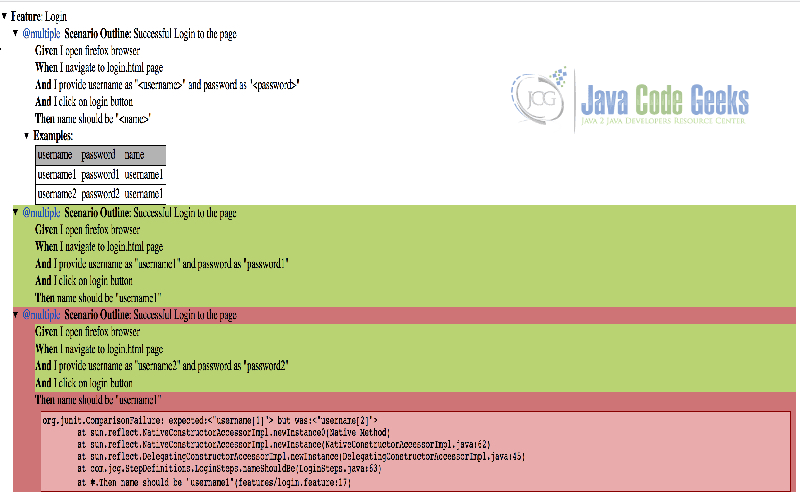
We can see that one of the testcases passed and other failed. The failed portions of the test case are highlighted in red.
To run all the scenarios at once, We can use a dummy tag and indicate all scenarios not matching the dummy tag.
Launcher.java
@CucumberOptions(plugin = {"html:target/cucumber-html-report"}, snippets = SnippetType.CAMELCASE,tags = {"~@mul"})
Here, We have configured to run scenarios not matching the tag @mul.
6. Summary
In the previous sections, We have covered how cucumber eschews Behaviour Driven Development and paves way for automated acceptance testing. Selenium plugs in for the automation of web application testing with appropriate drivers for each browser involved. Cucumber and Selenium together can provide for advanced and flexible automated testing.
7. Download the Source Code
You can download the full source code of this example here: cucumberSelenium
