In this example, we will show you how to implement a JAX-WS Logical Handler.
1. Introduction
When you send a request to a web service, the SOAP message may require verification. The SOAP message response may also require verification. For these requirements, you can use a SOAP message handler to intercept the SOAP message for further processing.
SOAP message handlers have access to the SOAP message and can be implemented on the consumer or the provider side of the web service. The handler can determine if the message is inbound or outbound and build specific behavior for those events.
SOAP message handlers are well suited for addressing non-functional requirements such as:
- Custom authentication
- Caching responses to improve performance
- Logging
There are two types of SOAP message handlers; SOAP handlers and logical handlers. SOAP handlers have access to all parts of the message; the HTTP header, the SOAP header and the SOAP body. Logical handlers can access the payload of the SOAP message only, that is, the data contained within the SOAP body. Logical handlers are the focus of this example.
1.1 Tools Used in this Example
- Eclipse Oxygen
- Maven 3.2.1
- Tomcat 8.5.4
- SoapUI 5.3.0
For Maven support within Eclipse, install M2Eclipse. Please visit the M2Eclipse website for more information.
To setup a Tomcat server for use in Eclipse, see Tomcat in Eclipse: 6 popular how to questions.
2. JAX-WS Logical Handler Example
In this example, we will create a simple web service that returns the capital city name for a given state. This exercise uses the “WSDL-first” or “top-down” approach to web services development.
2.1 Create the Web Service Provider
2.1.1 Create the Web Service Project
Let’s begin by creating a simple Maven Project.
- Select New -> Other… Maven Project. Click “Next”.
- Select “Create a simple project (skip archetype selection)” and click “Next”.
- Enter a Group Id and Artifact Id. Select “war” for Packaging and enter a Name and Description if desired. Click “Finish”.
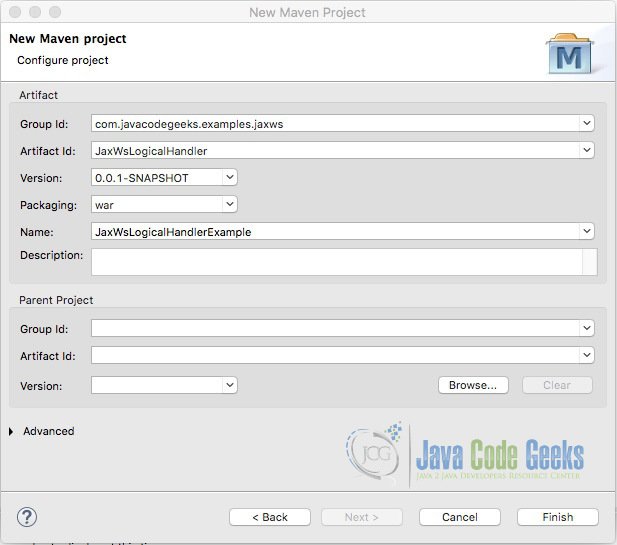
At this point, you will see the following error: web.xml is missing and<failOnMissingWebXml> is set to true , since we elected to package the application as a war file. To fix this, right-click on the project and select Java EE Tools -> Generate Deployment Descriptor Stub.
2.1.2 Create the WSDL File
Create a new folder named “wsdl” in the WEB-INF directory and create a WSDL file inside the folder with the following content:
StateCapital.wsdl
<?xml version='1.0' encoding='UTF-8'?>
<wsdl:definitions xmlns:xsd="http://www.w3.org/2001/XMLSchema"
	xmlns:wsdl="http://schemas.xmlsoap.org/wsdl/" xmlns:tns="http://jaxws.examples.javacodegeeks.com/"
	xmlns:soap="http://schemas.xmlsoap.org/wsdl/soap/" xmlns:ns1="http://schemas.xmlsoap.org/soap/http"
	name="StateCapitalLookupService" targetNamespace="http://jaxws.examples.javacodegeeks.com/">

	<wsdl:types>
		<xs:schema xmlns:xs="http://www.w3.org/2001/XMLSchema"
		xmlns:tns="http://jaxws.examples.javacodegeeks.com/" elementFormDefault="unqualified"
		targetNamespace="http://jaxws.examples.javacodegeeks.com/" version="1.0">

			<xs:complexType name="getStateCapitalRequest">
				<xs:sequence>
					<xs:element minOccurs="0" name="state" type="xs:string" />
				</xs:sequence>
			</xs:complexType>

			<xs:complexType name="getStateCapitalResponse">
				<xs:sequence>
					<xs:element minOccurs="0" name="city" type="xs:string" />
				</xs:sequence>
			</xs:complexType>

		<xs:element name="getStateCapitalRequest" type="tns:getStateCapitalRequest" />

		<xs:element name="getStateCapitalResponse" type="tns:getStateCapitalResponse" />

		</xs:schema>
	</wsdl:types>

	<wsdl:message name="getStateCapitalRequest">
		<wsdl:part element="tns:getStateCapitalRequest" name="parameters">
		</wsdl:part>
	</wsdl:message>
	<wsdl:message name="getStateCapitalResponse">
		<wsdl:part element="tns:getStateCapitalResponse" name="parameters">
		</wsdl:part>
	</wsdl:message>

	<wsdl:portType name="StateCapitalPortType">
		<wsdl:operation name="getStateCapital">
			<wsdl:input message="tns:getStateCapitalRequest" name="getStateCapitalRequest">
			</wsdl:input>
			<wsdl:output message="tns:getStateCapitalResponse" name="getStateCapitalResponse">
			</wsdl:output>
		</wsdl:operation>
	</wsdl:portType>

	<wsdl:binding name="StateCapitalLookupServiceSoapBinding"
		type="tns:StateCapitalPortType">
		<soap:binding style="document"
			transport="http://schemas.xmlsoap.org/soap/http" />
		<wsdl:operation name="getStateCapital">
			<soap:operation soapAction="" style="document" />
			<wsdl:input name="getStateCapitalRequest">
				<soap:body use="literal" />
			</wsdl:input>
			<wsdl:output name="getStateCapitalResponse">
				<soap:body use="literal" />
			</wsdl:output>
		</wsdl:operation>
	</wsdl:binding>

	<wsdl:service name="StateCapitalLookupService">
		<wsdl:port binding="tns:StateCapitalLookupServiceSoapBinding"
			name="StateCapitalPort">
			<soap:address
				location="http://localhost:8080/jaxwslogicalhandlerexample/services/stateCapitalLookupService" />
		</wsdl:port>
	</wsdl:service>
</wsdl:definitions>
The WSDL file defines one operation for our StateCapitol lookup service, getStateCapital. The operation takes a String as a parameter and returns a String.
2.1.3 Update the POM File
Open the pom.xml and add the following Maven plugins just above the closing </project> tag:
pom.xml
<properties>
 <cxf.version>3.1.11</cxf.version>
 </properties>
 <build>
	 <plugins>
		 <plugin>
		 <groupId>org.apache.maven.plugins</groupId>
		 <artifactId>maven-compiler-plugin</artifactId>
		 <version>3.6.1</version>
		 <configuration>
			 <source>1.8</source>
			 <target>1.8</target>
		 </configuration>
	 </plugin>
	 <plugin>
		 <groupId>org.apache.maven.plugins</groupId>
		 <artifactId>maven-war-plugin</artifactId>
		 <version>3.0.0</version>
		 <configuration>
			 <warSourceDirectory>src/main/webapp</warSourceDirectory>
			 <webXml>src/main/webapp/WEB-INF/web.xml</webXml>
			 <warName>JaxWsLogicalHandler</warName>
		 </configuration>
		 </plugin>
		 <plugin>
			 <groupId>org.apache.cxf</groupId>
			 <artifactId>cxf-codegen-plugin</artifactId>
			 <version>${cxf.version}</version>
			 <executions>
				 <execution>
					 <id>generate-sources</id>
					 <phase>generate-sources</phase>
					 <configuration>
						 <sourceRoot>${basedir}/src/generated</sourceRoot>
						 <wsdlOptions>
							 <wsdlOption>
								 <wsdl>${basedir}/src/main/webapp/WEB-INF/wsdl/StateCapital.wsdl</wsdl>
							 </wsdlOption>
						 </wsdlOptions>
					 </configuration>
					 <goals>
						 <goal>wsdl2java</goal>
					 </goals>
				 </execution>
			 </executions>
		 </plugin>
		 </plugins>
 </build>
In addition to the usual compile and war plugins, we are including the CXF codegen plugin. This plugin will run the wsdl2java goal to generate the web services stubs based on our WSDL file. The configuration section specifies the folder where the generated files will be placed.
It also specifies the location of the WSDL file.
Note: It is important the generated files to be placed under the source directory so that it is part of the Java Build Path.
Also, add the following dependencies below the closing </build> tag:
<dependencies>
  <dependency>
    <groupId>org.apache.cxf</groupId>
    <artifactId>cxf-rt-frontend-jaxws</artifactId>
    <version>${cxf.version}</version>
  </dependency>
  <dependency>
    <groupId>org.apache.cxf</groupId>
    <artifactId>cxf-rt-transports-http</artifactId>
    <version>${cxf.version}</version>
  </dependency>
  <dependency>
    <groupId>org.springframework</groupId>
    <artifactId>spring-core</artifactId>
    <version>4.3.8.RELEASE</version>
  </dependency>
  <dependency>
    <groupId>org.springframework</groupId>
    <artifactId>spring-web</artifactId>
   <version>4.3.8.RELEASE</version>
  </dependency>
</dependencies>
Save the changes and select: Maven->Update Project from the project context menu. If you look at your project structure you will see a new folder under “src” named “generated”. (You may need to “refresh” to see them.) This is where the wsdl2java tool placed the generated web service stubs.
2.1.4 Implement the Web Service
Create a new package named com.javacodegeeks.examples.jaxws.impl in “/src/main/java”. Inside this package, create a class that implements the StateCapitalPortType service endpoint interface and add the following code:
StateCapitolWSImpl.java
import java.util.HashMap;
import java.util.Map;

import com.javacodegeeks.examples.jaxws.GetStateCapitalRequest;
import com.javacodegeeks.examples.jaxws.GetStateCapitalResponse;
import com.javacodegeeks.examples.jaxws.StateCapitalPortType;

public class StateCapitolWSImpl implements StateCapitalPortType {

        Map<String, String> stateDataMap = new HashMap<>();

	public StateCapitolWSImpl() {
		init();
	}

	private void init() {
		stateDataMap.put("AL", "Montgomery");
		stateDataMap.put("CO", "Denver");
		stateDataMap.put("GA", "Atlanta");

	}

	@Override
	public GetStateCapitalResponse getStateCapital(GetStateCapitalRequest parameters) {
		String state = parameters.getState();
		String capital = stateDataMap.get(state);
		GetStateCapitalResponse response = new GetStateCapitalResponse();
		response.setCity(capital);
		return response;
	}
}
First, we create a class member of type Map that we’ll use to store entries of state abbreviations and capital city names. We then define a constructor that will call the init method, which adds a few entries to our map. Finally, we implement the getStateCapital method. This method returns a response that includes the name of the capital city for the state that was passed in the request.
2.1.5 Create the Spring Configuration File
Create the cxf-servlet.xml file in the webapp/WEB-INF directory to set up our service endpoint.
cxf-servlet.xml
 <?xml version="1.0" encoding="UTF-8"?>
<beans xmlns="http://www.springframework.org/schema/beans"
	xmlns:xsi="http://www.w3.org/2001/XMLSchema-instance" xmlns:jaxws="http://cxf.apache.org/jaxws"
	xmlns:cxf="http://cxf.apache.org/core" xmlns:soap="http://cxf.apache.org/bindings/soap"
	xsi:schemaLocation="http://cxf.apache.org/core http://cxf.apache.org/schemas/core.xsd http://www.springframework.org/schema/beans http://www.springframework.org/schema/beans/spring-beans.xsd http://cxf.apache.org/bindings/soap http://cxf.apache.org/schemas/configuration/soap.xsd http://cxf.apache.org/jaxws http://cxf.apache.org/schemas/jaxws.xsd">

	<jaxws:endpoint id="stateCapitalWs" address="/stateCapital"
		wsdlLocation="WEB-INF/wsdl/StateCapital.wsdl" implementor="com.javacodegeeks.examples.jaxws.impl.StateCapitalWSImpl"
		serviceName="stateCapital:StateCapitalLookupService"
		xmlns:stateCapital="http://jaxws.examples.javacodegeeks.com/" />

</beans>
Notice that we defined a namespace xmlns:stateCapital=http://jaxws.examples.javacodegeeks.com/ that is used as a prefix for the serviceName , which must match exactly with the service name we defined in the WSDL file.
2.1.6 Configure the CXF servlet in web.xml
The last step is to configure the CXFServlet in web.xml. We’ll map the servlet to handle all requests coming through /services/*.
web.xml
<?xml version="1.0" encoding="UTF-8"?>
<web-app xmlns:xsi="http://www.w3.org/2001/XMLSchema-instance" xmlns="http://java.sun.com/xml/ns/javaee" xsi:schemaLocation="http://java.sun.com/xml/ns/javaee http://java.sun.com/xml/ns/javaee/web-app_2_5.xsd" version="2.5">
  <display-name>JaxWsLogicalHandler
</display-name>
 <servlet>
   <servlet-name>cxfservlet</servlet-name>
   <servlet-class>org.apache.cxf.transport.servlet.CXFServlet</servlet-class>
   <load-on-startup>1</load-on-startup>
 </servlet>
 <servlet-mapping>
   <servlet-name>cxfservlet</servlet-name>
   <url-pattern>/services/*</url-pattern>
 </servlet-mapping>
</web-app>
2.1.7 Start the StateCapital Service
Run maven clean to clear the target directory and maven install to create the war file. (Right-click the project and select Run as and you will see these options in the context menu.) The generated war file can be deployed to a Tomcat server by copying it to the webapps directory and starting the server.
Let’s test our web service from within Eclipse. Right-click the project and select Run As -> Run on Server. Select the Tomcat server and add our project to configure and click “Finish”. When the application starts, we will see a 404 error in the browser, since we do not have a welcome page specified in web.xml. Enter /services/ at the end of the URL and hit “Enter”. You will see a link to the WSDL file on the “Available SOAP services” page.
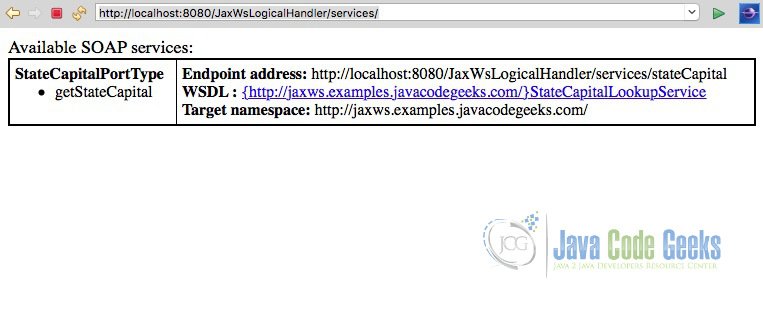
Click the link to see the WSDL file that was generated by the web services runtime.
Note: If you are using Eclipse’s internal browser, you may see a blank page. Copy the URL from the address bar and open the link in an external browser.
2.2 Testing the Web Service with SoapUI
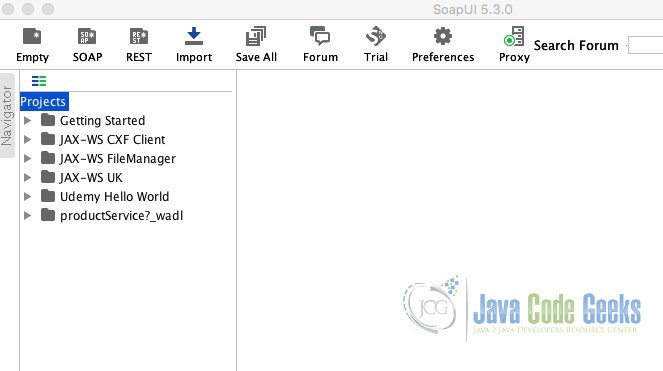
We will test our web service with SoapUI in this example.
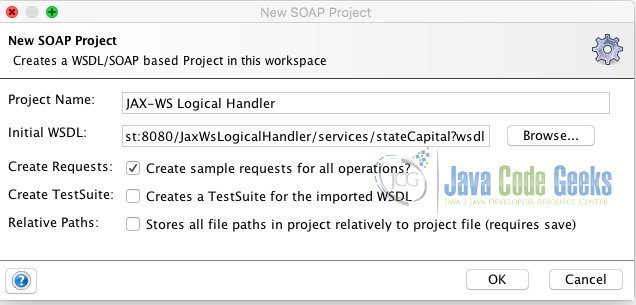
Start SoapUI and create a new SOAP project by clicking the SOAP button on the top bar.
Enter a name for your project and paste the WSDL URL link of the web service in the Initial WSDL text box, for example: http://localhost:8080/JaxWsLogicalHandler/services/stateCapital?wsdl . Make sure “Create Requests” is selected and click OK.
Expand “StateCapitalLookupServiceSoapBinding” and “getStateCapital” in the Navigator and double-click “Request 1”. Enter “al” (in lowercase letters) inside the state tag of the request.
request
<soapenv:Envelope xmlns:soapenv="http://schemas.xmlsoap.org/soap/envelope/" xmlns:jax="http://jaxws.examples.javacodegeeks.com/">
  <soapenv:Header/>
  <soapenv:Body>
    <jax:getStateCapitalRequest>
      <!--Optional:-->
      <state>al</state>
    </jax:getStateCapitalRequest>
  </soapenv:Body>
</soapenv:Envelope>
Click the green arrow to submit the request.
response
<soap:Envelope xmlns:soap="http://schemas.xmlsoap.org/soap/envelope/">
  <soap:Body>
    <ns2:getStateCapitalResponse xmlns:ns2="http://jaxws.examples.javacodegeeks.com/"/>
  </soap:Body>
</soap:Envelope>
If you look at the response, you will see that the getStateCapitalResponse is empty and the capital city was not returned. That is because the StateCapital lookup is case-sensitive. Let’s fix that by creating a Logical Handler.
2.3 Create a Logic Handler
To fix the issue, we will intercept the incoming request on the service side and modify the payload so that state abbreviations are always in uppercase. You can modify the payload by working with the message body as an XML object or a JAXB object. We will use the latter in this example
2.3.1 Create the Handler Class
Begin by creating a new Java class StateHandler that implements LogicalHandler.
At this point, you will see several errors.
- C cannot be resolved to a type.
LogicalHandler is a parameterized interface. Add the parameter type LogicalMessageContext. This is the context we’ll use to work with the logical message. LogicalHandler<LogicalMessageContext>
You will also see these errors:
- The type StateHandler must implement the inherited abstract method Handler.close(MessageContext)
- The type StateHandler must implement the inherited abstract method Handler.handleFault(C)
- The type StateHandler must implement the inherited abstract method Handler.handleMessage(C)
In its current state, StateHandler has unimplemented methods. Hover over StateHandler and select “Add unimplemented methods” from the available quick fixes. This will add the three methods to StateHandler .
StateHandler.java
package com.javacodegeeks.examples.jaxws.handler;

import javax.xml.ws.handler.LogicalHandler;
import javax.xml.ws.handler.LogicalMessageContext;
import javax.xml.ws.handler.MessageContext;

public class StateHandler implements LogicalHandler {

	@Override
	public boolean handleMessage(LogicalMessageContext context) {
		// TODO Auto-generated method stub
		return false;
	}

	@Override
	public boolean handleFault(LogicalMessageContext context) {
		// TODO Auto-generated method stub
		return false;
	}

	@Override
	public void close(MessageContext context) {
		// TODO Auto-generated method stub

	}
}
Let’s discuss the purpose of these methods.
handleMessage( ): This method is invoked on both the inbound request and outbound response SOAP messages. You implement this method to inspect or change the logical message. Returning true will invoke the next handler in the chain, while returning false will stop further message processing.handleFault( ): This method is invoked instead of handleMessage( ) when the message contains a fault. You implement this method for any exception handling you want to perform. If you want the message to be processed by the next message handler (providing there is another message handler in the chain), return true, otherwise, return false.close( ): This method is called once during the response phase of the service. You implement this method to perform any cleanup of resources.
2.3.2 Implement the handleMessage Method
Let’s implement our handleMessage method by adding the following code:
	@Override
	public boolean handleMessage(LogicalMessageContext context) {
		boolean outbound = (Boolean)
	             context.get (MessageContext.MESSAGE_OUTBOUND_PROPERTY);
		if (!outbound) {
			System.out.println("\nInbound message:");
           LogicalMessage msg = context.getMessage();
           JAXBContext jaxbContext = null;
           try {
				jaxbContext = JAXBContext.newInstance(ObjectFactory.class);
               Object payload = msg.getPayload(jaxbContext);
               if (payload instanceof JAXBElement) {
                   Object obj = ((JAXBElement)payload).getValue();
                   System.out.println("payload:"+payload.getClass().getName());
                   GetStateCapitalRequest request = (GetStateCapitalRequest) obj;
                   String stateUC = request.getState().toUpperCase();
                   request.setState(stateUC);
                   ((JAXBElement)payload).setValue(request);
                   msg.setPayload(payload, jaxbContext);
               }
			} catch (JAXBException e) {
				e.printStackTrace();
			}
		} else {
           System.out.println("\nOutbound message:");
		}
		return true;
	}
The first thing we do is determine if this is an inbound or outbound message. You accomplish this by inspecting the MESSAGE_OUTBOUND_PROPERTY property of the LogicalMessageContext.
On inbound messages:
We retrieve the LogicalMessage from the message context. Next, we create a JAXBContext instance from the com.javacodegeeks.examples.jaxws.ObjectFactory of our generated files. We then retrieve the message payload as an Object.
If the payload is a instance of JAXBElement, we get its value and cast it to our request object (GetStateCapitalRequest) so that we can call its methods. We then create a local variable stateUC that we initialize as an uppercase version of the state abbreviation retrieved from the request.
Next, we re-build the request by setting the updated state value in GetStateCapitalRequest, setting GetStateCapitalRequest in the payload, and finally, setting the payload in the Logical message.
On outbound messages:
We print out the message direction to the console.
Finally, we return true. This is important so that message processing continues by other handlers in the chain as well as the service.
2.3.3 Configure the Logical Handler
In order to configure the application to use our Logical Handler, we need to create a handler configuration file.
Create a new XML file called handlers.xml in the com.javacodegeeks.examples.jaxws.impl package with the following content. (The name is not important as we will specify it below, but the file has to be placed in the same package as our service implementation class.)
handlers.xml
<?xml version="1.0" encoding="UTF-8"?>
<handler-chains xmlns="http://java.sun.com/xml/ns/javaee"
	xmlns:xsi="http://www.w3.org/2001/XMLSchema-instance" xmlns:jaxb="http://java.sun.com/xml/ns/jaxb"
	xsi:schemaLocation="http://java.sun.com/xml/ns/javaee
  http://java.sun.com/xml/ns/javaee/javaee_web_services_metadata_handler_2_0.xsd">
    <handler-chain>
        <handler>
            <handler-name>StateHandler</handler-name>
            <handler-class>com.javacodegeeks.examples.jaxws.handler.StateHandler</handler-class>
        </handler>
    </handler-chain>
</handler-chains>
We specify our handler class in this file. If we have other handlers that we want to invoke, we can add them here inside the handler-chain element.
The CXF runtime has to know the name of our handler configuration file. We address this requirement by adding the following annotation to our service implementation class.
StateCapitolWSImpl.java
@HandlerChain(file = "handlers.xml")
public class StateCapitolWSImpl implements StateCapitolPortType {
That’s all there is to it. The next step it to re-test our updated service.
2.4 Test the Updated Service with SoapUI
Start the application and re-run the previous test.
<soap:Envelope xmlns:soap="http://schemas.xmlsoap.org/soap/envelope/">
   <soap:Body>
      <ns2:getStateCapitalResponse xmlns:ns2="http://jaxws.examples.javacodegeeks.com/">
         <city>Montgomery</city>
      </ns2:getStateCapitalResponse>
   </soap:Body>
</soap:Envelope>
You see that this time you get the capital city returned in the SOAP message response, even if the state value of the request is in lowercase.
3. Conclusion
In this example, we demonstrated how to to implement a JAX-WS Logical Handler.
4. Download the Source Code
This was a JAX-WS LogicalHandler Example.
You can download the full source code of this example here:

Is there a way to specify the @HandlerChain tag in the cxf-codegen-plugin configuration so it autogenerates?
Great post, thanks