In this example, we will show you how to exchange files with a SOAP web service using attachments.
1. Introduction
You may need to send or receive binary data, such as an image file or a PDF file, in a SOAP message. If the binary data is large, it would be inefficient to send it as part of a typical SOAP message. An alternative in such cases, is to transfer the binary data as an attachment to the message. Before we begin with our example, we’ll discuss a few standards.
1.1 Message Transmission Optimization Mechanism
Message Transmission Optimization Mechanism (MTOM) is a web service standard for optimizing the transfer of binary data in a SOAP message. The standard specifies the message format for packaging base64Binary data (such as an image file or PDF file).
1.2 XML-binary Optimized Packaging
XML-binary Optimized Packaging (XOP) is another standard used for packaging the SOAP message and attachment. XOP processing removes the binary data from the SOAP message and packages it as an attachment, placing a reference to the attachment in the message. The XML document and attachments together form the XOP package.
1.3 Multipurpose Internet Mail Extensions
Multipurpose Internet Mail Extensions (MIME) is yet another standard. The MIME standard supports multipart messages that have text content and non-text attachments. File attachments are categorized by MIME content types like image/jpeg or application/pdf. Attachments in a XOP package are MIME attachments.
Let’s continue to our example.
1.4 Tools Used in this Example
- Eclipse Oxygen
- Maven 3.2.1
- Tomcat 8.5.4
- SoapUI 5.3.0
For Maven support within Eclipse, install M2Eclipse. Please visit the M2Eclipse website for more information.
To setup a Tomcat server for use in Eclipse, see Tomcat in Eclipse: 6 popular how to questions.
2. JAX-WS Attachment Example
In this example, we’ll develop a simple web service to upload and download files using MTOM. We will be attaching an image file to the SOAP message, but the attachment can be any type of binary file. This exercise uses “Java-first” or “bottom-up” web services development.
2.1 Create the Web Service Provider
2.1.1 Create the Web Service Project
Let’s begin by creating a simple Maven Project. Select the Create a simple project (skip archetype selection) check box and click “Next”. Enter a Group Id and Artifact Id, select war for Packaging and click “Finish”.

At this point, you will see the following error: web.xml is missing and<failOnMissingWebXml> is set to true , since we elected to package the application as a war file. To fix this, right-click on the project and select Java EE Tools -> Generate Deployment Descriptor Stub.
Open the pom.xml and add the following Maven plugins just above the closing </project> tag:
pom.xml
<build>
  <pluginManagement>
    <plugins>
      <plugin>
      <groupId>org.apache.maven.plugins</groupId>
      <artifactId>maven-compiler-plugin</artifactId>
      <version>3.6.1</version>
      <configuration>
        <source>1.8</source>
        <target>1.8</target>
      </configuration>
    </plugin>
    <plugin>
      <groupId>org.apache.maven.plugins</groupId>
      <artifactId>maven-war-plugin</artifactId>
      <version>3.0.0</version>
      <configuration>
        <warSourceDirectory>src/main/webapp</warSourceDirectory>
        <webXml>src/main/webapp/WEB-INF/web.xml</webXml>
        <warName>JaxWsAttach</warName>
      </configuration>
      </plugin>
    </plugins>
  </pluginManagement>
</build>
Also, add the following dependencies below the closing </build> tag:
<dependencies>
  <dependency>
    <groupId>org.apache.cxf</groupId>
    <artifactId>cxf-rt-frontend-jaxws</artifactId>
    <version>3.1.11</version>
  </dependency>
  <dependency>
    <groupId>org.apache.cxf</groupId>
    <artifactId>cxf-rt-transports-http</artifactId>
    <version>3.1.11</version>
  </dependency>
  <dependency>
    <groupId>org.springframework</groupId>
    <artifactId>spring-core</artifactId>
    <version>4.3.8.RELEASE</version>
  </dependency>
  <dependency>
    <groupId>org.springframework</groupId>
    <artifactId>spring-web</artifactId>
   <version>4.3.8.RELEASE</version>
  </dependency>
</dependencies>
Save the changes and select: Maven->Update Project from the project context menu.
2.1.2 Create the Service Endpoint Interface (SEI)
We’ll create a Java interface that defines two methods, one for uploading a file and one for downloading a file.
FileManager.java
import javax.activation.DataHandler;
import javax.jws.WebService;

@WebService
public interface FileManager {

	void uploadFile(@WebParam(name = "file") DataHandler file);

	DataHandler downloadFile();
}
We use the @WebParam annotation to specify the name of the parameter as it will appear in the WSDL.
We use the javax.activation.DataHandler type in our methods. The DataHandler interface provides a consistent way to access input and output streams from a data source, regardless of what format the data source uses.
2.1.3 Implement the Service Interface
Next, we’ll implement the SEI created in the previous step. We set a Path class variable that we’ll use as both the uploaded and downloaded file location.
FileManagerImpl.java
import java.io.File;
import java.io.FileOutputStream;
import java.io.IOException;
import java.io.InputStream;
import java.io.OutputStream;
import java.nio.file.Path;
import java.nio.file.Paths;

import javax.activation.DataHandler;
import javax.activation.DataSource;
import javax.activation.FileDataSource;
import javax.jws.WebMethod;
import javax.jws.WebService;
import javax.xml.bind.annotation.XmlMimeType;

@WebService(endpointInterface = "com.javacodegeeks.examples.jaxws.service.FileManager",
	serviceName = "FileManager ")
public class FileManagerImpl implements FileManager {

	private Path path = Paths.get("/Users/gilbertlopez/uploaded/test.jpg");

	@Override
	@WebMethod
	public void uploadFile(DataHandler file) {

		try (InputStream input = file.getInputStream();
				OutputStream output = new FileOutputStream(
						new File(path.toString()));) {

			byte[] b = new byte[100000];
			int bytesRead = 0;
			while ((bytesRead = input.read(b)) != -1) {
				output.write(b, 0, bytesRead);
			}

		} catch (IOException e) {
			// TODO Auto-generated catch block
			e.printStackTrace();
		}

	}

	@Override
	@WebMethod
	public  @XmlMimeType("application/octet-stream")
	DataHandler downloadFile() {

		DataSource dataSource = new FileDataSource(
				new File(path.toString()));
		return new DataHandler(dataSource);

	}
}
Uploading a File: We create an InputStream from file.getInputStream() and an OutputStream with the FileOutputStream(File file) constructor. We then read the input stream into a byte array and write the array to the file specified by Path.
We are using a Java 7 try-with-resources statement that will close the streams at the end of the try block automatically.
Downloading a File: We annotate the return type of the DataHandler downloadFile() method with @XmlMimeType(application/octet-stream). The MIME type application/octet-stream can be used for different file types, such as an image file or PDF file. When using this annotation, MTOM will optimize the serialization of the underlying binary data. Otherwise, MTOM will just serialize it as a byte array (byte[]), which is less efficient.
We then declare a javax.activation.DataSource variable, assigning it a FileDataSource whose data source is the file specified by the Path class variable. Finally, we return our DataHandler with our data source.
2.1.4 Create the Spring Configuration File
Create the cxf-servlet.xml file in the webapp/WEB-INF directory to set up our service endpoint.
cxf-servlet.xml
<?xml version="1.0" encoding="UTF-8"?>
<beans xmlns="http://www.springframework.org/schema/beans"
xmlns:xsi="http://www.w3.org/2001/XMLSchema-instance" xmlns:jaxws="http://cxf.apache.org/jaxws"
xmlns:cxf="http://cxf.apache.org/core"
xmlns:soap="http://cxf.apache.org/bindings/soap"
xsi:schemaLocation="http://cxf.apache.org/core http://cxf.apache.org/schemas/core.xsd http://www.springframework.org/schema/beans http://www.springframework.org/schema/beans/spring-beans.xsd http://cxf.apache.org/bindings/soap http://cxf.apache.org/schemas/configuration/soap.xsd http://cxf.apache.org/jaxws http://cxf.apache.org/schemas/jaxws.xsd">

  <jaxws:server id="fileManager" serviceClass="com.javacodegeeks.examples.jaxws.service.FileManager" address="/fileManager">
    <jaxws:serviceBean>
      <bean class="com.javacodegeeks.examples.jaxws.service.FileManagerImpl" />
    </jaxws:serviceBean>
    <jaxws:properties>
      <entry key="mtom-enabled" value="true" />
    </jaxws:properties>
</jaxws:server>

</beans>
We’ll set the "mtom-enabled" property to "true" to enable binary transfer optimization.
2.1.5 Configure the CXF servlet in web.xml
The last step is to configure the CXFServlet in web.xml. We’ll map the servlet to handle all requests coming through /services/*.
web.xml
<?xml version="1.0" encoding="UTF-8"?>
<web-app xmlns:xsi="http://www.w3.org/2001/XMLSchema-instance" xmlns="http://java.sun.com/xml/ns/javaee" xsi:schemaLocation="http://java.sun.com/xml/ns/javaee http://java.sun.com/xml/ns/javaee/web-app_2_5.xsd" version="2.5">
  <display-name>JaxWsAttachmentExample
</display-name>
 <servlet>
   <servlet-name>cxfservlet</servlet-name>
   <servlet-class>org.apache.cxf.transport.servlet.CXFServlet</servlet-class>
   <load-on-startup>1</load-on-startup>
 </servlet>
 <servlet-mapping>
   <servlet-name>cxfservlet</servlet-name>
   <url-pattern>/services/*</url-pattern>
 </servlet-mapping>
</web-app>
2.1.6 Start the FileManager Service
Run maven clean to clear the target directory and maven install to create the war file. (Right-click the project and select Run as and you will see these options in the context menu.) The generated war file can be deployed to a Tomcat server by copying it to the webapps directory and starting the server.
Let’s test our web service from within Eclipse. Right-click the project and select Run As -> Run on Server. Select the Tomcat server and add our project to configure and click “Finish”. When the application starts, we will see a 404 error in the browser, since we do not have a welcome page specified in web.xml. Enter /services/ at the end of the URL and hit Enter. You will see a link to the WSDL file on the “Available SOAP services” page.
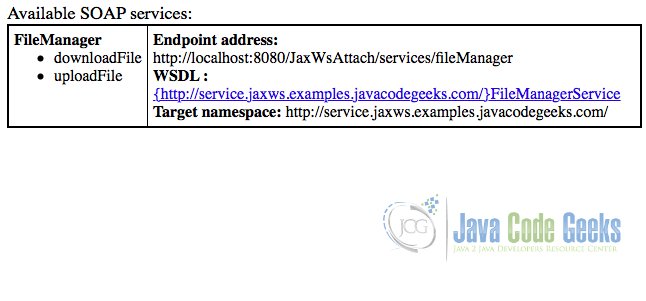
Click the link to see the WSDL file that was generated by the web services runtime.
Note: If you are using Eclipse s internal browser, you may see a blank page. Copy the URL from the address bar and open the link in an external browser.
2.2 Testing the Web Service with SoapUI
We’ll test our web service with SoapUI.
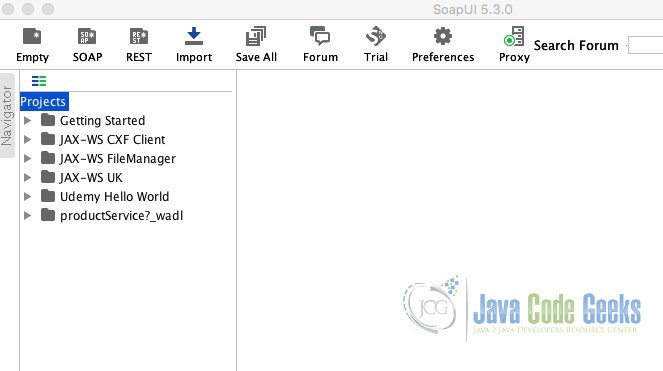
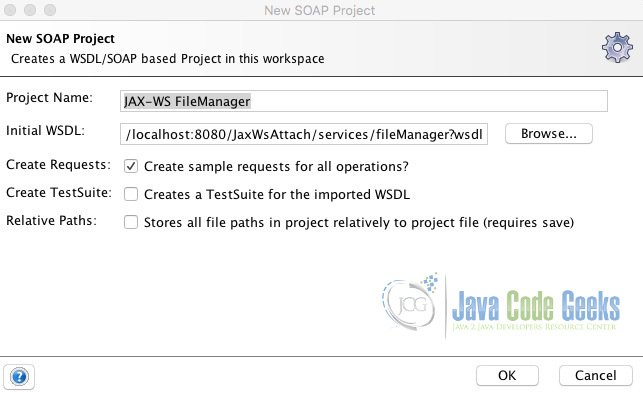
Start SoapUI and create a new SOAP project by clicking the SOAP button on the top bar.
Enter a name for your project and paste the WSDL URL link of the web service in the Initial WSDL text box, for example: http://localhost:8080/JaxWsAttach/services/fileManager?wsdl. Make sure Create Requests is selected and click “OK”.
2.2.1 Test Uploading a File
Expand FileManagerServiceSOAPBinding and uploadFile in the Navigator and double-click Request 1.
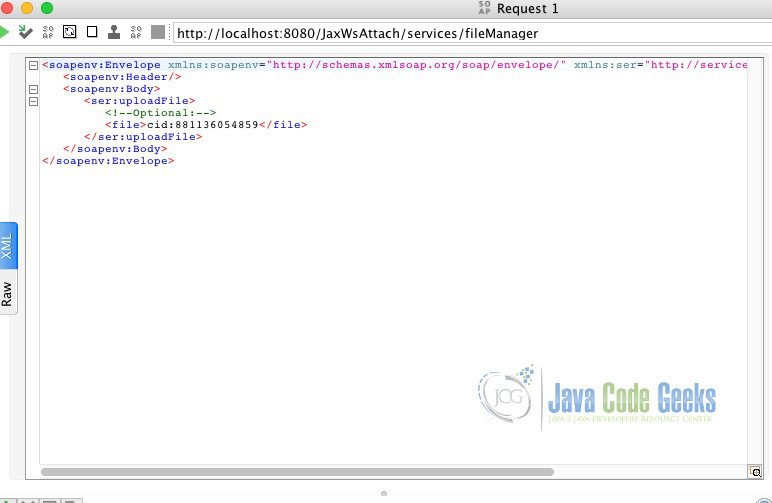
Notice that the <file> element in the request has a unique ID. We’ll bind the attachment to this ID. (Remember, MIME specifies that the binary data in the SOAP message will be sent as a multipart attachment.)
Click Attachments at the bottom of the request pane and click the + button in the upper-left hand corner.
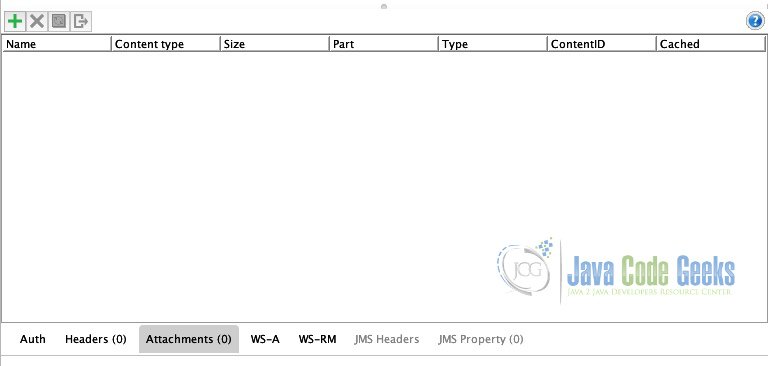
Browse to the location of your file and click “Open”. Click “No” when prompted to cache attachment in request .
Select the unique ID from the list under the Part column.

Click the green submit arrow on the upper-left corner of the Request window. You should see a successful response.
You can verify that the file was transferred by checking the file system.
2.2.2 Test Downloading a File
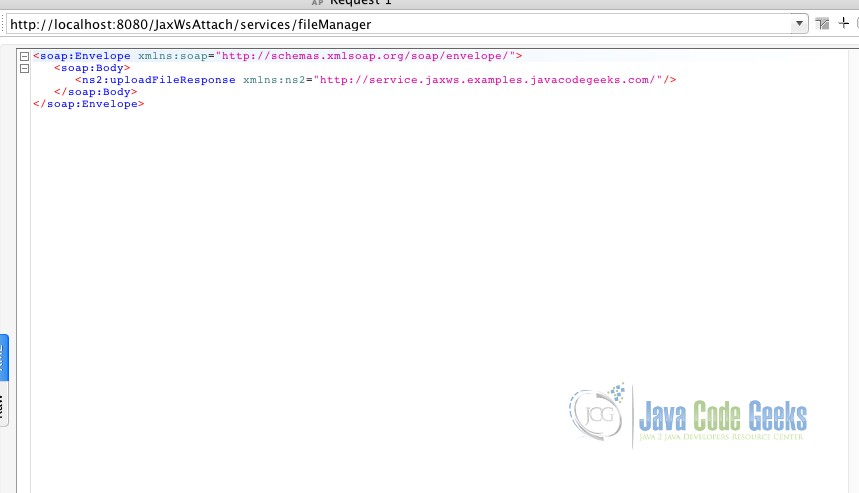
Expand FileManagerServiceSOAPBinding and downloadFile in the Navigator and double-click Request 1. Click the green submit arrow on the upper-left corner of the request window. You should see a successful response.
You will notice that the response SOAP message has a <xop:Include> tag. The ID value contained inside this tag is a reference to the attached file. Click Attachments at the bottom of the response page and double-click the file attachment in the list. The image will display in your favorite image viewer.
3. Conclusion
In this example, we have shown you how to send and receive binary data, such as an image file or a PDF file, as an attachment to the SOAP message when using “Java-first” web services development.
4. Download the Source Code
This was a JAX-WS Attachment Example.
You can download the full source code of this example here:

Thanks for your post Gilbert. Could you please clarify a question for me? Is it possible to send a JSON within a JAX-WS as an attachment (MIME application/json)? I think that this would not be possible with MTOM (only base64Encoded is permitted), but what about using SwA? Could you please help me with this? Thanks!
Hi Keller. Sorry for the delay.
I believe you are asking if you can send JSON files as attachments using MTOM. The answer is yes. DataHandler doesn’t care about the underlying source or format of the file. In fact, you don’t have to specify the MIME type anymore. DataHandler will serialize the file for you regardless of type. Hope this helps.
I would like to add, depending on your use case, developing a REST API might suit your needs better. You can write handlers for HTTP GET and HTTP POST requests that produce and consume JSON, respectively. Many frameworks (Spring for instance) will include the necessary libraries to convert JSON to POJOs and the reverse when developing a web project.
Hi Gilbert, could you please post the client code for downloading the soap attachment using spring ws
Sorry for the delay. I did not write client code for consuming the service. Please see section 2 of the following link for an example of writing a web service client with MTOM enabled. https://examples.javacodegeeks.com/enterprise-java/jws/jax-ws-attachment-with-mtom/
message Servlet.init() for servlet cxfservlet threw exception
please help me why shows this message
Sorry for the delay. Please describe the scenario and the pertinent part of the log with the exception. Also, you may want to download the Eclipse project to compare it with your code.