As I promised in my previous article, in this example, we are going to develop a simple Hello World application, with Javaserver Faces (JSF) 2.0. It may seem a bit of handy, but following along will make you understand how to easily configure every related project. So, let’s start!
Project Environment
This example was implemented using the following tools :
- JSF 2.2
- Maven 3.1
- Eclipse 4.3 (Kepler)
- JDK 1.6
- Apache Tomcat 7.0.41
Let’s first have a look at the final project’s structure, just to ensure that you won’t get lost anytime.
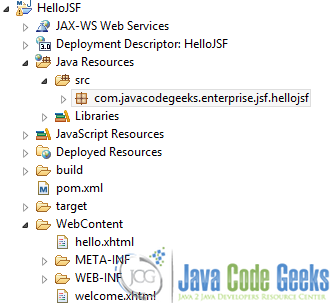
That is, just start by creating a Dynamic Web Project using Maven; I’m sure you ‘re quite experienced about how to do let’s get into the more technical part.
1. JSF 2.0 Dependencies
First, we need to configure the pom.xml file, in order to support JSF. This can be done with two ways. The first way is to add each single dependency manually, by right-clicking on the project and selecting Maven => Add Dependency; this way is accepted as easier, because you can have an auto-generated pom.xml file. The second way is what you exactly imagined, you just have to write by hand, everything that is required for this example’s purpose. So, here is the pom.xml file.
pom.xml
<project xmlns="http://maven.apache.org/POM/4.0.0" xmlns:xsi="http://www.w3.org/2001/XMLSchema-instance" xsi:schemaLocation="http://maven.apache.org/POM/4.0.0 http://maven.apache.org/xsd/maven-4.0.0.xsd">
  <modelVersion>4.0.0</modelVersion>
  <groupId>com.javacodegeeks.enterprise.jsf</groupId>
  <artifactId>hellojsf</artifactId>
  <version>0.0.1-SNAPSHOT</version>
  <packaging>war</packaging>
  <build>
    <sourceDirectory>src</sourceDirectory>
    <plugins>
      <plugin>
        <artifactId>maven-compiler-plugin</artifactId>
        <version>3.1</version>
        <configuration>
          <source>1.6</source>
          <target>1.6</target>
        </configuration>
      </plugin>
      <plugin>
        <artifactId>maven-war-plugin</artifactId>
        <version>2.3</version>
        <configuration>
          <warSourceDirectory>WebContent</warSourceDirectory>
          <failOnMissingWebXml>false</failOnMissingWebXml>
        </configuration>
      </plugin>
    </plugins>
  </build>
  <dependencies>
  	<dependency>
  		<groupId>com.sun.faces</groupId>
  		<artifactId>jsf-api</artifactId>
  		<version>2.2.4</version>
  	</dependency>
  	<dependency>
  		<groupId>com.sun.faces</groupId>
  		<artifactId>mojarra-jsf-impl</artifactId>
  		<version>2.0.0-b04</version>
  	</dependency>
  	<dependency>
  		<groupId>com.sun.faces</groupId>
  		<artifactId>mojarra-jsf-api</artifactId>
  		<version>2.0.0-b04</version>
  	</dependency>
  	<dependency>
  		<groupId>com.sun.faces</groupId>
  		<artifactId>jsf-impl</artifactId>
  		<version>2.2.4</version>
  	</dependency>
  	<dependency>
  		<groupId>javax.servlet</groupId>
  		<artifactId>jstl</artifactId>
  		<version>1.2</version>
  	</dependency>
  	<dependency>
  		<groupId>javax.servlet</groupId>
  		<artifactId>javax.servlet-api</artifactId>
  		<version>3.1.0</version>
  	</dependency>
  	<dependency>
  		<groupId>javax.servlet</groupId>
  		<artifactId>servlet-api</artifactId>
  		<version>3.0-alpha-1</version>
  	</dependency>
  	<dependency>
  		<groupId>javax.servlet.jsp</groupId>
  		<artifactId>javax.servlet.jsp-api</artifactId>
  		<version>2.3.1</version>
  	</dependency>
  </dependencies>
</project>
2. JSF Managed Bean
A Managed Bean is a regular Java Bean class, registered with JSF. In other words, Managed Bean is a java bean, managed by the JSF framework. For more information about Managed Bean, check here. From JSF 2.0 and onwards, we can declare a managed bean, just by using the annotation @ManagedBean. Let’s see how should the managed bean’s class structure be.
HelloBean.java
package com.javacodegeeks.enterprise.jsf.hellojsf;

import javax.faces.bean.ManagedBean;
import javax.faces.bean.SessionScoped;
import java.io.Serializable;

@ManagedBean
@SessionScoped
public class HelloBean implements Serializable {

	private static final long serialVersionUID = 1L;

	private String name;

	public String getName() {
		return name;
	}
	public void setName(String name) {
		this.name = name;
	}
}
Why do we need to implement the Serializable interface? Here is the absolute answer. As for the two annotations that our managed bean uses, any question that may occur, is answered here.
3. JSF Pages
In JSF, we usually treat the static content of our website, using xhtml, instead of simple html. So, follow along, in order to create our first xhtml page, which will prompt the user to enter his name in a text field and provide a button in order to redirect him to a welcome page:
- Right click on the Web Content folder
- Select New => HTML File (if you can’t find it, just select Other and the wizard will guide you through it).
- In the File Name, type
hello.xhtmland hit Next. - Select the
xhtml 1.0 stricttemplate. - Hit Finish.
Ok, good till here, but we have to do one more thing, in order to enable JSF components/features in our xhtml files: we just need to declare the JSF namespace at the beginning of our document. This is how to implement it and make sure that you ‘ll always care about it, when dealing with JSF and XHTML, together:
<html xmlns="http://www.w3.org/1999/xhtml"
xmlns:f="http://java.sun.com/jsf/core"
xmlns:h="http://java.sun.com/jsf/html">
Yeah! Now that we got everything set up, let’s move into writing the required code for our hello.xhtml file.
hello.xhtml
<?xml version="1.0" encoding="UTF-8"?>
<!DOCTYPE html PUBLIC "-//W3C//DTD XHTML 1.0 Transitional//EN"
"http://www.w3.org/TR/xhtml1/DTD/xhtml1-transitional.dtd">
<html xmlns="http://www.w3.org/1999/xhtml"
xmlns:f="http://java.sun.com/jsf/core"
xmlns:h="http://java.sun.com/jsf/html">

<h:head>
<title>First JSF Example</title>
</h:head>
<h:body>
<h3>JSF 2.2 Hello World Example</h3><h:form>
What's your name?
<h:inputText value="#{helloBean.name}"></h:inputText>
<h:commandButton value="Welcome Me" action="welcome"></h:commandButton>
</h:form>
</h:body>
</html>
What’s going on here? Nothing, absolutely nothing! As I fore-mentioned, we just have an inputText, where the user will enter his name and a button (which can be declared by using the commandButton xhtml tag), which has an interactive role by redirecting him to a welcome page, when clicked. I also know that you almost understood what the action parameter is used for: it’s the way to tell the browser where to navigate, in case our buttons gets clicked. So, here we want to navigate to the welcome page (yes, we don’t have to clarify the suffix, too; that’s why I left it as is), where the user will get a greeting from our application. Quite experienced right now, you can create by yourself the welcome.xhtml and provide a sample greeting, as below.
welcome.xhtml

<?xml version="1.0" encoding="UTF-8"?>
<!DOCTYPE html PUBLIC "-//W3C//DTD XHTML 1.0 Transitional//EN"
"http://www.w3.org/TR/xhtml1/DTD/xhtml1-transitional.dtd">
<html xmlns="http://www.w3.org/1999/xhtml"
      xmlns:h="http://java.sun.com/jsf/html">

    <h:head>
    	<title>Welcome</title>
    </h:head>
    <h:body bgcolor="white">
    	<h3>Everything went right!</h3>
    	<h4>Welcome #{helloBean.name}</h4>
    </h:body>
</html>
Did I miss something? For sure, but not really important, for you, new developers! Things were not so easy, in JSF 1.x, as we had to declare the fore-mentioned navigation rule, in faces-config.xml file. faces-config.xml allows to configure the application, managed beans, convertors, validators, and navigation. As for the navigation, while cooperating with JSF 2.0 and onwards, we can put the page name directly in the button’s “action” attribute. To get rid of any other questionmarks that may appear, please read this.
One last thing, before moving to the last project configuration: just in case you didn’t make it clear, a “#{...}” indicates a JSF expression and in this case, when the page is submitted, JSF will find the “helloBean” with the help of #{helloBean.name} expression and set the submitted inputText‘s value, through the setName() method. When welcome.xhtml page will get displayed, JSF will find the same session helloBean again and display the name property value, through the getName() method.
4. JSF 2.0 Servlet Configuration
Finally, we need to set up JSF in the web.xml file, just like we are doing in any other J2EE framework.
web.xml
<?xml version="1.0" encoding="UTF-8"?>
<web-app xmlns:xsi="http://www.w3.org/2001/XMLSchema-instance" xmlns="http://java.sun.com/xml/ns/javaee" xsi:schemaLocation="http://java.sun.com/xml/ns/javaee http://java.sun.com/xml/ns/javaee/web-app_3_0.xsd" id="WebApp_ID" version="3.0">
  <display-name>HelloJSF</display-name>
  <welcome-file-list>
    <welcome-file>faces/hello.xhtml</welcome-file>
  </welcome-file-list>
  <servlet>
    <servlet-name>Faces Servlet</servlet-name>
    <servlet-class>javax.faces.webapp.FacesServlet</servlet-class>
    <load-on-startup>1</load-on-startup>
  </servlet>
  <servlet-mapping>
    <servlet-name>Faces Servlet</servlet-name>
    <url-pattern>/faces/*</url-pattern>
  </servlet-mapping>
  <servlet-mapping>
    <servlet-name>Faces Servlet</servlet-name>
    <url-pattern>*.jsf</url-pattern>
  </servlet-mapping>
  <servlet-mapping>
    <servlet-name>Faces Servlet</servlet-name>
    <url-pattern>*.faces</url-pattern>
  </servlet-mapping>
  <servlet-mapping>
    <servlet-name>Faces Servlet</servlet-name>
    <url-pattern>*.xhtml</url-pattern>
  </servlet-mapping>
  <context-param>
    <param-name>javax.faces.PROJECT_STAGE</param-name>
    <param-value>Development</param-value>
  </context-param>
  <listener>
    <listener-class>com.sun.faces.config.ConfigureListener</listener-class>
  </listener>
</web-app>
What we actually did:
- Defined our
hello.xhtmlpage, as the first page that will be displayed, when the project’sURL, will be accessed. - Defined a
javax.faces.webapp.FacesServletmapping and mapped the application to the most used JSF file extensions (/faces/*, *.jsf, *.xhtml, *.faces).
So, all following URLs will end up to the same hello.xhtml file :
http://localhost:8080/HelloJSF/hello.jsfhttp://localhost:8080/HelloJSF/hello.faceshttp://localhost:8080/HelloJSF/hello.xhtmlhttp://localhost:8080/HelloJSF/faces/hello.xhtml
Tip: In JSF 2.0 development, it’s good to set the javax.faces.PROJECT_STAGE to Development, while you are in a “debugging” mode, ’cause it will provide many useful debugging information to let you track the bugs easily. When in deployment, you can change it to Production, because noone of us, wants his customers staring at the debugging information.
5. Demo
Thank God, time to run!
This is what you should get (don’t get confused about my port number – I just have my 8080 port, occupied):

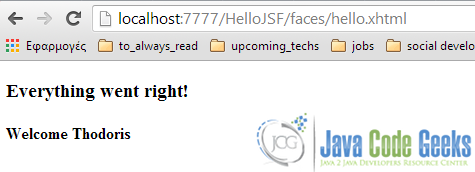
And after clicking the button:
6. Closing Words
So, that was it! Exhausting? Maybe. Interesting? Definetely! We had to dive into detail in this example, because we ‘ll keep the same structure for the next (where we ‘ll get our hands dirty with Ajax), too.
This was an example of a simple Hello World application using JSF 2.0. You can download the Eclipse Project of this example: HelloJSF
