In this example of Apache Solr Tutorial for Beginners, we will discuss about how to install the latest version of Apache Solr and show you how to configure it. Also we will show you how to perform the index using a sample data file. Apache Solr supports indexing from different source formats including various databases, PDF files, XML files, CSV files etc. For this example we will look into how to index data from a CSV file.
Our preferred environment for this example is Windows. Before you begin the Solr installation make sure you have JDK installed and Java_Home is set appropriately.
1. Why Apache Solr
Apache Solr is a powerful search server, which supports REST like API. Solr is powered by Lucene which enables powerful matching capabilities like phrases, wildcards, joins, grouping and many more across various data types. It is highly optimized for high traffic using Apache Zookeeper. Apache Solr comes with a wide set of features and we have listed a subset of high impact features.
- Advanced Full-Text search capabilities.
- Standards based on Open Interfaces – XML, JSON and Http.
- Highly scalable and fault tolerant.
- Supports both Schema and Schemaless configuration.
- Faceted Search and Filtering.
- Support major languages like English, German, Chinese, Japanese, French and many more
- Rich Document Parsing.
2. Installing Apache Solr
To begin with lets download the latest version of Apache Solr from the following location:
http://lucene.apache.org/solr/downloads.html
As of this writing, the stable version available is 5.0.0. Apache Solr has gone through various changes from 4.x.x to 5.0.0, so if you have different version of Solr you need to download the 5.x.x. version to follow this example.
Once the Solr zip file is downloaded unzip it into a folder. The extracted folder will look like the below.
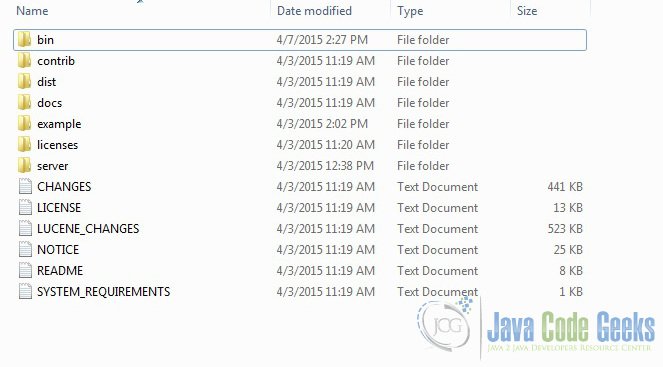
The bin folder contains the scripts to start and stop the server. The example folder contains few example files. We will be using one of them to demonstrate how Solr indexes the data. The server folder contains the logs folder where all the Solr logs are written. It will be helpful to check the logs for any error during indexing. The solr folder under server holds different collection or core. The configuration and data for each of the core/ collection are stored in the respective core/ collection folder.
Apache Solr comes with an inbuilt Jetty server. But before we start the solr instance we must validate the JAVA_HOME is set on the machine.
We can start the server using the command line script. Lets go to the bin directory from the command prompt and issue the following command
solr start
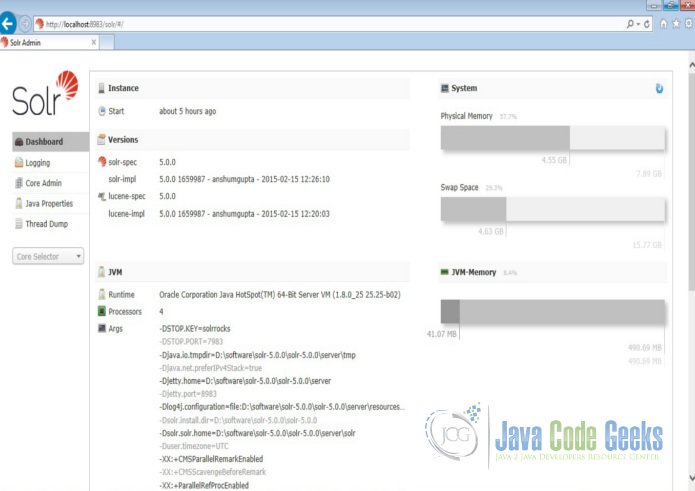
This will start the Solr server under the default port 8983.
We can now open the following URL in the browser and validate that our Solr instance is running. The specifics of solr admin tool is beyond the scope of the example.
http://localhost:8983/solr/
3. Configuring Apache Solr
In this section, we will show you how to configure the core/collection for a solr instance and how to define the fields. Apache Solr ships with an option called Schemaless mode. This option allow users to construct effective schema without manually editing the schema file. But for this example we will use the Schema configuration for understanding the internals of the Solr.
3.1 Creating a Core
When the Solr server is started in Standalone mode the configuration is called core and when it is started in SolrCloud mode the configuration is called Collection. In this example we will discuss about the standalone server and core. We will park the SolrCloud discussion for later time.
First, we need to create a Core for indexing the data. The Solr create command has the following options:
- -c <name> – Name of the core or collection to create (required).
- -d <confdir> – The configuration directory, useful in the SolrCloud mode.
- -n <configName> – The configuration name. This defaults to the same name as the core or collection.
- -p <port> – Port of a local Solr instance to send the create command to; by default the script tries to detect the port by looking for running Solr instances.
- -s <shards> – Number of shards to split a collection into, default is 1.
- -rf <replicas> – Number of copies of each document in the collection. The default is 1.
In this example we will use the -c parameter for core name and -d parameter for the configuration directory. For all other parameters we make use of default settings.
Now navigate the solr-5.0.0\bin folder in the command window and issue the following command.
solr create -c jcg -d basic_configs
We can see the following output in the command window.
Creating new core 'jcg' using command:
http://localhost:8983/solr/admin/cores?action=CREATE&name=jcg&instanceDir=jcg
{
"responseHeader":{
"status":0,
"QTime":663},
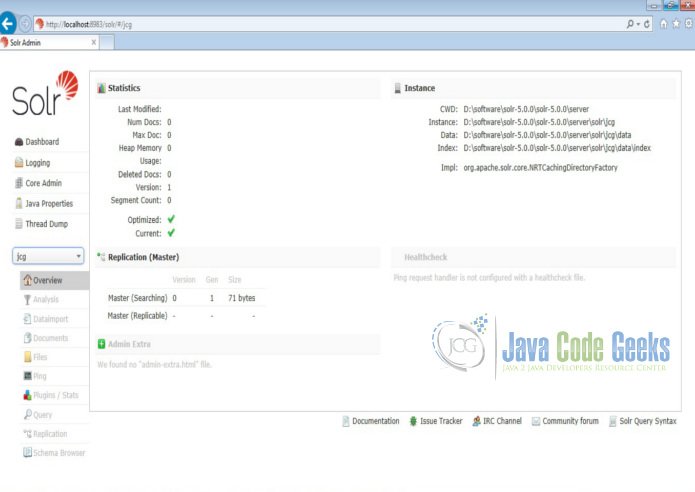
"core":"jcg"}Now we navigate to the following URL and we can see jcg core being populated in the core selector. You can also see the statistics of the core.
http://localhost:8983/solr
3.2 Modify the schema.xml file
We need to modify the schema.xml file under the folder server\solr\jcg\conf to include the fields. We will use one of the example file “books.csv” shipped along with Solr installation for indexing. The file is located under the folder solr-5.0.0\example\exampledocs
Now we navigate to the folder server\solr directory. You will see a folder called jcg created. The sub-folders namely conf and data have the core’s configuration and indexed data respectively.
Now edit the schema.xml file in the \server\solr\jcg\conf folder and add the following contents after the uniqueKey element.
schema.xml
 <uniqueKey>id</uniqueKey>
 <!-- Fields added for books.csv load-->
 <field name="cat" type="text_general" indexed="true" stored="true"/>
 <field name="name" type="text_general" indexed="true" stored="true"/>
 <field name="price" type="tdouble" indexed="true" stored="true"/>
 <field name="inStock" type="boolean" indexed="true" stored="true"/>
 <field name="author" type="text_general" indexed="true" stored="true"/>
We have set the attribute indexed to true. This specifies the field is used for indexing and the record can be retrieved using the index. Setting the value to false will make the field only stored but can’t be queried with.
Also note we have another attribute called stored and set it to true. This specifies the field is stored and can be returned in the output. Setting this field to false will make the field only indexed and can’t be retrieved in output.
We have assigned the type for the fields present in the “books.csv” file here. The first field in the CSV file “id” is automatically taken care by the uniqueKey element of schema.xml file for indexing. If you note, we have missed the fields series_t, sequence_i and genre_s without making any entry. But, when we perform indexing all these fields are also indexed without any issue. If you wonder how that happens take a closer look at the dynamicField section in schema.xml file.
schema.xml
 <dynamicField name="*_i" type="int" indexed="true" stored="true"/>
 <dynamicField name="*_is" type="ints" indexed="true" stored="true"/>
 <dynamicField name="*_s" type="string" indexed="true" stored="true" />
 <dynamicField name="*_ss" type="strings" indexed="true" stored="true"/>
 <dynamicField name="*_l" type="long" indexed="true" stored="true"/>
 <dynamicField name="*_ls" type="longs" indexed="true" stored="true"/>
 <dynamicField name="*_t" type="text_general" indexed="true" stored="true"/>
 <dynamicField name="*_txt" type="text_general" indexed="true" stored="true"/>
 <dynamicField name="*_b" type="boolean" indexed="true" stored="true"/>
 <dynamicField name="*_bs" type="booleans" indexed="true" stored="true"/>
 <dynamicField name="*_f" type="float" indexed="true" stored="true"/>
 <dynamicField name="*_fs" type="floats" indexed="true" stored="true"/>
 <dynamicField name="*_d" type="double" indexed="true" stored="true"/>
 <dynamicField name="*_ds" type="doubles" indexed="true" stored="true"/>
Since we have modified the configuration we have to stop and start the server. To do so, we need to issue the following command from bin directory through command line.
solr stop -all
The server will be stopped now. Now to start the server issue the following command from bin directory through command line.
solr start
4. Indexing the Data
Apache Solr comes with a Standalone Java program called the SimplePostTool. This program is packaged into JAR and available with the installation under the folder example\exampledocs.
Now we navigate to the example\exampledocs folder in the command prompt and type the following command. You will see a bunch of options to use the tool.
java -jar post.jar -h
The usage format in general is as follows
Usage: java [SystemProperties] -jar post.jar [-h|-] [<file|folder|url|arg>

[<file|folder|url|arg>...]]
As we said earlier, we will index the data present in the “books.csv” file shipped with Solr installation. We will navigate to the solr-5.0.0\example\exampledocs in the command prompt and issue the following command.
java -Dtype=text/csv -Durl=http://localhost:8983/solr/jcg/update -jar post.jar books.csv
The SystemProperties used here are:
- -Dtype – the type of the data file.
- -Durl – URL for the jcg core.
The file “books.csv” will now be indexed and the command prompt will display the following output.
SimplePostTool version 5.0.0
Posting files to [base] url http://localhost:8983/solr/jcg/update using content-
type text/csv...
POSTing file books.csv to [base]
1 files indexed.
COMMITting Solr index changes to http://localhost:8983/solr/jcg/update...
Time spent: 0:00:00.647
Now we navigate to the following URL and select the core jcg.
http://localhost:8983/solr

Take a closer look at the statistics section, the Num Docs parameter will show the count of the rows indexed.
5. Access the Indexed documents
Apache Solr provides a REST based API to access the data and also provides different parameters to retrieve the data. We will show you few scenario based queries.
5.1 Search by name
We will retrieve the details of the book by its name. To do so, we will use the following syntax. The parameter “q” in the URL is the query event.
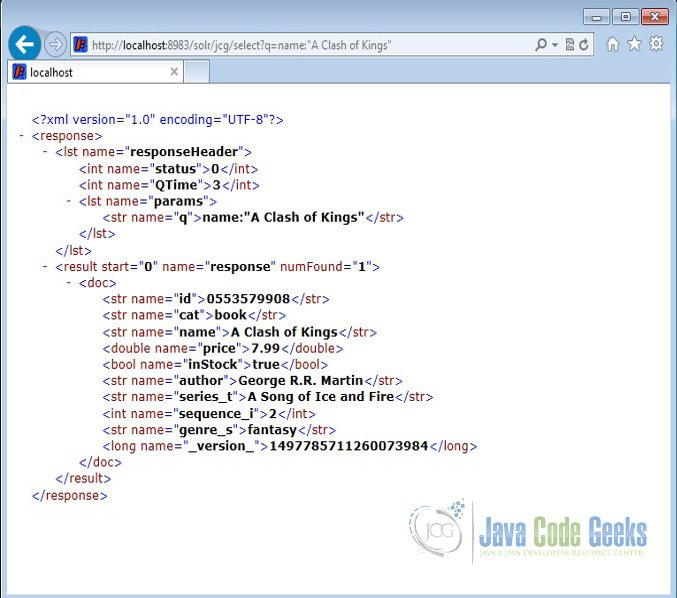
Open the following URL in a browser.
http://localhost:8983/solr/jcg/select?q=name:"A Clash of Kings"
The output will be as shown below.
5.2 Search by starting letter
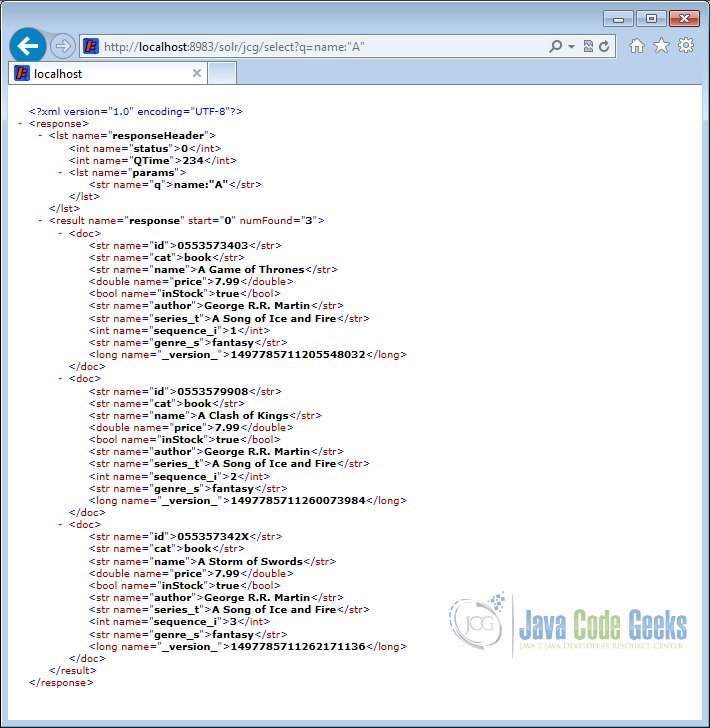
Now we will show you how to search for the record if we know only the starting letter or word and don’t remember the full title. We can use the following query to retrieve the result.
http://localhost:8983/solr/jcg/select?q=name:"A"
The output will list all the books staring with letter A.
5.3 Search using wildcard
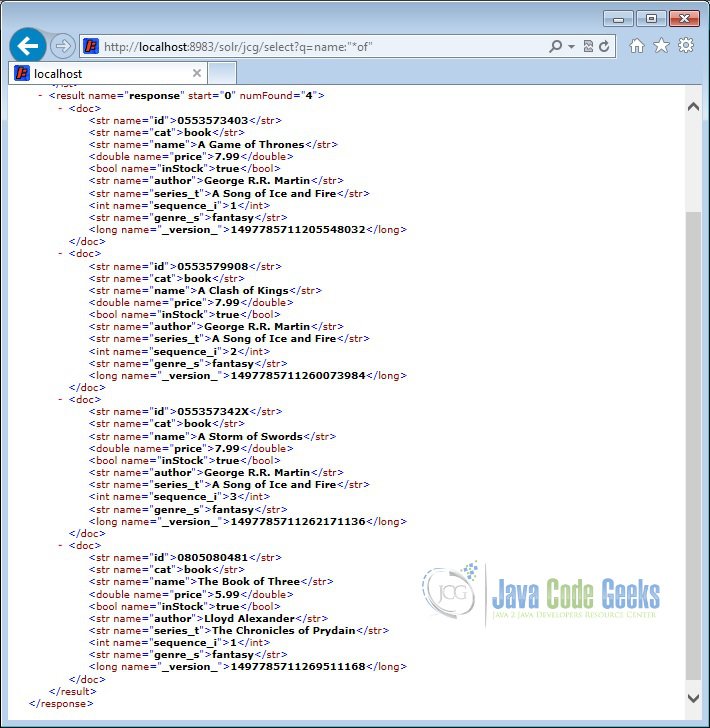
Solr supports wildcard search. We will show in the following query how to retrieve all the books which contains the word “of” in the name.
http://localhost:8983/solr/jcg/select?q=name:"*of"
The output will list all the books with the word “of” present in it.
5.4 Search using a condition
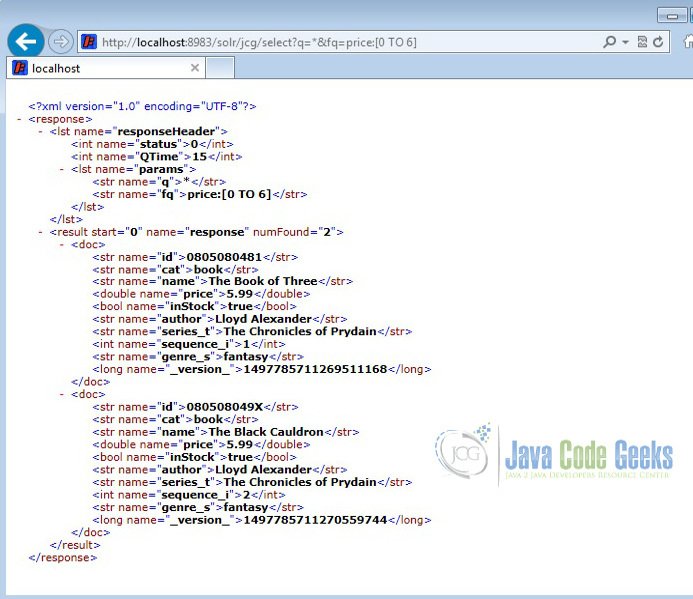
Solr supports conditional search. It provides “fq” parameter using which, we can set condition to our query. We will show you how to find books which are priced less than $6 in the following query.
http://localhost:8983/solr/jcg/select?q=*&fq=price:[0 TO 6]
The output will list only the books which are less than $6.
6. Solr Client API’s
There are different client API’s available to connect to the Solr server. We have listed a few widely used Solr client API’s.
- SolRuby – To connect from Ruby
- SolPHP – To connect from PHP
- PySolr – To connect from Python
- SolPerl – To connect from Perl
- SolrJ – To connect from Java
- SolrSharp – To connect from C#
Also Solr provides the REST based API which can be directly consumed using the JavaScript.
7. Download the Schema file
This was a tutorial on Apache Solr for beginners.
You can download the schema file here : Solr schema file

Very useful article. Thanks for posting. In section 3.2 modify the schema.xml file you mention that Solr has to be stopped and restarted for the changes to take effect. In case you want to index several csv files with different fields and formats wont this be a nuisance, especially if there are multiple users and a variety of csv files and other file formats? How do we scale for a multi-tenant architecture?
Thank you for this tutoriel it was VERY useful .