In this example, we will demonstrate the use of Response Assertion in Apache JMeter.
We will go about executing one simple test that will depict the result of our configured Response Assertion on a sampler.
Before we look at the usage of Response Assertion, let’s look at the concept:
1. Introduction
Apache JMeter is an open source Java based tool that enables you to perform functional, load, performance and regression tests on an application. The application may be running on a Web server or it could be a standalone in nature. It supports testing on both client-server and web model containing static and dynamic resources. It supports wide variety of protocols for conducting tests that includes, HTTP, HTTPS, JDBC, FTP, JMS, LDAP, SOAP etc.
A quick look at some of the features:
- It provides a comprehensive GUI based workbench to play around with tests. It also allows you to work in a non-GUI mode. JMeter can also be ported on the server allowing to perform tests in a distributed environment.
- It provides a concept of template which are pre-defined test plans for various schemes or protocols that can be directly used to create your required test plan.
- It enables you to build test plan structurally using powerful features like Thread Group, Controllers, Samplers, Listeners etc.
- It provides debugging and error monitoring through effective logging.
- It supports parameterized testing through the concept of variables
- It supports creation of different flavors of test plan that includes Web, Database, FTP, LDAP, Web service, JMS, Monitors etc.
- It allows for remote testing by having different JMeter instances running as servers across nodes and accessed from a single client application.
- It gives you real time test results that covers metrics like latency, throughput, response times, active threads etc.
- It enables you to perform testing based on regular expressions and many more other features.
1.1. What is an Assertion?
Assertions are statements that asserts the result of the test, whether positive or negative. It is like saying, ‘I assert that the output of the test contains a text string hello’ (positive assertion), or ‘I assert that the output of the test will not contain the text string hello’ (negative assertion). Assertions are one form of verifying your test result. If the test output does not match what you assert, then the test is considered failed.
1.2. Assertions in JMeter
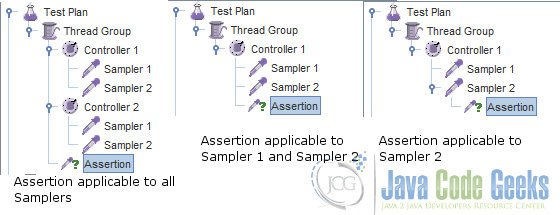
Assertions in JMeter can be applied to Test Plan, ThreadGroup, Controllers and Samplers. It is a way to scope your assertions. Assertions applied to the parent element of test plan tree is available to its child elements. When it is applied to child elements, it becomes more specific and will not be available to parent element but will be available to its children nodes. The below figure shows assertion scoping:
Types of Assertions supported in JMeter
- Size Assertion – Verifies the size of the response.
- Compare Assertion – Verifies the response content and time of all the samplers to which this assertion is applied.
- Duration Assertion – Verifies the response time.
- HTML Assertion – Verifies response for different HTML formats (that includes XHTML and XML).
- MD5Hex Assertion – Verifies the MD5Hex hash of the response data.
- Response Assertion – Verifies the content and different aspects of the response data.
- SMIME Assertion – Verifies response from Mail Reader Sampler whether secured or not and optionally verifies signer certificate.
- XML Assertion – Verifies whether the response data is in the form of XML or not.
- XML Schema Assertion – Verifies the response against the specified XML schema.
- XPath Assertion – Verifies XML response against the XPath expression.
The following assertions are defined by writing scripts using Beanshell/Groovy/BSF and scripts that supports JSR 223 specification:
- Bean Shell Assertion
- BSF Assertion
- JSR223 Assertion
This article will focus only on the Response Assertion.
1.3. What is Response Assertion?
Response Assertion is the most widely used assertion as it allows you to verify the content of the response which is what is usually required from the test. It verifies different segments of the response like text (response body), document (doc, pdf), response code (200, 404), response message (description of code) and response headers. It allows you to test the response against a pattern string which can be a plain text or a Perl5 regular expression. The pattern specified is matched against the selected segment of the response. It also allows you to define the pattern matching rules. For example, whether the specified pattern is ‘contained’ in the response or exactly ‘is equal’ to the response or ‘matches’ the response. You can also provide negative assertion like if the pattern ‘does not match’ the response. The assertion can be made negative by checking the Not field.
1.4. Viewing Response Assertion Results
After defining the Response Assertion and its matching rules, you perform the test and see the results. The results of the assertion can be viewed by adding or configuring Assertion Results listener. The Assertion Results visualizer will show the result of assertions whether passed or failed against each Sampler to which the assertion is configured.
2. Response Assertion By Example
We will now demonstrate the use of Response Assertion by defining it as part of test plan and then running the test. The test plan that we will create will invoke a JCG home page (www.javacodegeeks.com).
2.1. JMeter installation and setup
Before installing JMeter, make sure you have JDK 1.6 or higher installed. Download the latest release of JMeter using the link here. At the time of writing this article, the current release of JMeter is 2.13. To install, simply unzip the archive into your home directory where you want JMeter to be installed. Set the JAVA_HOME environment variable to point to JDK root folder. After unzipping the archive, navigate to /bin folder and run the command jmeter. For Windows, you can run using the command window. This will open JMeter GUI window that will allow you to build the test plan.
2.2. Configuring Response Assertion
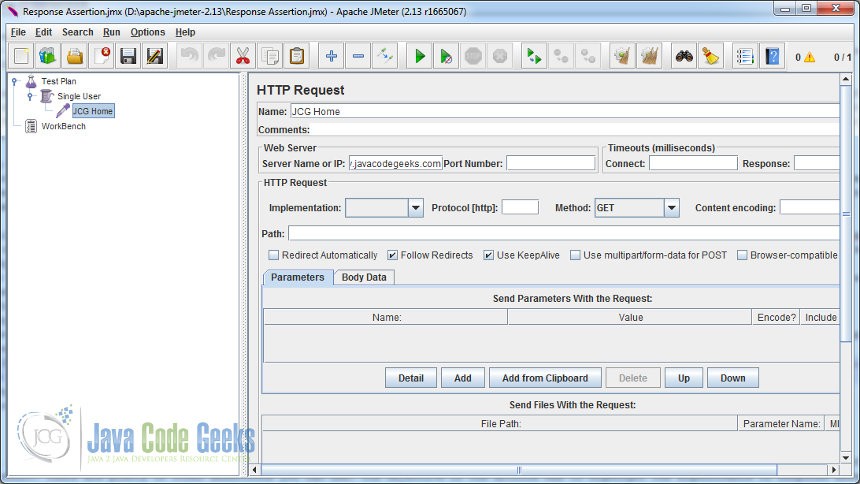
Before we configure Response Assertion, we will create a test plan with a ThreadGroup named ‘Single User’ and a HTTP Request Sampler named ‘JCG Home’. It will point to the server ‘www.javacodegeeks.com’. For more details on creating ThreadGroup and related elements, you can view the article JMeter Thread Group Example. The below image shows the configured ThreadGroup (Single User) and HTTP Request Sampler (JCG Home).
Next, we will define a positive assertion by checking the response code. When the test is executed, it will ping the web site named www.javacodegeeks.com and return the response code as 200 which is OK. It means the site is valid. Right click on JCG Home Sampler and select Add -> Assertions -> Response Assertion.
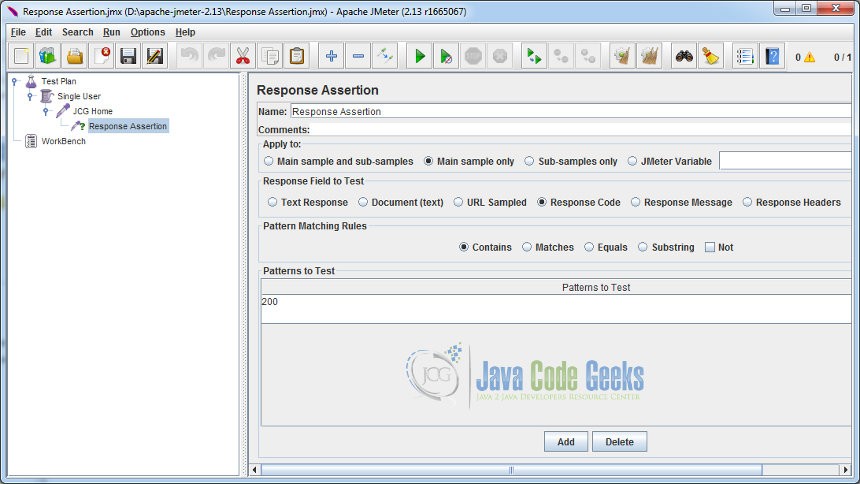
We will add the string pattern ‘200’ and select Contains as the matching rules. The response field selected will be Response Code. It means that we assert that the test result will return the response code as 200.
Now we configure the Assertion Results. Right click on JCG Home Sampler and select Add -> Listener -> Assertion Results.

Run the test and you will see the above output in the Assertion Result visualizer. It displays our sampler name ‘JCG Home’ and nothing else is displayed. It means our test is passed. What we asserted was true.
Now in the JCG Home sampler, change the server to ‘javacooodegeeks.com’ (see the extra ‘oo’). Obviously, there is no such site named ‘javacooodegeeks.com’. So when you run the test, the test will fail with the following message.
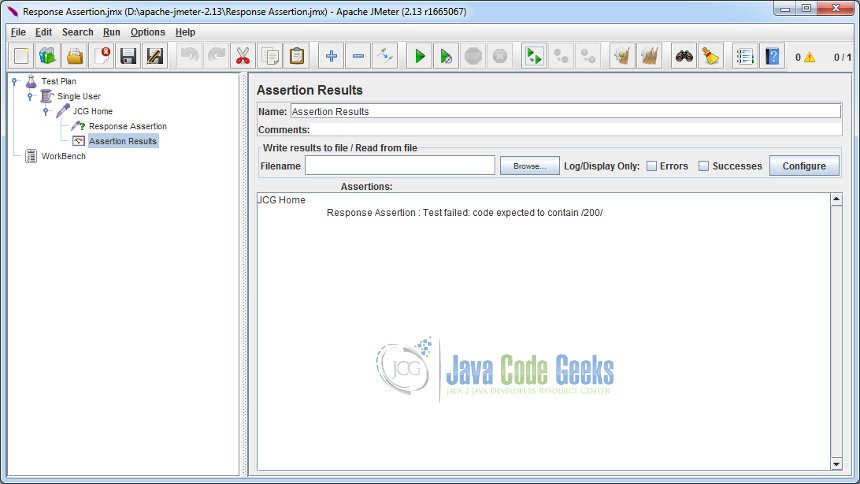
Our assertion was that the response code should be 200. But here the website was not found therefore it returned the response code other than 200. So the test failed.
3. Conclusion
As you see, assertions are very important when you want to verify the test result. Response Assertion is a very handy feature that can give you all the means and ways of verifying your test results. There are plenty of other assertions you can use. The objective of the article was to highlight the significance of Response Assertion during the test run.
