This is a ListView Example. ListView is used to allow a user to select one item or multiple items from a list of items. Each item in a ListView is represented by an instance of the ListCell class, which can be customized.
The items list in a ListView may contain any type of objects. ListView is a parameterized class. The parameter type is the type of the items in the list.
The following table shows an overview of the whole tutorial:
Table Of Contents
The following examples uses Java SE 7 and JavaFX 2.2.
1. Introduction
1.1 The Code
FxListViewExample1.java
import javafx.application.Application;
import javafx.beans.value.ChangeListener;
import javafx.beans.value.ObservableValue;
import javafx.collections.FXCollections;
import javafx.collections.ObservableList;
import javafx.geometry.Orientation;
import javafx.scene.Scene;
import javafx.scene.control.Label;
import javafx.scene.control.ListView;
import javafx.scene.control.TextArea;
import javafx.scene.layout.GridPane;
import javafx.scene.layout.VBox;
import javafx.stage.Stage;

public class FxListViewExample1 extends Application
{
	// Declaring the TextArea for Logging
	TextArea logging;

	public static void main(String[] args)
	{
		Application.launch(args);
	}

	@Override
	public void start(Stage stage)
	{
		// Create the TextArea
		logging = new TextArea();
		logging.setMaxWidth(300);
		logging.setMaxHeight(150);

		// Create the Labels
		Label seasonLbl = new Label("Select Season: ");
		Label fruitLbl = new Label("Select Fruit: ");

		// Create the Lists for the ListViews
		ObservableList<String> seasonList = FXCollections.<String>observableArrayList("Spring", "Summer", "Fall", "Winter");
		ObservableList<String> fruitList = FXCollections.<String>observableArrayList("Apple", "Banana", "Orange", "Mango");

		// Create the ListView for the seasons
		ListView<String> seasons = new ListView<>(seasonList);
		// Set the Orientation of the ListView
		seasons.setOrientation(Orientation.VERTICAL);
		// Set the Size of the ListView
		seasons.setPrefSize(120, 100);

		// Update the TextArea when the selected season changes
		seasons.getSelectionModel().selectedItemProperty().addListener(new ChangeListener<String>()
		{
		    public void changed(ObservableValue<? extends String> ov,
		            final String oldvalue, final String newvalue)
		    {
		    	seasonChanged(ov, oldvalue, newvalue);
        }});

		// Create the ListView for the fruits
		ListView<String> fruits = new ListView<String>();
		// Set the Orientation of the ListView
		fruits.setOrientation(Orientation.HORIZONTAL);
		// Set the Size of the ListView
		fruits.setPrefSize(200, 100);
		// Add the items to the ListView
		fruits.getItems().addAll(fruitList);

		// Update the message Label when the selected fruit changes
		fruits.getSelectionModel().selectedItemProperty().addListener(new ChangeListener<String>()
		{
		    public void changed(ObservableValue<? extends String> ov,
		            final String oldvalue, final String newvalue)
		    {
		    	fruitChanged(ov, oldvalue, newvalue);
        }});

		// Create the Season VBox
		VBox seasonSelection = new VBox();
		// Set Spacing to 10 pixels
		seasonSelection.setSpacing(10);
		// Add the Label and the List to the VBox
		seasonSelection.getChildren().addAll(seasonLbl,seasons);

		// Create the Fruit VBox
		VBox fruitSelection = new VBox();
		// Set Spacing to 10 pixels
		fruitSelection.setSpacing(10);
		// Add the Label and the List to the VBox
		fruitSelection.getChildren().addAll(fruitLbl,fruits);

		// Create the GridPane
		GridPane pane = new GridPane();
		// Set the horizontal and vertical gaps between children
		pane.setHgap(10);
		pane.setVgap(5);
		// Add the Season List at position 0
		pane.addColumn(0, seasonSelection);
		// Add the Fruit List at position 1
		pane.addColumn(1, fruitSelection);
		// Add the TextArea at position 2
		pane.addColumn(2, logging);

		// Set the Style-properties of the GridPane
		pane.setStyle("-fx-padding: 10;" +
			"-fx-border-style: solid inside;" +
			"-fx-border-width: 2;" +
			"-fx-border-insets: 5;" +
			"-fx-border-radius: 5;" +
			"-fx-border-color: blue;");

		// Create the Scene
		Scene scene = new Scene(pane);
		// Add the Scene to the Stage
		stage.setScene(scene);
		// Set the Title
		stage.setTitle("A simple ListView Example");
		// Display the Stage
		stage.show();
	}

	// Method to display the Season, which has been changed
	public void seasonChanged(ObservableValue<? extends String> observable,String oldValue,String newValue)
	{
		String oldText = oldValue == null ? "null" : oldValue.toString();
		String newText = newValue == null ? "null" : newValue.toString();

		logging.appendText("Season changed: old = " + oldText + ", new = " + newText + "\n");
	}

	// Method to display the Fruit, which has been changed
	public void fruitChanged(ObservableValue<? extends String> observable,String oldValue,String newValue)
	{
		String oldText = oldValue == null ? "null" : oldValue.toString();
		String newText = newValue == null ? "null" : newValue.toString();

		logging.appendText("Fruit changed: old = " + oldText + ", new = " + newText + "\n");
	}


}
1.2 Understanding the ListView Control
You can specify the list items while creating a ListView, as in the following code:
// Create the Lists for the ListViews
ObservableList<String> seasonList = FXCollections.<String>observableArrayList("Spring", "Summer", "Fall", "Winter");

// Create the ListView for the seasons
ListView<String> seasons = new ListView<>(seasonList);
After you create a ListView, you can add items to its list of items using the items property, which is of the ObjectProperty<ObservableList<T>> type in which T is the type parameter for the ListView, as in the following code:
// Create the Lists for the ListViews
ObservableList<String> fruitList = FXCollections.<String>observableArrayList("Apple", "Banana", "Orange", "Mango");

// Create the ListView for the fruits
ListView<String> fruits = new ListView<String>();
fruits.getItems().addAll(fruitList);
ListView sets its preferred width and height, which are normally not the width and height that you want for your control. It would have helped developers if the control had provided a property such as visibleItemCount. Unfortunately, the ListView API does not support such a property. You need to set them to reasonable values in your code, as follows:
// Set the Size of the ListView
seasons.setPrefSize(120, 100);
If the space needed to display items is larger than what is available, a vertical, a horizontal, or both scrollbars are automatically added.
1.3 Orientation of a ListView
The items in a ListView may be arranged vertically in a single column (default) or horizontally in a single row. It is controlled by the orientation property, as shown in the following code:
// Set the Orientation of the ListView
seasons.setOrientation(Orientation.VERTICAL);

// Set the Orientation of the ListView
fruits.setOrientation(Orientation.HORIZONTAL);
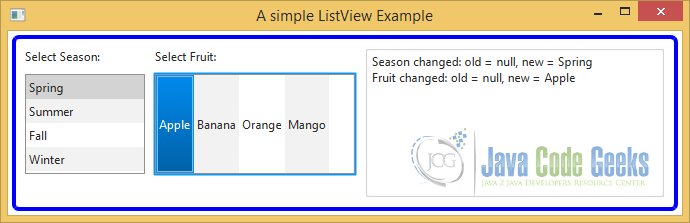
The above example shows two instances of ListView. One uses vertical orientation and the other horizontal orientation.
1.4 The GUI
The following GUI shows an example of two Listiews with two different Orientations:
2. Selection Model in ListView
2.1 The Code
FxListViewExample2.java
import java.util.ArrayList;
import javafx.application.Application;
import javafx.beans.value.ChangeListener;
import javafx.beans.value.ObservableValue;
import javafx.event.ActionEvent;
import javafx.event.EventHandler;
import javafx.scene.Scene;
import javafx.scene.control.Button;
import javafx.scene.control.Label;
import javafx.scene.control.ListView;
import javafx.scene.control.SelectionMode;
import javafx.scene.control.TextArea;
import javafx.scene.layout.GridPane;
import javafx.scene.layout.HBox;
import javafx.scene.layout.VBox;
import javafx.stage.Stage;

public class FxListViewExample2 extends Application
{
	// Declaring the TextArea for Logging
	TextArea logging;

	public static void main(String[] args)
	{
		Application.launch(args);
	}

	@Override
	public void start(Stage stage)
	{
		// Create the TextArea
		logging = new TextArea();
		logging.setMaxWidth(350);
		logging.setMaxHeight(350);

		// Create the Label
		Label monthsLbl = new Label("Select Month: ");

		// Create the ListView
		final ListView<String> months = new ListView<>();
		// Add the items to the List
		months.getItems().addAll(createMonthList());
		// Set the size of the ListView
		months.setPrefSize(120, 120);
		// Enable multiple selection
		months.getSelectionModel().setSelectionMode(SelectionMode.MULTIPLE);

		// Update the message Label when the selected item changes
		months.getSelectionModel().selectedItemProperty().addListener(new ChangeListener<String>()
		{
		    public void changed(ObservableValue<? extends String> ov,
		            final String oldvalue, final String newvalue)
		    {
		    	monthChanged(ov, oldvalue, newvalue);
        }});

		// Create the HBox for the Months
		HBox monthsSelection = new HBox();
		// Set Spacing to 10 pixels
		monthsSelection.setSpacing(10);
		// Add the Label and the List to the HBox
		monthsSelection.getChildren().addAll(monthsLbl, months);

		// Create some buttons to assist in selection
		Button selectAllBtn = new Button("Select All");
		Button clearAllBtn = new Button("Clear All");
		Button selectFirstBtn = new Button("Select First");
		Button selectLastBtn = new Button("Select Last");
		Button selectNextBtn = new Button("Select Next");
		Button selectPreviousBtn = new Button("Select Previous");

		// Let all buttons expand as needed
		selectAllBtn.setMaxWidth(Double.MAX_VALUE);
		clearAllBtn.setMaxWidth(Double.MAX_VALUE);
		selectFirstBtn.setMaxWidth(Double.MAX_VALUE);
		selectLastBtn.setMaxWidth(Double.MAX_VALUE);
		selectNextBtn.setMaxWidth(Double.MAX_VALUE);
		selectPreviousBtn.setMaxWidth(Double.MAX_VALUE);

		// Update the TextArea when all items will be selected
		selectAllBtn.setOnAction(new EventHandler<ActionEvent>()
		{
            @Override public void handle(ActionEvent e)
            {
            	months.getSelectionModel().selectAll();
            }
        });

		// Update the TextArea when the selection will be deleted
		clearAllBtn.setOnAction(new EventHandler<ActionEvent>()
		{
            @Override public void handle(ActionEvent e)
            {
            	months.getSelectionModel().clearSelection();
            }
        });

		// Update the TextArea when the first item will be selected
		selectFirstBtn.setOnAction(new EventHandler<ActionEvent>()
		{
            @Override public void handle(ActionEvent e)
            {
            	months.getSelectionModel().selectFirst();
            }
        });

		// Update the TextArea when the last item will be selected
		selectLastBtn.setOnAction(new EventHandler<ActionEvent>()
		{
            @Override public void handle(ActionEvent e)
            {
            	months.getSelectionModel().selectLast();
            }
        });

		// Update the TextArea when the next item will be selected
		selectNextBtn.setOnAction(new EventHandler<ActionEvent>()
		{
            @Override public void handle(ActionEvent e)
            {
            	months.getSelectionModel().selectNext();
            }
        });

		// Update the TextArea when the previous item will be selected
		selectPreviousBtn.setOnAction(new EventHandler<ActionEvent>()
		{
            @Override public void handle(ActionEvent e)
            {
            	months.getSelectionModel().selectPrevious();
            }
        });

		// Create the VBox for the Buttons
		VBox buttons = new VBox();
		// Add the Buttons to the VBox
		buttons.getChildren().addAll(selectFirstBtn,selectLastBtn,selectNextBtn,
				selectPreviousBtn,selectAllBtn,clearAllBtn);

		// Create the Selection HBox
		HBox selection = new HBox();
		// Set Spacing to 10 pixels
		selection.setSpacing(10);
		// Add the List and the Buttons to the HBox
		selection.getChildren().addAll(monthsSelection,buttons);

		// Create the GridPane
		GridPane pane = new GridPane();
		// Set the horizontal and vertical gaps between children
		pane.setHgap(10);
		pane.setVgap(5);
		// Add the HBox to the GridPane at position 0
		pane.addColumn(0, selection);
		// Add the Buttons to the GridPane at position 1
		pane.addColumn(1, buttons);

		// Create the VBox
		VBox root = new VBox();
		// Set Spacing to 10 pixels
		root.setSpacing(10);
		// Add the GridPane and the TextArea to the VBox
		root.getChildren().addAll(pane,logging);

		// Set the Style-properties of the VBox
		root.setStyle("-fx-padding: 10;" +
				"-fx-border-style: solid inside;" +
				"-fx-border-width: 2;" +
				"-fx-border-insets: 5;" +
				"-fx-border-radius: 5;" +
				"-fx-border-color: blue;");

		// Create the Scene
		Scene scene = new Scene(root);
		// Add the Scene to the Stage
		stage.setScene(scene);
		// Set the Title
		stage.setTitle("A ListView Example with a Selection Model");
		// Display the Stage
		stage.show();
	}

	// Helper-Method to create an ArrayList of Persons
	private ArrayList<String> createMonthList()
	{
		ArrayList<String> months = new ArrayList<String>();

		months.add("January");
		months.add("February");
		months.add("March");
		months.add("April");
		months.add("May");
		months.add("June");
		months.add("July");
		months.add("August");
		months.add("September");
		months.add("October");
		months.add("November");
		months.add("December");

		return months;
	}

	// Method to display the Data, which has been changed
	public void monthChanged(ObservableValue<? extends String> observable,String oldValue,String newValue)
	{
		String oldText = oldValue == null ? "null" : oldValue.toString();
		String newText = newValue == null ? "null" : newValue.toString();

		logging.appendText("Itemchanged: old = " + oldText + ", new = " + newText + "\n");
	}

}
ListView has a selection model that stores the selected state of its items. Its selectionModel property stores the reference of the selection model. By default, it uses an instance of the MultipleSelectionModel class. You can use a custom selection model, however, that is rarely needed. The selection model can be configured to work in two modes:
- Single selection mode
- Multiple selection mode
In single selection mode, only one item can be selected at a time. If an item is selected, the previously selected item is deselected. By default, a ListView supports single selection mode. An item can be selected using a mouse or a keyboard. You can select an item using a mouse-click. Using a keyboard to select an item requires that the ListView has focus. You can use the up/down arrow in a vertical ListView and the left/right arrow in a horizontal ListView to select items.
In multiple selection mode, multiple items can be selected at a time. Using only a mouse lets you select only one item at a time. Clicking an item selects the item. Clicking an item with the Shift key pressed selects all contiguous items. Clicking an item with the Ctrl key pressed selects a deselected item. You can use the up/down or left/right arrow key to navigate and the Ctrl key with the spacebar or Shift key with the spacebar to select multiple items. If you want a ListView to operate in multiple selection mode, you need to set the selectionMode property of its selection model, as in the following code:
// Enable multiple selection
months.getSelectionModel().setSelectionMode(SelectionMode.MULTIPLE);
The MultipleSelectionModel class inherits from the SelectionModel class, which contains selectedIndex and selectedItem properties.
The selectedIndex property is -1 if there is no selection. In single selection mode, it is the index of the currently selected item. In multiple selection mode, it is the index of the last selected item. In multiple selection mode, use the getSelectedIndices() method that returns a read-only ObservableList containing the indices of all selected items. If you are interested in listening for selection change in a ListView, you can add a ChangeListener to the selectedIndex property or a ListChangeListener to the ObservableList returned by the getSelectedIndices() method.
The selectedItem property is null if there is no selection. In single selection mode, it is the currently selected item. In multiple selection mode, it is the last selected item. In multiple selection mode, use the getSelectedItems() method that returns a read-only ObservableList containing all selected items. If you are interested in listening for selection change in a ListView, you can add a ChangeListener to the selectedItem property or a ListChangeListener to the ObservableList returned by the getSelectedItems() method.
The selection model of ListView contains several methods to select items in different ways:
- The selectAll() method selects all items.
- The selectFirst() and selectLast() methods select the first item and the last item, respectively.
- The selectIndices(int index, int… indices) method selects items at the specified indices. Indices outside the valid range are ignored.
- The selectRange(int start, int end) method selects all indices from the start index (inclusive) to the end index (exclusive).
- The clearSelection() and clearSelection(int index) methods clear all selection and the selection at the specified index, respectively.
The folowing code snippet demonstrates how to use the selection model of a ListView for making selections and listening for selection change events.
// Update the TextArea when all items will be selected
selectAllBtn.setOnAction(new EventHandler<ActionEvent>()
{
	@Override public void handle(ActionEvent e)
	{
		months.getSelectionModel().selectAll();
	}
});

// Update the TextArea when the selection will be deleted
clearAllBtn.setOnAction(new EventHandler<ActionEvent>()
{
	@Override public void handle(ActionEvent e)
	{
		months.getSelectionModel().clearSelection();
	}
});

// Update the TextArea when the first item will be selected
selectFirstBtn.setOnAction(new EventHandler<ActionEvent>()
{
	@Override public void handle(ActionEvent e)
	{
		months.getSelectionModel().selectFirst();
	}
});

// Update the TextArea when the last item will be selected
selectLastBtn.setOnAction(new EventHandler<ActionEvent>()
{
	@Override public void handle(ActionEvent e)
	{
		months.getSelectionModel().selectLast();
	}
});

// Update the TextArea when the next item will be selected
selectNextBtn.setOnAction(new EventHandler<ActionEvent>()
{
	@Override public void handle(ActionEvent e)
	{
		months.getSelectionModel().selectNext();
	}
});

// Update the TextArea when the previous item will be selected
selectPreviousBtn.setOnAction(new EventHandler<ActionEvent>()
{
	@Override public void handle(ActionEvent e)
	{
		months.getSelectionModel().selectPrevious();
	}
});
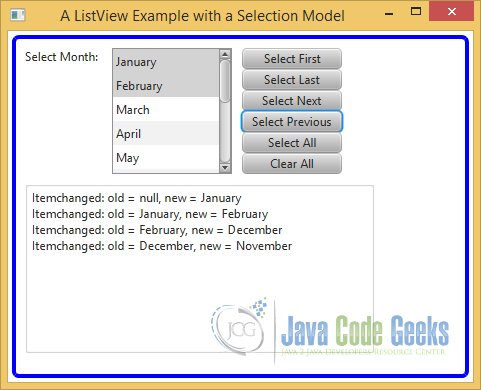
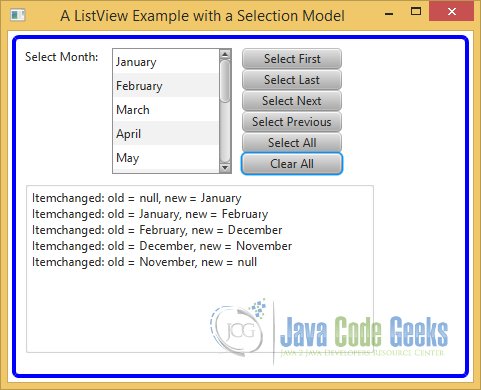
2.2 The GUI
After starting the “SelectFirst”, “SelectNext” and other buttons were pressed:
The following Image shows the GUI after pressing the button “ClearAll”
3. Using Cell Factory in ListView
3.1 The Person Class
The Person class contains only the attributes first name and last name of a person. The class also supports a Constructor, Getters and Setters for each attribute and a toString Method.
Person.java
public class Person
{
	// Declaring the attributes
	private String firstName;
	private String lastName;

	public Person(String firstName, String lastName)
	{
		this.firstName = firstName;
		this.lastName = lastName;
	}

	public String getFirstName()
	{
		return firstName;
	}

	public void setFirstName(String firstName)
	{
		this.firstName = firstName;
	}

	public String getLastName()
	{
		return lastName;
	}

	public void setLastName(String lastName)
	{
		this.lastName = lastName;
	}

	@Override
	public String toString()
	{
		return firstName + " " + lastName;
	}
}
3.2 The Person Cell Class
The following code declares a PersonCell class, which inherits from the ListCell<String> class. You need to update its content in its updateItem() method, which is automatically called. The method receives the item, which in this case is String, and a boolean argument indicating whether the cell is empty. Inside the method, you call the method in the superclass first. You derive a person from the string argument and set the text in the cell.
PersonCell.java

import javafx.scene.control.ListCell;

public class PersonCell  extends ListCell<Person>
{
	@Override
	public void updateItem(Person item, boolean empty)
	{
		super.updateItem(item, empty);

		int index = this.getIndex();
		String name = null;

		// Format name
		if (item == null || empty)
		{
		}
		else
		{
			name = (index + 1) + ". " +
			item.getLastName() + ", " +
			item.getFirstName();
		}

		this.setText(name);
		setGraphic(null);
	}
}
Each item in a ListView is displayed in an instance of ListCell, which a Labeled control. The ListView class contains a cellFactory property that lets you use custom cells for its items.
3.3 The PersonCellFactory Class
PersonCellFactory.java
import javafx.scene.control.ListCell;
import javafx.scene.control.ListView;
import javafx.util.Callback;

public class PersonCellFactory implements Callback<ListView<Person>, ListCell<Person>>
{
	@Override
	public ListCell<Person> call(ListView<Person> listview)
	{
		return new PersonCell();
	}
}
The property type is ObjectProperty<Callback<ListView<T>,ListCell<T>>>. The reference of the ListView is passed to the call() method of the Callback object and it returns an instance of the ListCell class. The control needs to create only the number of cells that are visible. Upon scrolling, it may reuse the cells that went out of the view to display newly visible items. The updateItem() method of the ListCell receives the reference of the new item.
By default, a ListView calls the toString() method of its items and it displays the string in its cell. In the updateItem() method of your custom ListCell, you can populate the text and graphic for the cell to display anything you want in the cell based on the item in that cell.
3.4 The Code
FxListViewExample3.java
import java.util.ArrayList;
import javafx.application.Application;
import javafx.beans.value.ChangeListener;
import javafx.beans.value.ObservableValue;
import javafx.scene.Scene;
import javafx.scene.control.Label;
import javafx.scene.control.ListView;
import javafx.scene.control.TextArea;
import javafx.scene.layout.HBox;
import javafx.scene.layout.VBox;
import javafx.stage.Stage;

public class FxListViewExample3 extends Application
{
	// Declaring the TextArea for Logging
	TextArea logging;

	public static void main(String[] args)
	{
		Application.launch(args);
	}

	@Override
	public void start(Stage stage)
	{
		// Create the TextArea
		logging = new TextArea();
		logging.setMaxWidth(350);
		logging.setMaxHeight(350);

		// Create the Label
		Label personLbl = new Label("Select your Person: ");

		// Create the ListView
		ListView<Person> persons = new ListView<>();
		// Set the size of the ListView
		persons.setPrefSize(150, 120);
		// Add the Persons to the ListView
		persons.getItems().addAll(createPersonList());

		// Add a custom cell factory to display formatted names of persons
		persons.setCellFactory(new PersonCellFactory());

		// Update the message Label when the selected item changes
		persons.getSelectionModel().selectedItemProperty().addListener(new ChangeListener<Person>()
		{
		    public void changed(ObservableValue<? extends Person> ov,
		            final Person oldvalue, final Person newvalue)
		    {
		    	personChanged(ov, oldvalue, newvalue);
		    }
		});

		// Create the Selection HBox
		HBox selection = new HBox();
		// Set Spacing to 20 pixels
		selection.setSpacing(20);
		// Add the Label and Persons to the HBox
		selection.getChildren().addAll(personLbl, persons);

		// Create the VBox
		VBox root = new VBox();
		// Set Spacing to 10 pixels
		root.setSpacing(10);
		// Add the HBox and the TextArea to the VBox
		root.getChildren().addAll(selection, logging);

		// Set the Style-properties of the VBox
		root.setStyle("-fx-padding: 10;" +
			"-fx-border-style: solid inside;" +
			"-fx-border-width: 2;" +
			"-fx-border-insets: 5;" +
			"-fx-border-radius: 5;" +
			"-fx-border-color: blue;");

		// Create the Scene
		Scene scene = new Scene(root);
		// Add the Scene to the Stage
		stage.setScene(scene);
		// Set the Title
		stage.setTitle("A ListView Example with a Cell Factory");
		// Display the Stage
		stage.show();

	}

	// Helper-Method to create an ArrayList of Persons
	private ArrayList<Person> createPersonList()
	{
		ArrayList<Person> persons = new ArrayList<Person>();

		persons.add(new Person("Donna", "Duncan"));
		persons.add(new Person("Layne", "Estes"));
		persons.add(new Person("John", "Jacobs"));
		persons.add(new Person("Mason", "Boyd"));
		persons.add(new Person("Harry", "Eastwood"));

		return persons;
	}

	// Method to display the Person, which has been changed
	public void personChanged(ObservableValue<? extends Person> ov,Person oldValue,Person newValue)
	{
		String oldText = oldValue == null ? "null" : oldValue.toString();
		String newText = newValue == null ? "null" : newValue.toString();

		logging.appendText("Change: old = " + oldText + ", new = " + newText + "\n");
	}

}
Our program shows how to use a custom cell factory to display the formatted names of Person items. The following snippet of code in the program creates and sets a custom cell factory. The updateItem() method of the ListCell formats the name of the Person object and adds a serial number that is the index of the cell plus one.
The following code snippet shows how to add a custom cell factory to a ListView:
// Add a custom cell factory to display formatted names of persons
persons.setCellFactory(new PersonCellFactory());
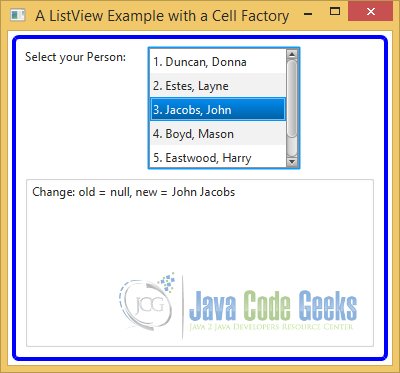
3.5 The GUI
The following GUI shows a ListView with a CellFactory, which display the id first name and last name of a person:
4. Handling Events While Editing a ListView
4.1 The Code
FxListViewExample4.java
import javafx.application.Application;
import javafx.collections.FXCollections;
import javafx.collections.ObservableList;
import javafx.event.EventHandler;
import javafx.scene.Scene;
import javafx.scene.control.Label;
import javafx.scene.control.ListView;
import javafx.scene.control.ListView.EditEvent;
import javafx.scene.control.TextArea;
import javafx.scene.control.cell.TextFieldListCell;
import javafx.scene.layout.HBox;
import javafx.scene.layout.VBox;
import javafx.stage.Stage;

public class FxListViewExample4 extends Application
{
	// Declaring the TextArea for Logging
	TextArea logging;

	public static void main(String[] args)
	{
		Application.launch(args);
	}

	@Override
	public void start(Stage stage)
	{
		// Create the TextArea
		logging = new TextArea();
		logging.setMaxWidth(350);
		logging.setMaxHeight(350);

		// Create the Label
		Label fruitLbl = new Label("Select or Edit Fruits: ");

		// Create the List of Fruits
		ObservableList<String> fruitList = FXCollections.<String>observableArrayList("Apple", "Banana", "Orange", "Mango", "Lemon");

		// Create the ListView
		final ListView<String> fruits = new ListView<String>();
		// Add the Items to the ListView
		fruits.getItems().addAll(fruitList);
		// Set the size of the ListView
		fruits.setPrefSize(200, 120);
		// Make the ListView editable
		fruits.setEditable(true);
		// Add the CellFactory to the ListView
		fruits.setCellFactory(TextFieldListCell.forListView());
		// Select the first entry in the list
		fruits.getSelectionModel().selectFirst();

		// Set editing related event handlers (OnEditStart)
		fruits.setOnEditStart(new EventHandler<ListView.EditEvent<String>>()
		{
			@Override
			public void handle(EditEvent<String> event)
			{
				editStart(event);
			}
		});

		// Set editing related event handlers (OnEditCommit)
		fruits.setOnEditCommit(new EventHandler<ListView.EditEvent<String>>()
		{
			@Override
			public void handle(EditEvent<String> event)
			{
				fruits.getItems().set(event.getIndex(), event.getNewValue());
				editCommit(event);
			}
		});

		// Set editing related event handlers (OnEditCancel)
		fruits.setOnEditCancel(new EventHandler<ListView.EditEvent<String>>()
		{
			@Override
			public void handle(EditEvent<String> event)
			{
				editCancel(event);
			}
		});

		// Create the Selection Box
		HBox selection = new HBox();
		// Set Spacing to 20 pixels
		selection.setSpacing(20);
		// Add the Label and the ListView to the HBox
		selection.getChildren().addAll(fruitLbl,fruits);

		// Create the VBox
		VBox root = new VBox();
		// Set Spacing to 10 pixels
		root.setSpacing(10);
		// Add the HBox and the TextArea to the VBox
		root.getChildren().addAll(selection,logging);

		// Set the Style-properties of the VBox
		root.setStyle("-fx-padding: 10;" +
			"-fx-border-style: solid inside;" +
			"-fx-border-width: 2;" +
			"-fx-border-insets: 5;" +
			"-fx-border-radius: 5;" +
			"-fx-border-color: blue;");

		// Create the Scene
		Scene scene = new Scene(root);
		// Add the Scene to the Stage
		stage.setScene(scene);
		// Set the Title
		stage.setTitle("A ListView Example with Edit Events");
		// Display the Stage
		stage.show();
	}

	// Helper Methods to display the Index and Value of the Item, which will be edited

	public void editStart(ListView.EditEvent<String> e)
	{
		logging.appendText("Edit Start: Index=" + e.getIndex() + ", Item=" + e.getNewValue() + "\n");
	}

	public void editCommit(ListView.EditEvent<String> e)
	{
		logging.appendText("Edit Commit: Index=" + e.getIndex() + ", Item=" + e.getNewValue() + "\n");
	}

	public void editCancel(ListView.EditEvent<String> e)
	{
		logging.appendText("Edit Cancel: Index=" + e.getIndex() + ", Item=" + e.getNewValue() + "\n");
	}

}
4.2 Using Editable ListView
The ListView control offers many customizations, and one of them is its ability to let users edit the items. You need to set two properties for a ListView before it can be edited:
- Set the editable property of the ListView to true.
- Set the cellFactory property of the ListView to a cell factory that produces an editable ListCell.
Select a cell and click to start editing. Alternatively, press the spacebar when a cell has focus to start editing. If a ListView is editable and has an editable cell, you can also use the edit(int index) method of the ListView to edit the item in the cell at the specified index.
4.2.1 Using a TextField to Edit ListView Items
An instance of the TextFieldListCell is a ListCell that displays an item in a Label when the item is not being edited and in a TextField when the item is being edited. If you want to edit a domain object to a ListView, you will need to use a StringConverter to facilitate the two-way conversion. The forListView() static method of the TextFieldListCell class returns a cell factory configured to be used with String items. The following snippet of code shows how to set a TextField as the cell editor for a ListView:
// Create the List of Fruits
ObservableList<String> fruitList = FXCollections.<String>observableArrayList("Apple", "Banana", "Orange", "Mango", "Lemon");

// Create the ListView
final ListView<String> fruits = new ListView<String>();
// Add the Items to the ListView
fruits.getItems().addAll(fruitList);

// Make the ListView editable
fruits.setEditable(true);
// Add the CellFactory to the ListView
fruits.setCellFactory(TextFieldListCell.forListView());
// Select the first entry in the list
fruits.getSelectionModel().selectFirst();
4.3 Handling Events While Editing a ListView
An editable ListView fires three kinds of events:
- An editStart event when the editing starts
- An editCommit event when the edited value is committed
- An editcancel event when the editing is cancelled
The ListView class defines a ListView.EditEvent<T> static inner class to represent edit-related event objects. Its getIndex() method returns the index of the item that is edited. The getNewValue() method returns the new input value. The getSource() method returns the reference of the ListView firing the event. The ListView class provides onEditStart, onEditCommit, and onEditCancel properties to set the event handlers for these methods.
The following snippet of code adds the necessary event handers to a ListView:
// Set editing related event handlers (OnEditStart)
fruits.setOnEditStart(new EventHandler<ListView.EditEvent<String>>()
{
	@Override
	public void handle(EditEvent<String> event)
	{
		editStart(event);
	}
});

// Set editing related event handlers (OnEditCommit)
fruits.setOnEditCommit(new EventHandler<ListView.EditEvent<String>>()
{
	@Override
	public void handle(EditEvent<String> event)
	{
		fruits.getItems().set(event.getIndex(), event.getNewValue());
		editCommit(event);
	}
});

// Set editing related event handlers (OnEditCancel)
fruits.setOnEditCancel(new EventHandler<ListView.EditEvent<String>>()
{
	@Override
	public void handle(EditEvent<String> event)
	{
		editCancel(event);
	}
});
The handlers prints the index and the value of the edited item:
public void editStart(ListView.EditEvent<String> e)
{
	logging.appendText("Edit Start: Index=" + e.getIndex() + ", Item=" + e.getNewValue() + "\n");
}

public void editCommit(ListView.EditEvent<String> e)
{
	logging.appendText("Edit Commit: Index=" + e.getIndex() + ", Item=" + e.getNewValue() + "\n");
}

public void editCancel(ListView.EditEvent<String> e)
{
	logging.appendText("Edit Cancel: Index=" + e.getIndex() + ", Item=" + e.getNewValue() + "\n");
}
4.4 The GUI
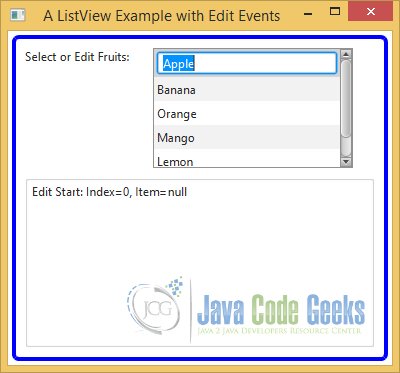
The following image shows the ListCell after double clicking in the edit mode:
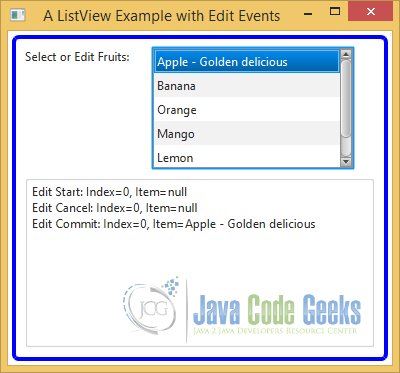
The following image shows the item after editing:
5. Download Java Source Code
This was an example of javafx.scene.control.ListView
You can download the full source code of this example here: JavaFxListViewExample.zip