This is a JavaFX 3D Shape example. Any shape, drawn in a three-dimensional space, having three dimensions (length, width, and depth) is known as a 3D shape.
JavaFX 8 offers two types of 3D shapes.
- Predefined shapes
- User-defined shapes
Box, Sphere, and Cylinder are three predefined 3D shapes that you can use in your JavaFX applications. You can also create any type of 3D shapes using a triangle mesh. The Box, Sphere, and Cylinder classes represent the three predefined shapes. The MeshView class represents a user-defined 3D shape in a Scene.
The following table shows an overview of the whole article:
Table Of Contents
The following examples uses Java SE 8 and JavaFX 2.2.
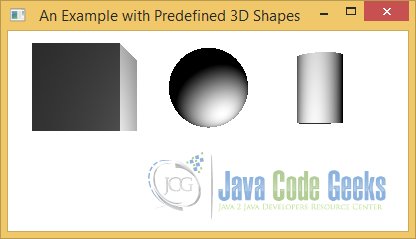
1. Using Predefined 3D Shapes
1.1 The Code
Fx3DShapeExample1.java
import javafx.application.Application;
import javafx.scene.Group;
import javafx.scene.PerspectiveCamera;
import javafx.scene.PointLight;
import javafx.scene.Scene;
import javafx.scene.shape.Box;
import javafx.scene.shape.Cylinder;
import javafx.scene.shape.Sphere;
import javafx.stage.Stage;

public class Fx3DShapeExample1 extends Application
{
	public static void main(String[] args)
	{
		Application.launch(args);
	}

	@Override
	public void start(Stage stage)
	{
		// Create a Box
		Box box = new Box(100, 100, 100);
		box.setTranslateX(150);
		box.setTranslateY(0);
		box.setTranslateZ(400);

		// Create a Sphere
		Sphere sphere = new Sphere(50);
		sphere.setTranslateX(300);
		sphere.setTranslateY(-5);
		sphere.setTranslateZ(400);

		// Create a Cylinder
		Cylinder cylinder = new Cylinder(40, 120);
		cylinder.setTranslateX(500);
		cylinder.setTranslateY(-25);
		cylinder.setTranslateZ(600);

		// Create a Light
		PointLight light = new PointLight();
		light.setTranslateX(350);
		light.setTranslateY(100);
		light.setTranslateZ(300);

		// Create a Camera to view the 3D Shapes
		PerspectiveCamera camera = new PerspectiveCamera(false);
		camera.setTranslateX(100);
		camera.setTranslateY(-50);
		camera.setTranslateZ(300);

		// Add the Shapes and the Light to the Group
		Group root = new Group(box, sphere, cylinder, light);

		// Create a Scene with depth buffer enabled
		Scene scene = new Scene(root, 400, 200, true);
		// Add the Camera to the Scene
		scene.setCamera(camera);

		// Add the Scene to the Stage
		stage.setScene(scene);
		// Set the Title of the Stage
		stage.setTitle("An Example with Predefined 3D Shapes");
		// Display the Stage
		stage.show();
	}
}
1.2 Introduction
JavaFX 8 provides the following three built-in 3D geometric shapes:
- Box
- Sphere
- Cylinder
The shapes are represented by instances of the Box, Sphere, and Cylinder classes. The classes inherit from the Shape3D class, which contains three properties that are common to all types of 3D shapes:
- Material
- Draw mode
- Cull face
The properties specific to a shape type are defined in the specific class defining the Shape. All shapes are nodes. Therefore, you can apply transformations to them. You can position them at any point in the 3D space using the translateX, translateY, and translateZ transformations.
1.3 The Box
A Box is defined by the following three properties:
- width
- height
- depth
The Box class contains two constructors:
- Box()
- Box(double width, double height, double depth)
The no-args constructor creates a Box with width, height, and depth of 2.0 each. The other constructor lets you specify the dimensions of the Box. The center of the Box is located at the origin of its local coordinate system.
The following snippet of code creates a Box with width 100, height 200 and depth 100. After the creation, the Box will be transformed.
// Create a Box
Box box = new Box(100, 100, 100);
box.setTranslateX(150);
box.setTranslateY(0);
box.setTranslateZ(400);
1.4 The Sphere
A Sphere is defined by only one property named radius. The Sphere class contains three constructors:
- Sphere()
- Sphere(double radius)
- Sphere(double radius, int divisions)
The no-args constructor creates a Sphere of radius 1.0. The second constructor lets you specify the radius of the Sphere. The third constructor lets you specify the radius and divisions. A 3D sphere is made up of many divisions, which are constructed from connected triangles. The value of the number of divisions defines the resolution of the Sphere. The higher the number of divisions, the smoother the Sphere looks.
The following snippet of code creates a Sphere with radius 50. After the creation, the Spere will be transformed.
// Create a Sphere
Sphere sphere = new Sphere(50);
sphere.setTranslateX(300);
sphere.setTranslateY(-5);
sphere.setTranslateZ(400);
1.5 The Cylinder
A Cylinder is defined by two properties:
- radius
- height
The radius of the Cylinder is measured on the XZ plane. The axis of the Cylinder is measured along the y-axis. The height of the Cylinder is measured along its axis. The Cylinder class contains three constructors:
- Cylinder()
- Cylinder(double radius, double height)
- Cylinder(double radius, double height, int divisions)
The no-args constructor creates a Cylinder with a 1.0 radius and a 2.0 height. The second constructor lets you specify the radius and height properties. The third constructor lets you specify the number of divisions, which defines the resolution of the Cylinder. The higher the number of divisions, the smoother the Cylinder looks.
The following snippet of code creates a Cylinder with radius 40 and height 120. After the creation, the Cylinder will be transformed.
// Create a Cylinder
Cylinder cylinder = new Cylinder(40, 120);
cylinder.setTranslateX(500);
cylinder.setTranslateY(-25);
cylinder.setTranslateZ(600);
The details about the creation of PointLight and PerspectiveCamera will be discussed in the following chapters.
1.6 The GUI
The program creates the three shapes and positions them in the space. It creates a Light, which is an instance of the PointLight, and positions it in the space. The light is used to light the 3D shapes. All shapes and the light are added to a Group, which is added to the Scene. To view the shapes, you need to add a Camera to the Scene. The program adds a PerspectiveCamera to the Scene.
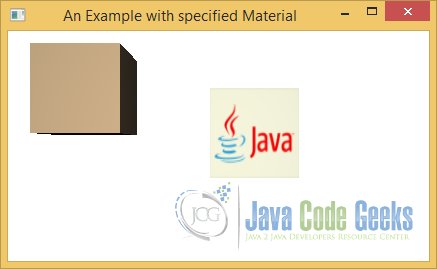
2. Specifying the Shape Material
2.1 The Code
Fx3DShapeExample2.java
import javafx.application.Application;
import javafx.scene.Group;
import javafx.scene.PerspectiveCamera;
import javafx.scene.PointLight;
import javafx.scene.Scene;
import javafx.scene.image.Image;
import javafx.scene.paint.Color;
import javafx.scene.paint.PhongMaterial;
import javafx.scene.shape.Box;
import javafx.stage.Stage;

public class Fx3DShapeExample2 extends Application
{
	public static void main(String[] args)
	{
		Application.launch(args);
	}

	@Override
	public void start(Stage stage)
	{
		// Create a Box
		Box box = new Box(100, 100, 100);
		box.setTranslateX(250);
		box.setTranslateY(0);
		box.setTranslateZ(400);

		// Create the Material
		PhongMaterial material = new PhongMaterial();
		material.setDiffuseColor(Color.TAN);
		// Set the material for the box
		box.setMaterial(material);

		// Create a Box with texture
		Box textbox = new Box(100, 100, 100);
		textbox.setTranslateX(450);
		textbox.setTranslateY(50);
		textbox.setTranslateZ(400);

		// Create the Material
		PhongMaterial textureMaterial = new PhongMaterial();
		// Create the Image
		Image image = new Image("file:/img/core-logo-java.jpg");
		textureMaterial.setDiffuseColor(Color.BEIGE);
		textureMaterial.setDiffuseMap(image);
		// Set the material for the box
		textbox.setMaterial(textureMaterial);

		// Create a Light
		PointLight light = new PointLight();
		light.setTranslateX(250);
		light.setTranslateY(100);
		light.setTranslateZ(300);

		// Create a Camera to view the 3D Shapes
		PerspectiveCamera camera = new PerspectiveCamera(false);
		camera.setTranslateX(200);
		camera.setTranslateY(-50);
		camera.setTranslateZ(300);

		// Create the Group with both Boxes
		Group root = new Group(box, textbox);

		// Create a Scene with depth buffer enabled
		Scene scene = new Scene(root, 400, 200, true);
		// Add the Camera to the Scene
		scene.setCamera(camera);

		// Add the Scene to the Stage
		stage.setScene(scene);
		// Set the Title of the Stage
		stage.setTitle("An Example with specified Material");
		// Display the Stage
		stage.show();
	}
}
A Material is used for rendering the surface of shapes. You can specify the Material for the surface of 3D objects using the Material property, which is defined in the Shape3D class. The Material property is an instance of the abstract class Material. JavaFX provides the PhongMaterial class as the only concrete implementation of Material. The following properties are defined in the PhongMaterial class:
- diffuseColor
- diffuseMap
- specularColor
- specularMap
- selfIlluminationMap
- specularPower
- bumpMap
The PhongMaterial class contains three constructors:
- PhongMaterial()
- PhongMaterial(Color diffuseColor)
- PhongMaterial(Color diffuseColor, Image diffuseMap, Image specularMap, Image bumpMap, Image selfIlluminationMap)
The no-args constructor creates a PhongMaterial with the diffuse color as Color.WHITE. The other two constructors are used to create a PhongMaterial with the specified properties.
The following snippet of code creates a Box, creates a PhongMaterial with tan diffuse color, and sets the Material to the Box:
// Create a Box
Box box = new Box(100, 100, 100);
box.setTranslateX(250);
box.setTranslateY(0);
box.setTranslateZ(400);

// Create the Material
PhongMaterial material = new PhongMaterial();
material.setDiffuseColor(Color.TAN);
// Set the material for the box
box.setMaterial(material);
In the second case, we use an Image as the diffuse map to have texture for the Material, as shown in the following code:
// Create a Box with texture
Box textbox = new Box(100, 100, 100);
textbox.setTranslateX(450);
textbox.setTranslateY(50);
textbox.setTranslateZ(400);

// Create the Material
PhongMaterial textureMaterial = new PhongMaterial();
// Create the Image
Image image = new Image("file:/img/core-logo-java.jpg");
textureMaterial.setDiffuseColor(Color.BEIGE);
textureMaterial.setDiffuseMap(image);
// Set the material for the box
textbox.setMaterial(textureMaterial);
2.2 The GUI
The following example shows two boxes. One Box with diffuse color and the other Box with diffuse map. The Image used for the diffuse map provides the texture for the surface of the second Box.
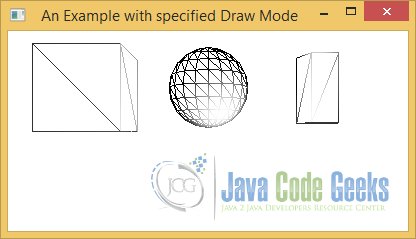
3. Specifying the Draw Mode of Shapes
3.1 The Code
Fx3DShapeExample3.java
import javafx.application.Application;
import javafx.scene.Group;
import javafx.scene.PerspectiveCamera;
import javafx.scene.PointLight;
import javafx.scene.Scene;
import javafx.scene.shape.Box;
import javafx.scene.shape.Cylinder;
import javafx.scene.shape.DrawMode;
import javafx.scene.shape.Sphere;
import javafx.stage.Stage;

public class Fx3DShapeExample3 extends Application
{
	public static void main(String[] args)
	{
		Application.launch(args);
	}

	@Override
	public void start(Stage stage)
	{
		// Create a Box
		Box box = new Box(100, 100, 100);
		box.setDrawMode(DrawMode.LINE);
		box.setTranslateX(150);
		box.setTranslateY(0);
		box.setTranslateZ(400);

		// Create a Sphere
		Sphere sphere = new Sphere(50, 20);
		sphere.setDrawMode(DrawMode.LINE);
		sphere.setTranslateX(300);
		sphere.setTranslateY(-5);
		sphere.setTranslateZ(400);

		// Create a Cylinder
		Cylinder cylinder = new Cylinder(40, 120, 5);
		cylinder.setDrawMode(DrawMode.LINE);
		cylinder.setTranslateX(500);
		cylinder.setTranslateY(-25);
		cylinder.setTranslateZ(600);

		// Create a Light
		PointLight light = new PointLight();
		light.setTranslateX(350);
		light.setTranslateY(100);
		light.setTranslateZ(300);

		// Create a Camera to view the 3D Shapes
		PerspectiveCamera camera = new PerspectiveCamera(false);
		camera.setTranslateX(100);
		camera.setTranslateY(-50);
		camera.setTranslateZ(300);

		// Add the Shapes and the Light to the Group
		Group root = new Group(box, sphere, cylinder, light);

		// Create a Scene with depth buffer enabled
		Scene scene = new Scene(root, 400, 200, true);
		// Add the Camera to the Scene
		scene.setCamera(camera);

		// Add the Scene to the Stage
		stage.setScene(scene);
		// Set the Title of the Stage
		stage.setTitle("An Example with specified Draw Mode");
		// Display the Stage
		stage.show();
	}
}
A 3D Shape surface consists of many connected polygons made up of triangles. For example, a Box is made up of 12 triangles. Each side of the Box using two triangles. The drawMode property in the Shape3D class specifies how the surface of 3D shapes is rendered. Its value is one of the constants of the DrawMode enum.
- DrawMode.FILL
- DrawMode.LINE
The DrawMode.FILL is the default and it fills the interior of the triangles. The DrawMode.LINE draws only the outline of the triangles. That is, it draws only lines connecting the vertices of the consecutive triangles.
The following code snippet creates a Box, a Sphere and a Cylinder with DrawMode.LINE:
// Create a Box
Box box = new Box(100, 100, 100);
box.setDrawMode(DrawMode.LINE);
box.setTranslateX(150);
box.setTranslateY(0);
box.setTranslateZ(400);

// Create a Sphere
Sphere sphere = new Sphere(50, 20);
sphere.setDrawMode(DrawMode.LINE);
sphere.setTranslateX(300);
sphere.setTranslateY(-5);
sphere.setTranslateZ(400);

// Create a Cylinder
Cylinder cylinder = new Cylinder(40, 120, 5);
cylinder.setDrawMode(DrawMode.LINE);
cylinder.setTranslateX(500);
cylinder.setTranslateY(-25);
cylinder.setTranslateZ(600);
3.2 The GUI
The following GUI shows the shapes. The program output is similar to the one shown in the above example. The program sets the drawMode property of all shapes to DrawMode.LINE.
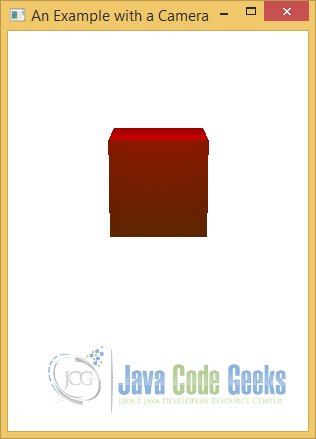
4. Using Cameras and Light Sources
4.1 The Code
Fx3DShapeExample4.java
import javafx.animation.Animation;
import javafx.animation.RotateTransition;
import javafx.application.Application;
import javafx.scene.Group;
import javafx.scene.PerspectiveCamera;
import javafx.scene.PointLight;
import javafx.scene.Scene;
import javafx.scene.paint.Color;
import javafx.scene.shape.Box;
import javafx.scene.shape.CullFace;
import javafx.scene.transform.Rotate;
import javafx.stage.Stage;
import javafx.util.Duration;

public class Fx3DShapeExample4 extends Application
{
	public static void main(String[] args)
	{
		Application.launch(args);
	}

	@Override
	public void start(Stage stage)
	{
		// Create a Box
		Box box = new Box(100, 100, 100);
		box.setCullFace(CullFace.NONE);
		box.setTranslateX(250);
		box.setTranslateY(100);
		box.setTranslateZ(400);

		// Create a Camera to view the 3D Shapes
		PerspectiveCamera camera = new PerspectiveCamera(false);
		camera.setTranslateX(100);
		camera.setTranslateY(-50);
		camera.setTranslateZ(300);

		// Add a Rotation Animation to the Camera
		RotateTransition rotation = new RotateTransition(Duration.seconds(2), camera);
		rotation.setCycleCount(Animation.INDEFINITE);
		rotation.setFromAngle(0);
		rotation.setToAngle(90);
		rotation.setAutoReverse(true);
		rotation.setAxis(Rotate.X_AXIS);
		rotation.play();

		// Create a red Light
		PointLight redLight = new PointLight();
		redLight.setColor(Color.RED);
		redLight.setTranslateX(250);
		redLight.setTranslateY(-100);
		redLight.setTranslateZ(250);

		// Create a green Light
		PointLight greenLight = new PointLight();
		greenLight.setColor(Color.GREEN);
		greenLight.setTranslateX(250);
		greenLight.setTranslateY(300);
		greenLight.setTranslateZ(300);

		// Add the Box and the Lights to the Group
		Group root = new Group(box, redLight, greenLight);
		// Enable Rotation for the Group
		root.setRotationAxis(Rotate.X_AXIS);
		root.setRotate(30);

		// Create a Scene with depth buffer enabled
		Scene scene = new Scene(root, 300, 400, true);
		// Add the Camera to the Scene
		scene.setCamera(camera);

		// Add the Scene to the Stage
		stage.setScene(scene);
		// Set the Title of the Stage
		stage.setTitle("An Example with a Camera");
		// Display the Stage
		stage.show();
	}

}
4.2 Using Cameras
Cameras are used to render the Scene. Two types of cameras are available.
- Perspective camera
- Parallel camera
The names of the cameras suggest the projection type they use to render the Scene. A Camera in JavaFX is a node. They can be added to the scene graph and positioned like other nodes.
A PerspectiveCamera defines the viewing volume for a perspective projection, which is a truncated right pyramid. The Camera projects the objects contained within the near and far clipping planes onto the projection plane. Therefore, any objects outside the clipping planes are not visible.
The content that the camera will project onto the projection plane is defined by two properties in the Camera class.
- nearClip
- farClip
The nearClip is the distance between the Camera and the near clipping plane. Objects closer to the Camera than the nearClip are not rendered.
The farClip is the distance between the Camera and the far clipping plane. Objects farther from the Camera than the farClip are not rendered.
The PerspectiveCamera class contains two constructors.
- PerspectiveCamera()
- PerspectiveCamera(boolean fixedEyeAtCameraZero)
The no-args constructor creates a PerspectiveCamera with the fixedEyeAtCameraZero flag set to false, which makes it behave more or less like a parallel camera where the objects in the scene at Z=0 stay the same size when the scene is resized.
The second constructor lets you specify this flag. If you want to view 3D objects with real 3D effects, you need to set this flag to true. Setting this flag to true will adjust the size of the projected images of the 3D objects as the Scene is resized. Making the scene smaller will make the objects look smaller as well.
The following code snippet creates a PerspectiveCamera and adds it to the Scene:
// Create a Camera to view the 3D Shapes
PerspectiveCamera camera = new PerspectiveCamera(false);
camera.setTranslateX(100);
camera.setTranslateY(-50);
camera.setTranslateZ(300);

// Add the Camera to the Scene
scene.setCamera(camera);
You can move and rotate the Camera as you move and rotate nodes. To move it to a different position, use the translateX, translateY, and translateZ properties. To rotate, use the Rotate transformation.
In the following code snippet, the Group will be created and rotated along the X-Axis:
// Add the Box and the Lights to the Group
Group root = new Group(box, redLight, greenLight);
// Enable Rotation for the Group
root.setRotationAxis(Rotate.X_AXIS);
root.setRotate(30);
4.3 Using Light Sources
Similar to the real world, you need a light source to view the 3D objects in a Scene. An instance of the abstract base class LightBase represents a light source. Its two concrete subclasses, AmbientLight and PointLight, represent an ambient light and a point light. The LightBase class inherits from the Node class. Therefore, a light source is a Node and it can be added to the scene graph as any other nodes.

A light source has three properties: light color, on/off switch, and a list of affected nodes.
The LightBase class contains the following two properties:
- color
- lightOn
The color specifies the color of the Light. The lightOn specifies whether the Light is on. The getScope() method of the LightBase class returns an ObservableList, which is the hierarchical list of nodes affected by this light source. If the list is empty, the scope of the light source is universe, which means that it affects all nodes in the Scene.
An instance of the PointLight class represents a point light source. A point light source is a fixed point in space and radiates lights equally in all directions. The intensity of a point light decreases as the distance of the of the lighted point increases from the light source.
In the following code snippet, a green and a red light will be created and added to the Group:
// Create a red Light
PointLight redLight = new PointLight();
redLight.setColor(Color.RED);
redLight.setTranslateX(250);
redLight.setTranslateY(-100);
redLight.setTranslateZ(250);

// Create a green Light
PointLight greenLight = new PointLight();
greenLight.setColor(Color.GREEN);
greenLight.setTranslateX(250);
greenLight.setTranslateY(300);
greenLight.setTranslateZ(300);

// Add the Box and the Lights to the Group
Group root = new Group(box, redLight, greenLight);
4.4 The GUI
The following example uses a PerspectiveCamera to view a Box. You have used two lights: one to light the front and the top faces and one to light the bottom face of the Box. The Camera is animated by rotating it indefinitely along the x-axis. As the Camera rotates, it brings different parts of the Box into the view.
5. Creating Subscenes
5.1 The Code
Fx3DShapeExample5.java
import javafx.animation.Animation;
import javafx.animation.RotateTransition;
import javafx.application.Application;
import javafx.geometry.Point3D;
import javafx.scene.Group;
import javafx.scene.PerspectiveCamera;
import javafx.scene.PointLight;
import javafx.scene.Scene;
import javafx.scene.SceneAntialiasing;
import javafx.scene.SubScene;
import javafx.scene.layout.HBox;
import javafx.scene.paint.Color;
import javafx.scene.shape.Box;
import javafx.scene.shape.CullFace;
import javafx.scene.transform.Rotate;
import javafx.stage.Stage;
import javafx.util.Duration;

public class Fx3DShapeExample5 extends Application
{
	public static void main(String[] args)
	{
		Application.launch(args);
	}

	@Override
	public void start(Stage stage)
	{
		// Create the Sub-Scenes
		SubScene subscene1 = createSubScene(Rotate.Y_AXIS);
		SubScene subscene2 = createSubScene(Rotate.X_AXIS);

		// Create the HBox with both Sub-Scenes
		HBox root = new HBox(20, subscene1, subscene2);

		// Create a Scene with depth buffer enabled
		Scene scene = new Scene(root, 500, 300, true);

		// Add the Scene to the Stage
		stage.setScene(scene);
		// Set the Title of the Stage
		stage.setTitle("An Example with SubScenes");
		// Display the Stage
		stage.show();
	}

	private SubScene createSubScene(Point3D rotationAxis)
	{
		// Create a Box
		Box box = new Box(100, 100, 100);
		box.setCullFace(CullFace.NONE);
		box.setTranslateX(250);
		box.setTranslateY(100);
		box.setTranslateZ(400);

		// Create a Camera to view the 3D Shapes
		PerspectiveCamera camera = new PerspectiveCamera(false);
		camera.setTranslateX(100);
		camera.setTranslateY(-50);
		camera.setTranslateZ(300);

		// Add a Rotation Animation to the Camera
		RotateTransition rotation = new RotateTransition(Duration.seconds(2), camera);
		rotation.setCycleCount(Animation.INDEFINITE);
		rotation.setFromAngle(-10);
		rotation.setToAngle(10);
		rotation.setAutoReverse(true);
		rotation.setAxis(rotationAxis);
		rotation.play();

		// Create a red Light
		PointLight light = new PointLight(Color.RED);
		light.setTranslateX(250);
		light.setTranslateY(-100);
		light.setTranslateZ(290);

		// Add the Box and the Light to the Group
		Group root = new Group(box, light);
		// Enable Rotation for the Group
		root.setRotationAxis(Rotate.X_AXIS);
		root.setRotate(30);

		// Create the Sub-Scene
		SubScene subscene = new SubScene(root, 200, 200, true, SceneAntialiasing.BALANCED);
		// Add the Camera to the Sub-Scene
		subscene.setCamera(camera);

		return subscene;
	}
}
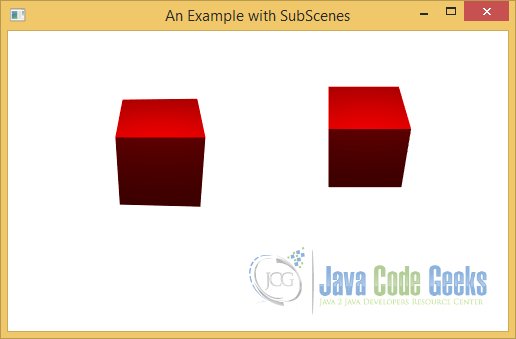
A Scene can use only one Camera. Sometimes, you may want to view different parts of a Scene using multiple cameras. JavaFX 8 introduces this concept as subscenes. A SubScene is a container for a scene graph. It can have its own width, height, fill color, depth buffer, antialiasing flag, and camera. An instance of the SubScene class represents a SubScene. The SubScene inherits from the Node class. Therefore, a SubScene can be used wherever a Node can be used. A SubScene can be used to separate 2D and 3D nodes in an application. You can use a Camera for the SubScene to view 3D objects that will not affect the 2D nodes in the other part of the main scene.
The following method creates a Group which contains a Box, a Camera and a PointhLight. After creation, the Group will be added to the SubScene. An animation is set up to rotate the Camera along the specified axis. The start() method creates two subscenes and adds them to an HBox. One SubScene swings the Camera along the y-axis and another along the x-axis. The HBox is added to the main Scene.
private SubScene createSubScene(Point3D rotationAxis)
{
	// Create a Box
	Box box = new Box(100, 100, 100);
	box.setCullFace(CullFace.NONE);
	box.setTranslateX(250);
	box.setTranslateY(100);
	box.setTranslateZ(400);

	// Create a Camera to view the 3D Shapes
	PerspectiveCamera camera = new PerspectiveCamera(false);
	camera.setTranslateX(100);
	camera.setTranslateY(-50);
	camera.setTranslateZ(300);

	// Add a Rotation Animation to the Camera
	RotateTransition rotation = new RotateTransition(Duration.seconds(2), camera);
	rotation.setCycleCount(Animation.INDEFINITE);
	rotation.setFromAngle(-10);
	rotation.setToAngle(10);
	rotation.setAutoReverse(true);
	rotation.setAxis(rotationAxis);
	rotation.play();

	// Create a red Light
	PointLight light = new PointLight(Color.RED);
	light.setTranslateX(250);
	light.setTranslateY(-100);
	light.setTranslateZ(290);

	// Add the Box and the Light to the Group
	Group root = new Group(box, light);
	// Enable Rotation for the Group
	root.setRotationAxis(Rotate.X_AXIS);
	root.setRotate(30);

	// Create the Sub-Scene
	SubScene subscene = new SubScene(root, 200, 200, true, SceneAntialiasing.BALANCED);
	// Add the Camera to the Sub-Scene
	subscene.setCamera(camera);

	return subscene;
}
5.2 The GUI
The following image shows the effect of the above code:
6. Creating User-Defined Shapes
6.1 The Code
Fx3DShapeExample6.java
import javafx.animation.Animation;
import javafx.animation.RotateTransition;
import javafx.application.Application;
import javafx.scene.Group;
import javafx.scene.PerspectiveCamera;
import javafx.scene.PointLight;
import javafx.scene.Scene;
import javafx.scene.paint.Color;
import javafx.scene.shape.MeshView;
import javafx.scene.shape.TriangleMesh;
import javafx.scene.transform.Rotate;
import javafx.stage.Stage;
import javafx.util.Duration;

public class Fx3DShapeExample6 extends Application
{
	public static void main(String[] args)
	{
		Application.launch(args);
	}

	@Override
	public void start(Stage stage)
	{
		// Create a MeshView
		MeshView meshView = this.createMeshView();
		meshView.setTranslateX(250);
		meshView.setTranslateY(100);
		meshView.setTranslateZ(400);

		// Scale the Meshview to make it look bigger
		meshView.setScaleX(10.0);
		meshView.setScaleY(10.0);
		meshView.setScaleZ(10.0);

		// Create a Camera to view the 3D Shapes
		PerspectiveCamera camera = new PerspectiveCamera(false);
		camera.setTranslateX(100);
		camera.setTranslateY(-50);
		camera.setTranslateZ(300);

		// Add a Rotation Animation to the Camera
		RotateTransition rt = new RotateTransition(Duration.seconds(2), camera);
		rt.setCycleCount(Animation.INDEFINITE);
		rt.setFromAngle(-30);
		rt.setToAngle(30);
		rt.setAutoReverse(true);
		rt.setAxis(Rotate.Y_AXIS);
		rt.play();

		// Create the red Front Light
		PointLight redLight = new PointLight();
		redLight.setColor(Color.RED);
		redLight.setTranslateX(250);
		redLight.setTranslateY(150);
		redLight.setTranslateZ(300);

		// Create the green Back Light
		PointLight greenLight = new PointLight();
		greenLight.setColor(Color.GREEN);
		greenLight.setTranslateX(200);
		greenLight.setTranslateY(150);
		greenLight.setTranslateZ(450);

		// Add the Shapes and the Light to the Group
		Group root = new Group(meshView, redLight, greenLight);
		// Rotate the triangle with its lights to 90 degrees
		root.setRotationAxis(Rotate.Y_AXIS);
		root.setRotate(90);

		// Create a Scene with depth buffer enabled
		Scene scene = new Scene(root, 400, 300, true);
		// Add the Camera to the Scene
		scene.setCamera(camera);

		// Add the Scene to the Stage
		stage.setScene(scene);
		// Set the Title of the Stage
		stage.setTitle("An Example using a TriangleMesh");
		// Display the Stage
		stage.show();
	}

	public MeshView createMeshView()
	{
		float[] points =
		{
			50, 0, 0,
			45, 10, 0,
			55, 10, 0
		};

		float[] texCoords =
		{
			0.5f, 0.5f,
			0.0f, 1.0f,
			1.0f, 1.0f
		};

		int[] faces =
		{
			0, 0, 2, 2, 1, 1,
			0, 0, 1, 1, 2, 2
		};

		// Create a TriangleMesh
		TriangleMesh mesh = new TriangleMesh();
		mesh.getPoints().addAll(points);
		mesh.getTexCoords().addAll(texCoords);
		mesh.getFaces().addAll(faces);

		// Create a NeshView
		MeshView meshView = new MeshView();
		meshView.setMesh(mesh);

		return meshView;
	}
}
6.2 Introduction
JavaFX lets you define a 3D Shape using a mesh of polygons. An instance of the abstract Mesh class represents the mesh data. The TriangleMesh class is concrete subclass of the Mesh class. A TriangleMesh represents a 3D surface consisting of a mesh of triangles.
An instance of the MeshView class represents a 3D surface. The data for constructing a MeshView is specified as an instance of the Mesh.
A TriangleMesh needs to supply data for three aspects of a 3D object.
- Points
- Texture coordinates
- Faces
Points are the vertices of the triangles in the mesh. You need to specify the (x, y, z) coordinates of vertices in an array. Suppose v0, v1, v2, v3, v4, and so on are the points in 3D space that represent the vertices of the triangles in a mesh. Points in a TriangleMesh are specified as an Array of floats.
The texture of a 3D surface is provided as an image that is a 2D object. Texture coordinates are points in a 2D plane, which are mapped to the vertices of triangles. You need to think of the triangles in a mesh unwrapped and placed onto a 2D plane. Overlay the image that supplies the surface texture for the 3D shape onto the same 2D plane. Map the vertices of the triangles to the 2D coordinates of the image to get a pair of (u, v) coordinates for each vertex in the Mesh. The array of such (u, v) coordinates is the texture coordinate. Suppose t0, t1, t2, t3, t4, and so on are the texture coordinates.
Faces are the planes created by joining the three edges of the triangles. Each triangle has two faces: a front face and a back face. A face is specified in terms of indices in the points and texture coordinates arrays. A face is specified as v0, t0, v1, t1, v2, t2, and so on, where v1 is the index of the vertex in the points array and t1 is the index of the vertex in the texture coordinates Array.
6.3 Creating a 3D Triangle
You may argue that a triangle is a 2D Shape, not a 3D shape. It is agreed that a triangle is a 2D shape. You will create a triangle in a 3D space using a TriangleMesh. The triangle will have two faces. This example is chosen because it is the simplest shape you can create with a mesh of triangles. In case of a triangle, the Mesh consists of only one triangle.
The triangle can be created using a Mesh of one triangle. Let us create the points array for the TriangleMesh object.
float[] points =
{
	50, 0, 0,  // v0 (iv0 = 0)
	45, 10, 0, // v1 (iv1 = 1)
	55, 10, 0  // v2 (iv2 = 2)
};
The second part of the figure maps the vertices of the triangle to a unit square. You can create the texture coordinates array as follows:
float[] texCoords =
{
	0.5f, 0.5f, // t0 (it0 = 0)
	0.0f, 1.0f, // t1 (it1 = 1)
	1.0f, 1.0f  // t2 (it2 = 2)
};
Using the points and texture coordinates arrays, you can specify the faces array as follows:
int[] faces =
{
	0, 0, 2, 2, 1, 1, // iv0, it0, iv2, it2, iv1, it1 (front face)
	0, 0, 1, 1, 2, 2  // iv0, it0, iv1, it1, iv2, it2 back face
};
Once you have the points, texture coordinates, and faces arrays, you can construct a TriangleMesh object as follows:
// Create a TriangleMesh
TriangleMesh mesh = new TriangleMesh();
mesh.getPoints().addAll(points);
mesh.getTexCoords().addAll(texCoords);
mesh.getFaces().addAll(faces);
A TriangleMesh provides the data for constructing a user-defined 3D object. A MeshView object creates the surface for the object with a specified TriangleMesh.
// Create a NeshView
MeshView meshView = new MeshView();
meshView.setMesh(mesh);
6.4 The GUI
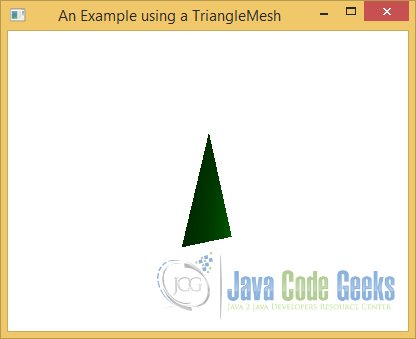
The following image shows a triangle using a TriangleMesh. It adds two different lights to light the two faces of the triangle. An Animation rotates the Camera, so you can view both sides of the triangle in different colors.
7. Download Java Source Code
This was an example of javafx.scene.shape.Shape3D
You can download the full source code of this example here: JavaFx3DShapeExample.zip
