1. Introduction
In 2015, is it still acceptable to develop web applications in which we have to hit F5 to actualize the page content? The answer is simple: Of course yes! But still, we can offer our users a better overall experience. I could ask myself: How comes Twitter or Facebook are able to notify me when I have new interactions or messages, but the software I use at my job is not? This is where the real-time applications get on stage.
This article is the first of a series of three in which I want to introduce you the basic concepts behind real-time applications in Java with simple examples. In this first article, I will demonstrate how GMail, Facebook, Twitter and many other websites have implemented real-time notifications using the periodic refresh design pattern.

AngularJS Programming Cookbook
In this ebook, we provide a compilation of AngularJS based examples that will help you kick-start your own web projects. We cover a wide range of topics, from Single Page Apps and Routing, to Data Binding and JSON Fetching. With our straightforward tutorials, you will be able to get your own projects up and running in minimum time. Download the cookbook by joining the Web Code Geeks Newsletter.
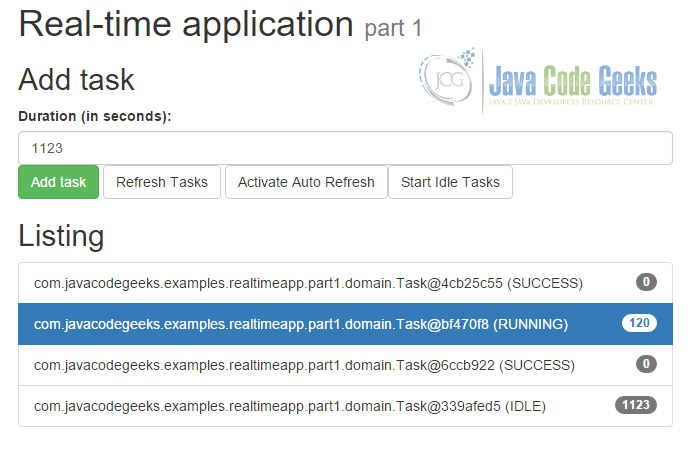
In this example, I will be showing you how real-time updates can be useful in a system where the users execute tasks that take time to run (import of CSV files into the system, copy of files from server to server, batch update in the database, etc.). AngularJS will be used in the front end to implement the Periodic Refresh pattern. Spring and Jackson will be used together to create a RESTful JSON Web Service answering the AJAX request made by Angular. If you do not know about AngularJS or Spring MVC, I would suggest you read tutorials before. Here is a screenshot of the end result:
2. The Periodic Refresh AJAX pattern
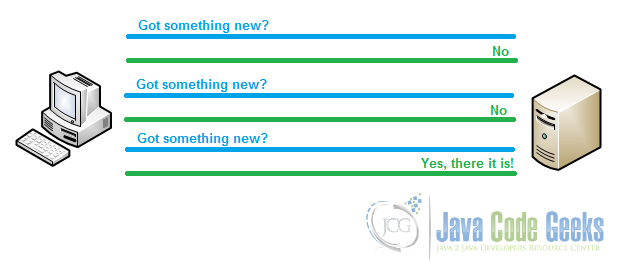
The Periodic Refresh pattern or polling is the simplest way of creating a real-time application. Basically, a JavaScript function periodically creates an XMLHttpRequest that is sent to the server. This request asks the server for updated information, then the view is actualized if necessary.
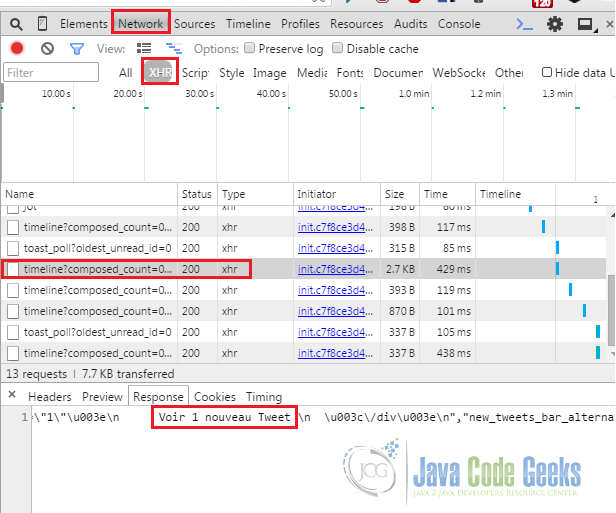
You can easily see this pattern in action in your Twitter feed. In any modern browser, hit F12, go to the Network tab and filter the requests so only XHR are displayed. Every 10 seconds or so, a new request is sent to the server asking for an update regarding new tweets. If there is any, a notification is displayed.
3. RESTful JSON Java Back-end
3.1. Maven dependencies
In order to create a simple REST web service that will accept and answer JSON objects, you have to include Spring MVC and Jackson. Your pom.xml file should contain the following dependencies:
pom.xml
 <dependency>
  <groupId>org.springframework</groupId>
  <artifactId>spring-core</artifactId>
  <version>4.2.1.RELEASE</version>
</dependency>
<dependency>
  <groupId>org.springframework</groupId>
  <artifactId>spring-webmvc</artifactId>
  <version>4.2.1.RELEASE</version>
</dependency>
<dependency>
  <groupId>com.fasterxml.jackson.core</groupId>
  <artifactId>jackson-databind</artifactId>
  <version>2.6.1</version>
</dependency>
<dependency>
    <groupId>javax.servlet</groupId>
    <artifactId>javax.servlet-api</artifactId>
    <version>3.1.0</version>
</dependency>
3.2. The Task object
Then, we want to create our Task object that will be used in the web service. This Task object has a duration in milliseconds and a status that can either be IDLE, RUNNING or SUCCESS.
Task.java
public class Task {
  private TaskStatus status = TaskStatus.IDLE;
  private long duration;

  // Getters and Setters...

  public void decrementDuration() {
    this.duration--;
  }

  public boolean isRunning() {
    return this.status.equals(TaskStatus.RUNNING);
  }

  public String getName() {
    return this.toString();
  }

  public void start() {
    this.status = TaskStatus.RUNNING;
  }
}
3.3. The TaskExecutor
Those Task objects, once instanciated, will be managed by a class called TaskExecutor. This class is a Spring Singleton that holds the tasks submitted by all users. Once it’s instanciated, it starts a thread that loops through the running tasks in the tasks pool and decrement their duration. When the duration gets to zero, the status is set to SUCCESS:
TaskExecutor.java
package com.javacodegeeks.examples.realtimeapp.part1.services;

import java.util.LinkedList;
import java.util.List;

import javax.annotation.PostConstruct;

import org.springframework.context.annotation.Scope;
import org.springframework.stereotype.Component;

import com.javacodegeeks.examples.realtimeapp.part1.domain.Task;
import com.javacodegeeks.examples.realtimeapp.part1.domain.TaskStatus;

@Component
@Scope("singleton")
public class TaskExecutor {
  private List pool = new LinkedList<>();

  @PostConstruct
  public void initialize() {
    Runnable taskPoolConsumer = () -> {
      while (true) {
        try {
          this.pool.stream()
              .filter(task -> task.isRunning() && task.getDuration() > 0)
              .forEach(task -> task.decrementDuration());

          this.pool.stream()
            .filter(task -> task.isRunning() && task.getDuration() == 0)
            .forEach(task -> task.setStatus(TaskStatus.SUCCESS));

          Thread.sleep(1000);
        } catch (Exception e) {
          e.printStackTrace();
        }
      }
    };

    new Thread(taskPoolConsumer).start();
  }

  public void startAllTasks() throws InterruptedException {
    this.pool.stream().forEach(task -> task.start());
  }

  public List getPool() {
    return this.pool;
  }

  public void addTask(Task taskToAdd) {
    this.pool.add(taskToAdd);
  }

}
3.4 The Web Service
To create the web service, we will be using the @RestController annotation from Spring. This web service will be mapped to "/api/task" and will answer POST and GET requests.
TaskService.java
@RestController
@RequestMapping("/api/task")
public class TaskService {
  @Autowired
  private TaskExecutor taskExecutor;

  @RequestMapping(method = RequestMethod.GET)
  public List getTasks() {
    return this.taskExecutor.getPool();
  }

  @RequestMapping(method = RequestMethod.POST)
  public void addTask(@RequestBody Task taskToAdd) {
    this.taskExecutor.addTask(taskToAdd);
  }

  public void startIdleTasks() throws InterruptedException {
    this.taskExecutor.startAllTasks();
  }

}
3.5 The ManagedBean to start the tasks
Finally, we have a managed bean of JSF to execute the code behind the last button.
TaskController.java
@ManagedBean(name = "taskController", eager=true)
@Component
@RequestScoped
public class TaskController {
  @Autowired
  private TaskService taskService;

  public void startTasks(ActionEvent event) throws InterruptedException {
    this.taskService.startIdleTasks();
  }

}
4. Front-end implementation with AngularJS
First, you want to create your module, then your controller. In the end result screenshot above, our controller will manage the first three buttons (Add Task, Refresh Tasks and Activate Auto Refresh). The last button is a JSF button managed by a backing bean.
index.xhtml
var part1 = angular.module("part1", []);
part1.controller("RealtimeCtrl", function($scope, $http, $timeout) {
  $scope.tasks = [];

  $scope.addTask = function() {
    $http.post("api/task", $scope.task);
  }

  $scope.getTasks = function() {
    $http.get("api/task")
      .success(function(data) {
        $scope.tasks = data;
      });
  }

  $scope.activateRealtime = function() {
    $scope.getTasks();
    $timeout($scope.activateRealtime, 1000);
  }

});
I used Angular’s dependency injection to get the $scope, $http and $timeout services. In the Angular scope, I initially set the list of tasks to an empty array which will be replaced by the tasks array returned by the web service. Now, we have our three functions. The first one is addTask() which simply creates an Ajax POST request to the server with the task object from Angular’s scope in the request data. The second function above is getTasks() which creates an Ajax GET request to the server. The server will return an array of JSON objects corresponding to the tasks registered on the server. The last but not the least function is the implementation of the real-time feel, that is a recursive function with a pause of a second that simply retrieves the tasks using the controller’s function getTask(). This is the complete index.xhtml code:
index.xhtml
<!DOCTYPE html>
<html xmlns="http://www.w3.org/1999/xhtml"
    xmlns:h="http://java.sun.com/jsf/html"
    xmlns:f="http://java.sun.com/jsf/core">

  <h:head>
    <title>Real-time applications - Part 1 - Java Code Geeks</title>
    <link rel="stylesheet" href="https://examples.javacodegeeks.com/wp-content/litespeed/localres/aHR0cHM6Ly9tYXhjZG4uYm9vdHN0cmFwY2RuLmNvbS8=bootstrap/3.3.5/css/bootstrap.min.css"/>
    <script src="https://examples.javacodegeeks.com/wp-content/litespeed/localres/aHR0cHM6Ly9jZG5qcy5jbG91ZGZsYXJlLmNvbS8=ajax/libs/angular.js/1.4.5/angular.min.js"></script>

    <script>
      var part1 = angular.module("part1", []);
      part1.controller("RealtimeCtrl", function($scope, $http, $timeout) {
        $scope.tasks = [];

        $scope.addTask = function() {
          $http.post("api/task", $scope.task);
        }

        $scope.getTasks = function() {
          $http.get("api/task")
            .success(function(data) {
              $scope.tasks = data;
            });
        }

        $scope.activateRealtime = function() {
          $scope.getTasks();
          $timeout($scope.activateRealtime, 1000);
        }

      });

    </script>
  </h:head>

  <h:body>
    <div ng-app="part1" ng-controller="RealtimeCtrl" class="container">
      <h1>Real-time application <SMALL>part 1</SMALL></h1>
      <h2>Add task</h2>
      <h:form>
        <label for="durationField">Duration (in seconds):</label>
        <input type="number" id="durationField" class="form-control" ng-model="task.duration"/>
        <button type="button" ng-click="addTask()" class="btn btn-success">Add task</button>
        <button type="button" ng-click="getTasks()" class="btn btn-default">Refresh Tasks</button>
        <button type="button" ng-click="activateRealtime()" class="btn btn-default">Activate Auto Refresh</button>
        <h:commandButton actionListener="#{taskController.startTasks}"
            styleClass="btn btn-default"
            value="Start Idle Tasks">
          <f:ajax execute="@form"/>
        </h:commandButton>
      </h:form>

      <h2>Listing</h2>
      <ul class="list-group">
        <li ng-repeat="curTask in tasks" class="list-group-item {{curTask.running ? 'active' : ''}}">
          {{curTask.name}} ({{curTask.status}})<span class="badge">{{curTask.duration}}</span>
        </li>
      </ul>
    </div>
  </h:body>
</html>
5. What’s next?
Obviously, there are tons of different ways of implementing a real-time application with the Periodic Refresh pattern. I picked AngularJS along RESTful JSON Web service because AngularJS really simplifies the update of the UI without having to refresh the page.
In the next article, I will reuse the same application but I will show you how have a better feel of the real-time application. The part 2 will be on Long Polling and the part 3 on the spanking new HTML 5 WebSocket.
6. Download the Eclipse project
This was an example of how to integrate AngularJS and Spring MVC to create an application that is updated automatically using the Periodic Refresh design pattern.
You can download the full source code of this example here: Real-time part 1

Fantastic, I never knew one could combine angularjs and java in eclipse, though I have not run it but I will try
Indah Yusuf
bro thnaks