Now, that we have understood the basics of ANT in the previous example, we can now proceed to use the same, for building a Java EE Application. A typical Java Web-Application involves cleaning the old compiled Class and WAR files, re-compiling the source files, packaging it, into a WAR and finally, copying it into the deployment of the respective Web/Application Server.
Project Environment
- Eclipse Mars
- JBoss 5.1
- Apache ANT 1.9
As we have already discussed set-up in the previous example, we will straight-away start with the actual coding.
Build File
The build.xml file, will now, have a few more tasks for packaging the application into a WAR file and copying it to deployment folder.
build.xml
 <?xml version="1.0" encoding="ISO-8859-1"? >

 <project name="J2EEAntExample" basedir="." default="deployApp" >

   <property file="build.properties" / >

	 <!-- The Class-Path for the build is defined here-- >
	 <path id="cp" >
	  	 <fileset dir="${lib.dir}" includes="*.jar"/ >
		 <fileset dir="${jboss.dir}/bin" includes="*.jar" / >
		 <fileset dir="${jboss.dir}/lib" includes="*.jar" / >
		 <fileset dir="${jboss.dir}/server/default/lib" includes="*.jar" / >
		 <fileset dir="${jboss.dir}/common/lib" includes="*.jar" / >
	  </path >

	 <!-- The Class-Path for the JUnit Test is defined here.This also includes the compiled classes directory-- >
	 <path id="jUnit.cp" >
		     <path refid="cp"/ >
			 <pathelement location="${bin.dir}" / >
		 </path >

	 <!-- Clean the classes, dist and report folder  -- >
	 <target name="clean" >
		   <delete dir="${bin.dir}" / >
		   <delete dir="${temp.dir}" / >
		   <delete dir="${jboss.deploy}/J2EEAntExample.war" / >
	 </target >

	 <!-- Create the bin,dist and report folders for fresh build -- >
	 <target name="init" depends="clean" >
		   <mkdir dir="${bin.dir}" / >
		   <mkdir dir="${temp.dir}" / >
	 </target >

	 <!-- Compilation of Java Src Files into WEB-INF/classes -- >
	 <target name="compile" depends="init" >
					 <javac destdir="${bin.dir}" debug="true" srcdir="${src.dir}" >
						 <classpath refid="cp"/ >
					 </javac >
						 <copy todir="${bin.dir}" >
						    		 <fileset dir="${src.dir}" >
						    			 <include name="**/*.properties" / >
						    			 <include name="**/*.xml" / >
						    		 </fileset >

						  </copy >
	 </target >

	 <!-- Package the build into a WAR File after compilation and testing tasks are completed.-- >
	 <target name="war" depends="compile" >
		 <war destfile="${temp.dir}/J2EEAntExample.war" webxml="WebContent/WEB-INF/web.xml" >
		  <fileset dir="WebContent" / >
		  </war >
	 </target >

	 <!-- Copying the WAR File to the deployment folder -- >
	 <target name="deployApp" depends="war,logtask,test" >
	  	 <copy todir="${jboss.deploy}" file="${temp.dir}/J2EEAntExample.war" / >
	 </target >

	 <!-- 	This task is Used to Unit-Test the Compiled Java Files -- >
		 <target name="test" >
			 <junit printsummary="yes" haltonfailure="yes" >
				 <classpath refid="jUnit.cp" / >
				 <formatter type="plain" / >
				 <batchtest fork="yes" todir="${test.reports.dir}" >
					 <fileset dir="${src.dir}" >
						 <include name="**/*Test.java" / >
					 </fileset >
				 </batchtest >
			 </junit >
		 </target >

	 <!-- My Custom task definition goes here-- >
		  <taskdef name="logtask" classname="com.jcg.customTasks.LogTasks" classpathref="jUnit.cp"/ >

		 <!-- Using the custom task, Logtask defined earlier-- >
		 <target name="logtask" >
		   <logtask message="Hello World!"/ >
		 </target >

	 <!-- This task is enabled only for systems that support SCP command(primarily, *IX systems) -- >
     <target name="remoteDeploy" depends="war" >
    	   <scp file="${temp.dir}/J2EEAntExample.war" todir="chand@192.168.21.257:/home/chand" password="${Password}" verbose="on" trust="on"/ >
     </target >

 </project >
build.properties
src.dir = src
lib.dir = ${basedir}/WebContent/WEB-INF/lib
bin.dir = ${basedir}/WebContent/WEB-INF/classes
temp.dir = ${basedir}/temp
test.reports.dir = ${basedir}/testreports
jboss.dir = F:/dev/jboss-5.1.0.GA
jboss.deploy = ${jboss.dir}/server/default/deploy
Password = secretpassword
Explanation:
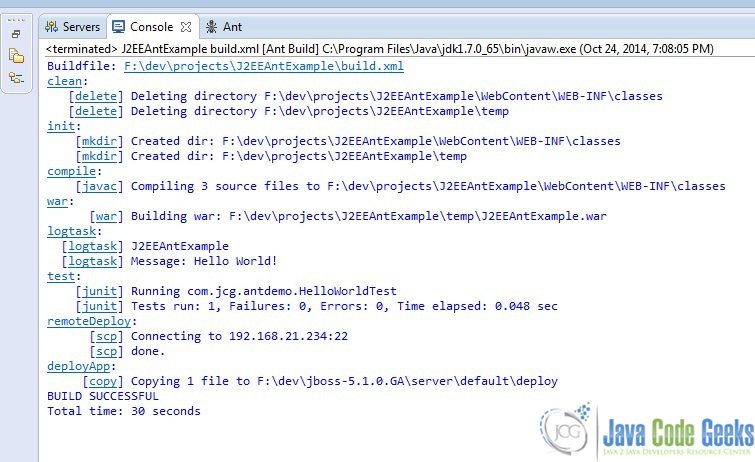
We are already familiar with the clean, init, JUnit amd Compile tasks. Here, we will try to learn about J2EE specific targets ,namely, WAR copy and a few other related tasks.
Target : WAR
The WAR task is much like JAR task, as in , it used to package the class files, jsps ,XML and any other file , into a file with extension war. The war task has destfile attribute which is used to specify the destination directory for WAR file. As the name suggests, webxml attribute is used to specify the path of the web.xml in the Web-Application.The war has many other attributes, for ensuring a fine control over the WAR file generation process.One other attribute we will discuss is compress. It can be used in conjunction with level attribute to define the compression levels.
Target : Copy
The copy target is used to copy the created WAR file into the deployment folder of the respective server(in our case JBoss). In some servers, like Apache Tomcat, JBoss 5 etc, merely copying the war file triggers the deployment process. From Jboss 6 onwards, delete the XXXX.war.deployed file and then, the user has to copy a flag file, whose name will be war file name with the dodeploy extension (e.g. XXXXXX.war.dodeploy). The same can be easily achieved through ANT build file through delete and touch tasks.
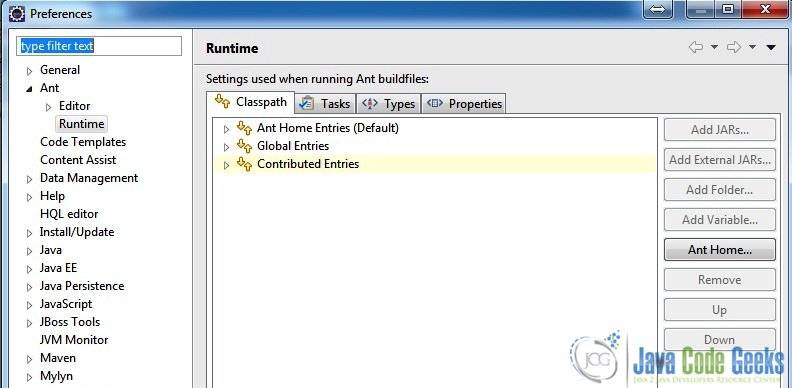
For remote deployment, we may use the scp task as demonstrated above which actually uses the SCP command, under the hood.For remote copy, the user has to include jsch.jar either in the $(ANT_HOME)/lib and provide ANT Home path in eclipse(as shown in image below) or go to Windows>>Preferences>>ANT>>Runtime, then add the jar to the eclipse. The same is demonstrated below:
Creating Custom task :
ANT provides an array of tasks. However, if the user is not satisfied with the built-in tasks, ANT provides the user with simple mechanism to create a task.The user has to simply extend the org.apache.tools.ant.Task class and override the execute method.The user also, has to add the JAR files in the ${ANT_HOME}/lib to the project, so as to compile the Logtasks class.
LogTasks.java
package com.jcg.customTasks;

import org.apache.tools.ant.BuildException;
import org.apache.tools.ant.Project;
import org.apache.tools.ant.Task;


/**
 * @author Chandan Singh
 */
public class LogTasks extends Task
{
		String messageStr;

		public void setMessage(String message)
		{
				this.messageStr = message;
		}

		public void execute() throws BuildException
		{
				log(getProject().getProperty("ant.project.name"),Project.MSG_INFO);
				log("Message: " + messageStr, Project.MSG_INFO);
		}

}
Note : While it is perfectly OK to write a class without extending from the TASK class for creating a custom task, the Task class certainly provides the functionality which eases the task creation process.
Conclusion :
So here we have learned how to use the highly flexible Apache ANT tool, to build our JavaEE Application.
You can download the full source code of this example here :J2EE-ANT BUILD Example
